Categorisation Walkthrough
Categorization overview
The first thing you encounter when entering the categorization function is the following view below. You can choose between three rules at the top of the menu ribbon: Overriding, Supplier, and Default rules. Supplier rules are the most commonly used rule and are therefore set as default. To view or manage the Overriding or Default rules, press either of the buttons at the top.
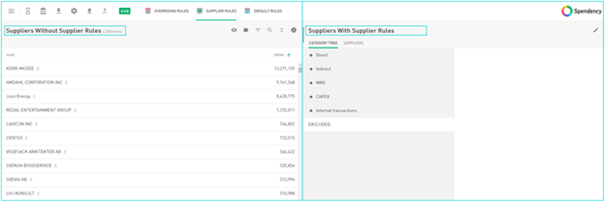
Suppliers without Supplier Rules, on the left side, displays all suppliers who have not yet had a Supplier rule applied to them. The spend from them can still be categorized by overriding or default rules. On the right side, all Suppliers with Supplier Rules are displayed, and the category tree. To categorize a supplier, select a row, drag-and-drop it to the right category. Before you categorize a supplier, we recommend you normalize it.

Normalizing suppliers
The first thing you want to do before you start categorizing suppliers is to normalize them. Normalizing in this context means merging several suppliers that should be regarded as one but still have non-identical data in the system. For example, it could be suppliers with the same organization number but with different names.
In the illustration below, the merging arrow to the right of the supplier’s name indicates that another supplier has the same organisation number but a different name. If you press the arrow in the upper right corner, only suppliers with normalisation suggestions are displayed. Press the merge arrow next to the supplier to filter on that specific supplier.
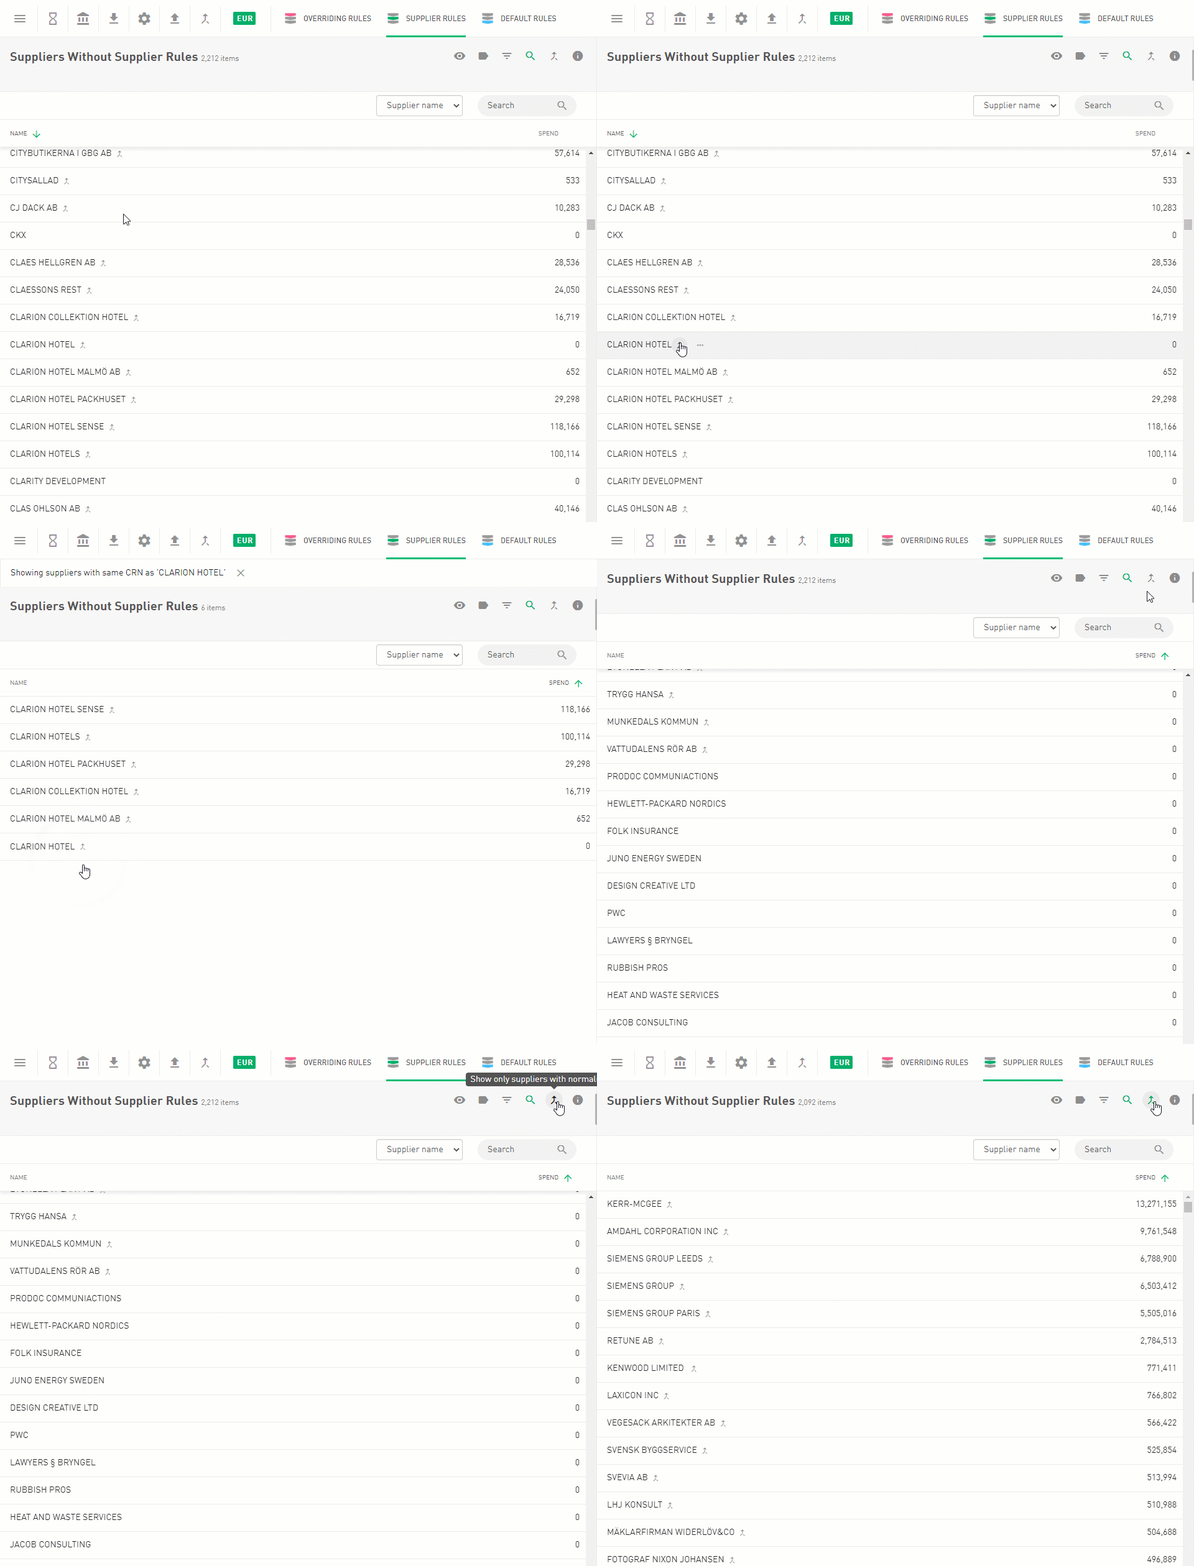
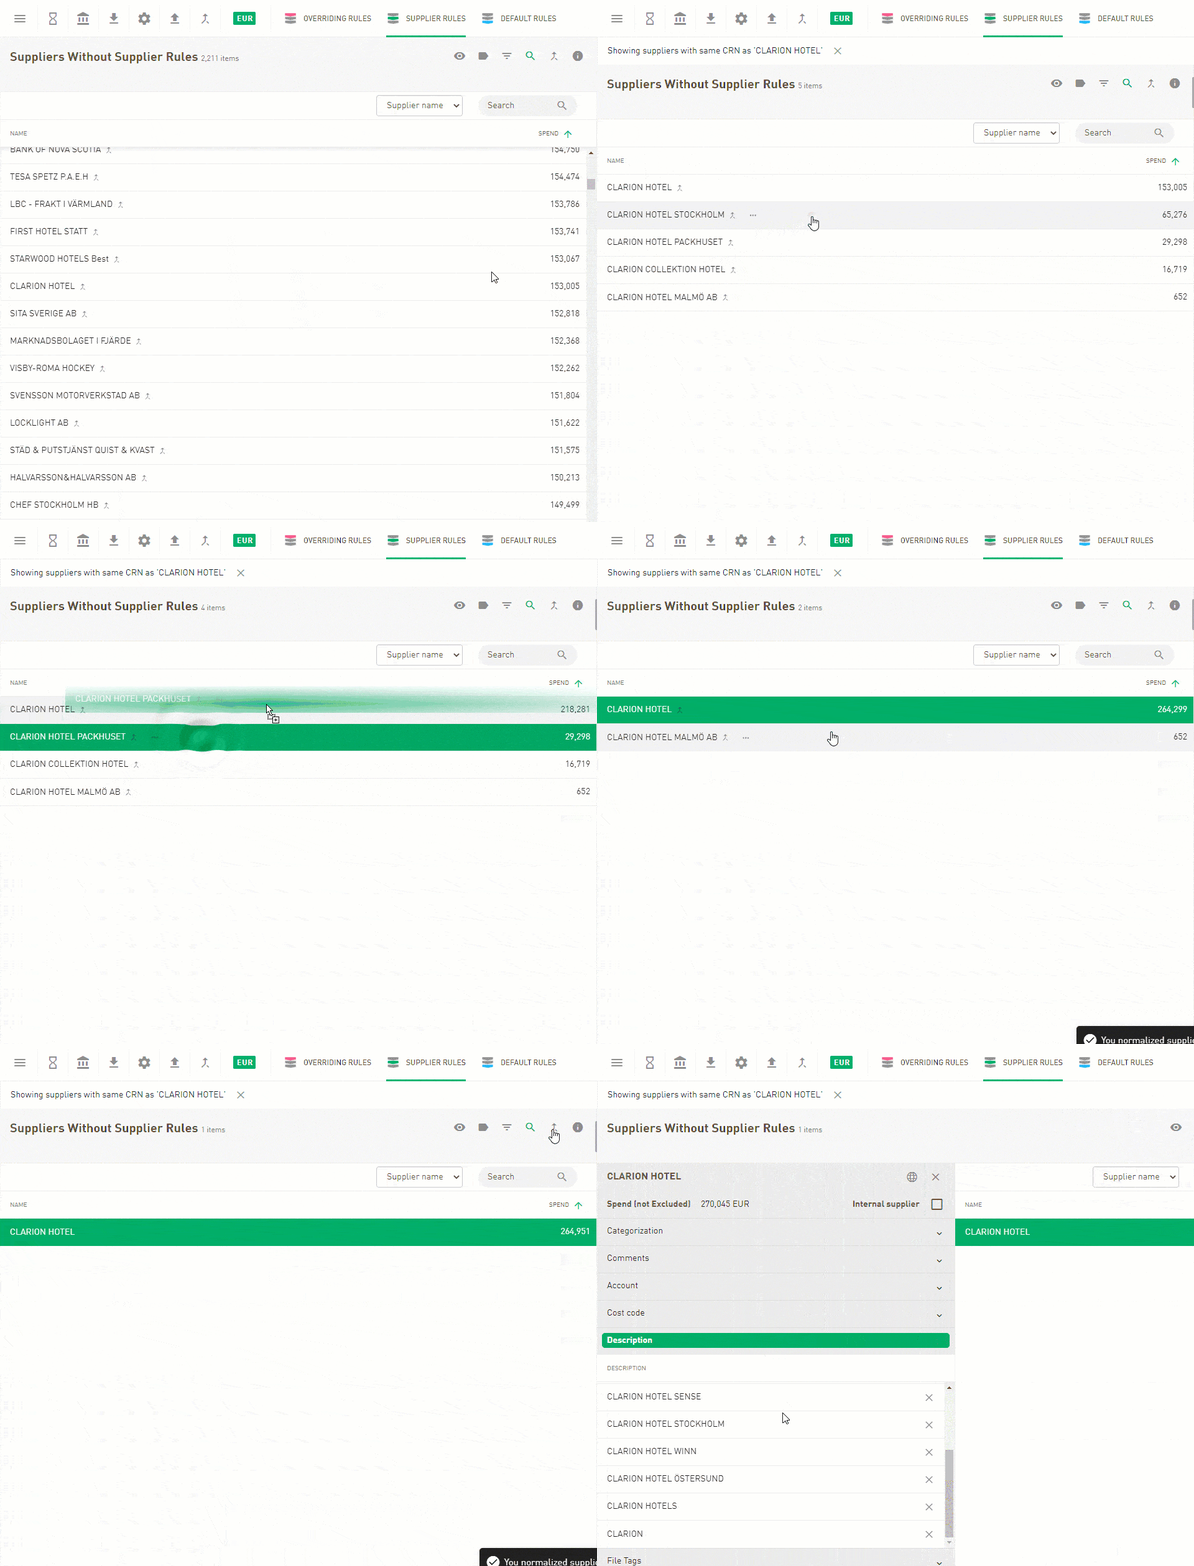
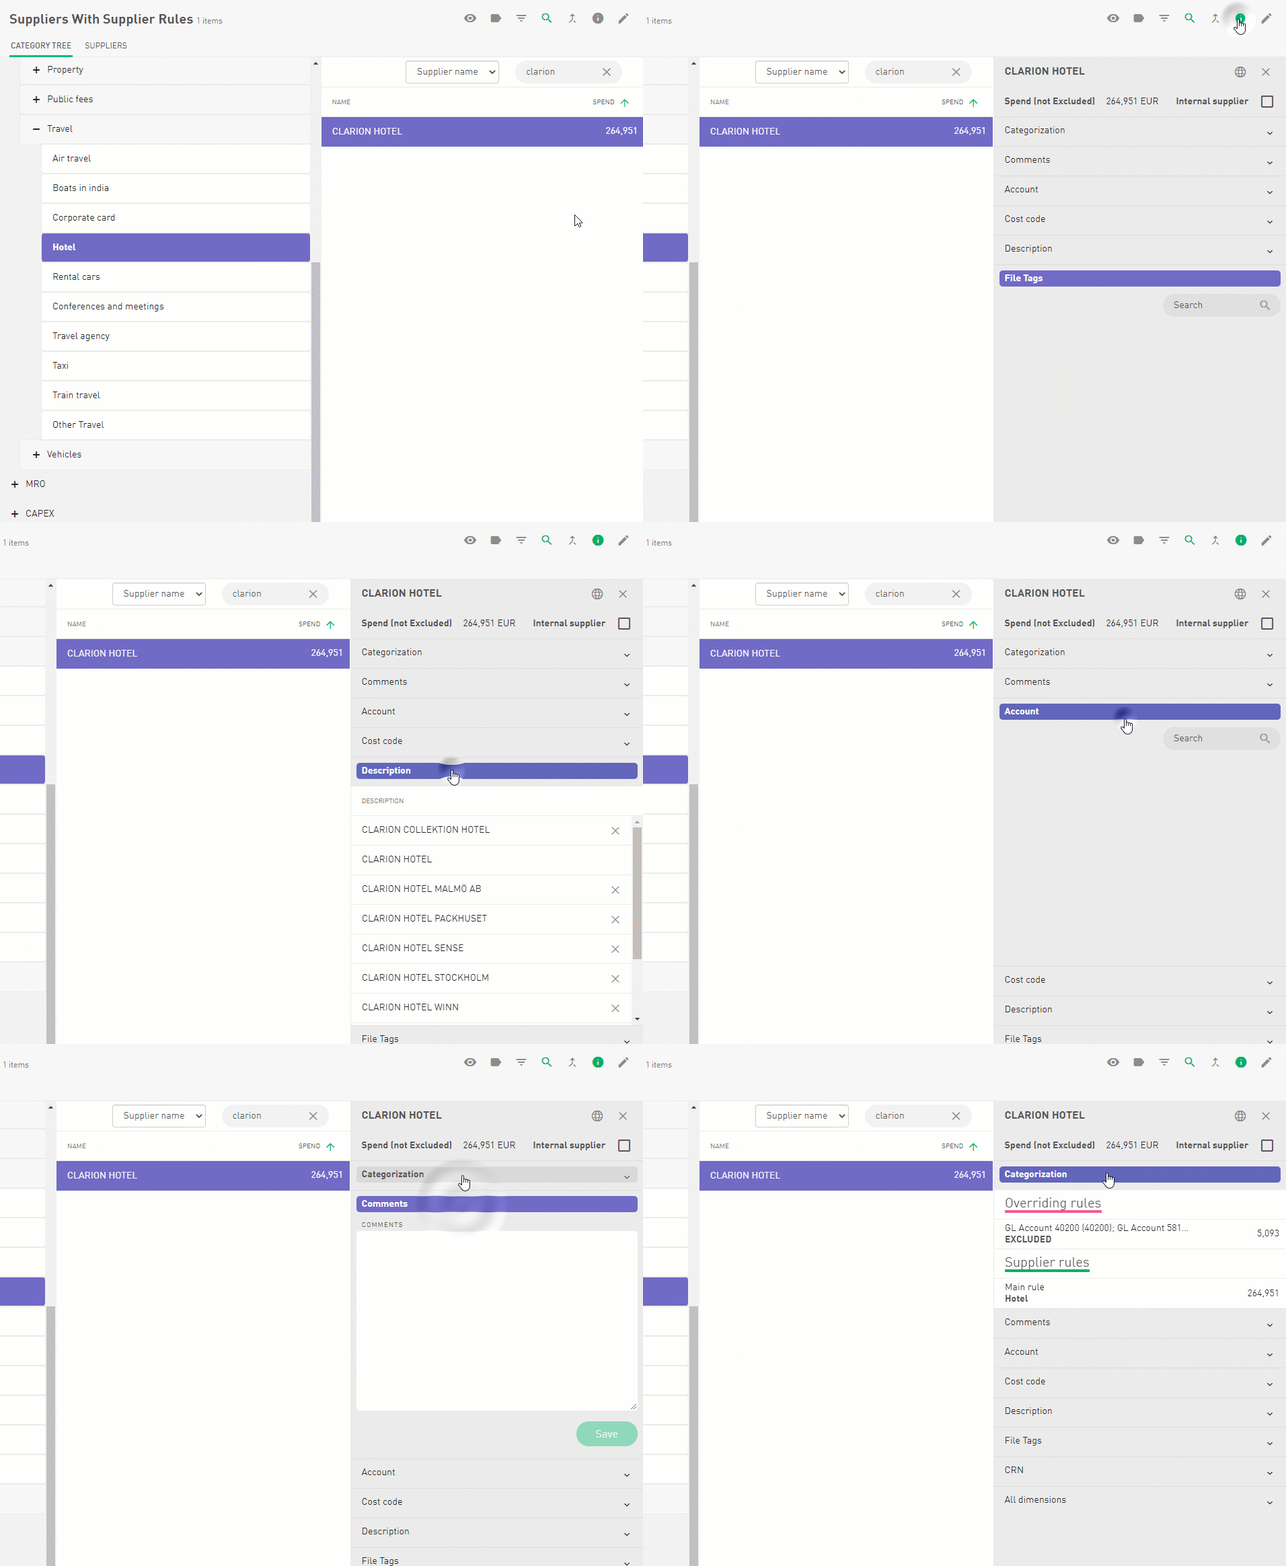
Out of the different supplier names shown, choose which one you want to use as your display name and drag and drop the other suppliers on that name. In the illustration below, the name “Clarion Hotel” has been identified as the best one, and thus the other ones will be dragged and dropped on it. Press the information symbol in the upper right corner to display the suppliers that have been normalized under the displayed supplier.
Normalise uncategorised suppliers with an already categorised supplier
It is also possible to normalise directly on a categorised supplier. For example, Clarion Hotels is already categorised under the category Hotels. E.g. another subsidiary to Clarion Hotel has been uploaded, the Clarion Collection Hotels. When you press the merge arrow, it will suggest a normalisation with Clarion Hotels, which is already categorised. Drag and drop the supplier to the categorised supplier, and they will now get the same rules. When the normalisation is complete, it is time to categorise the supplier.
Normalise with supplier name
Using the merging arrow will only filter suppliers with the same organisation number. Sometimes the data does not contain the organisation number as it is not always specified. They will not be displayed when using the merging arrow. There is a function called “Find similar suppliers”, by pressing this, you will filter all suppliers with similar names.

Remove normalisation rule
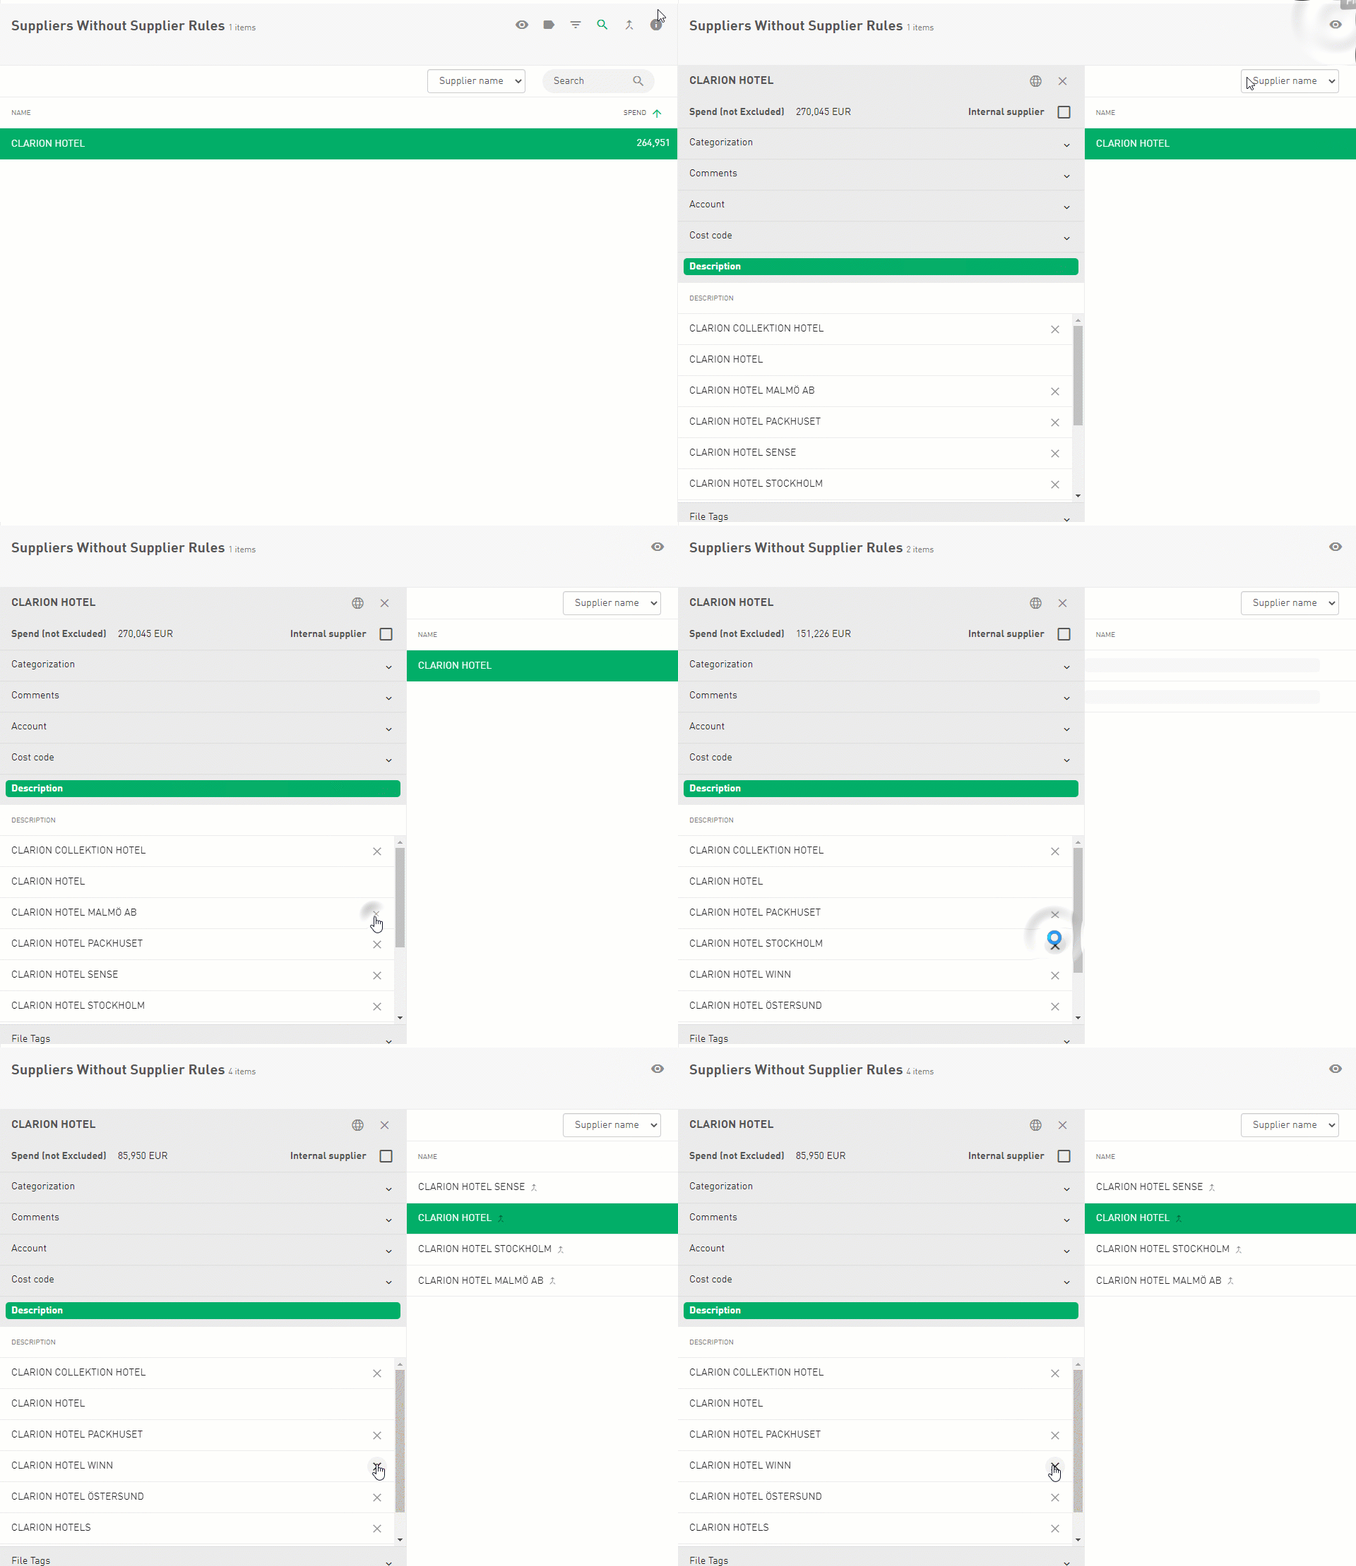
If you want to undo a normalisation, press the information button and then Description. Press the X-button to delete the normalisation rule.
Supplier information overview
To get an informative overview of a supplier, you can press the information button. It displays the complete categorisation rules, comments written by other users, account numbers and cost centres. If you press the globe, the system will Google the name to give you more information about the supplier.
Three different rule classifications
In Onventis Analytics, there are three types of rule classifications: Overriding, Supplier, and Default rules. Before you begin applying rules, please read the following article: Rule Hierarchy in Onventis Analytics.
Overriding rules
Overriding rules have the highest priority and affect all the suppliers that meet the criteria. This rule should be used with caution as one rule can affect several suppliers. The typical use for the overriding rule is to exclude data that should not be included when analyzing, for example, tax accounts. If an overriding rule is applied, every supplier with a transaction on that particular tax account will be excluded from the analysis. To set an overriding rule, press GL-account or advanced condition, choose the account you want to exclude, and save.
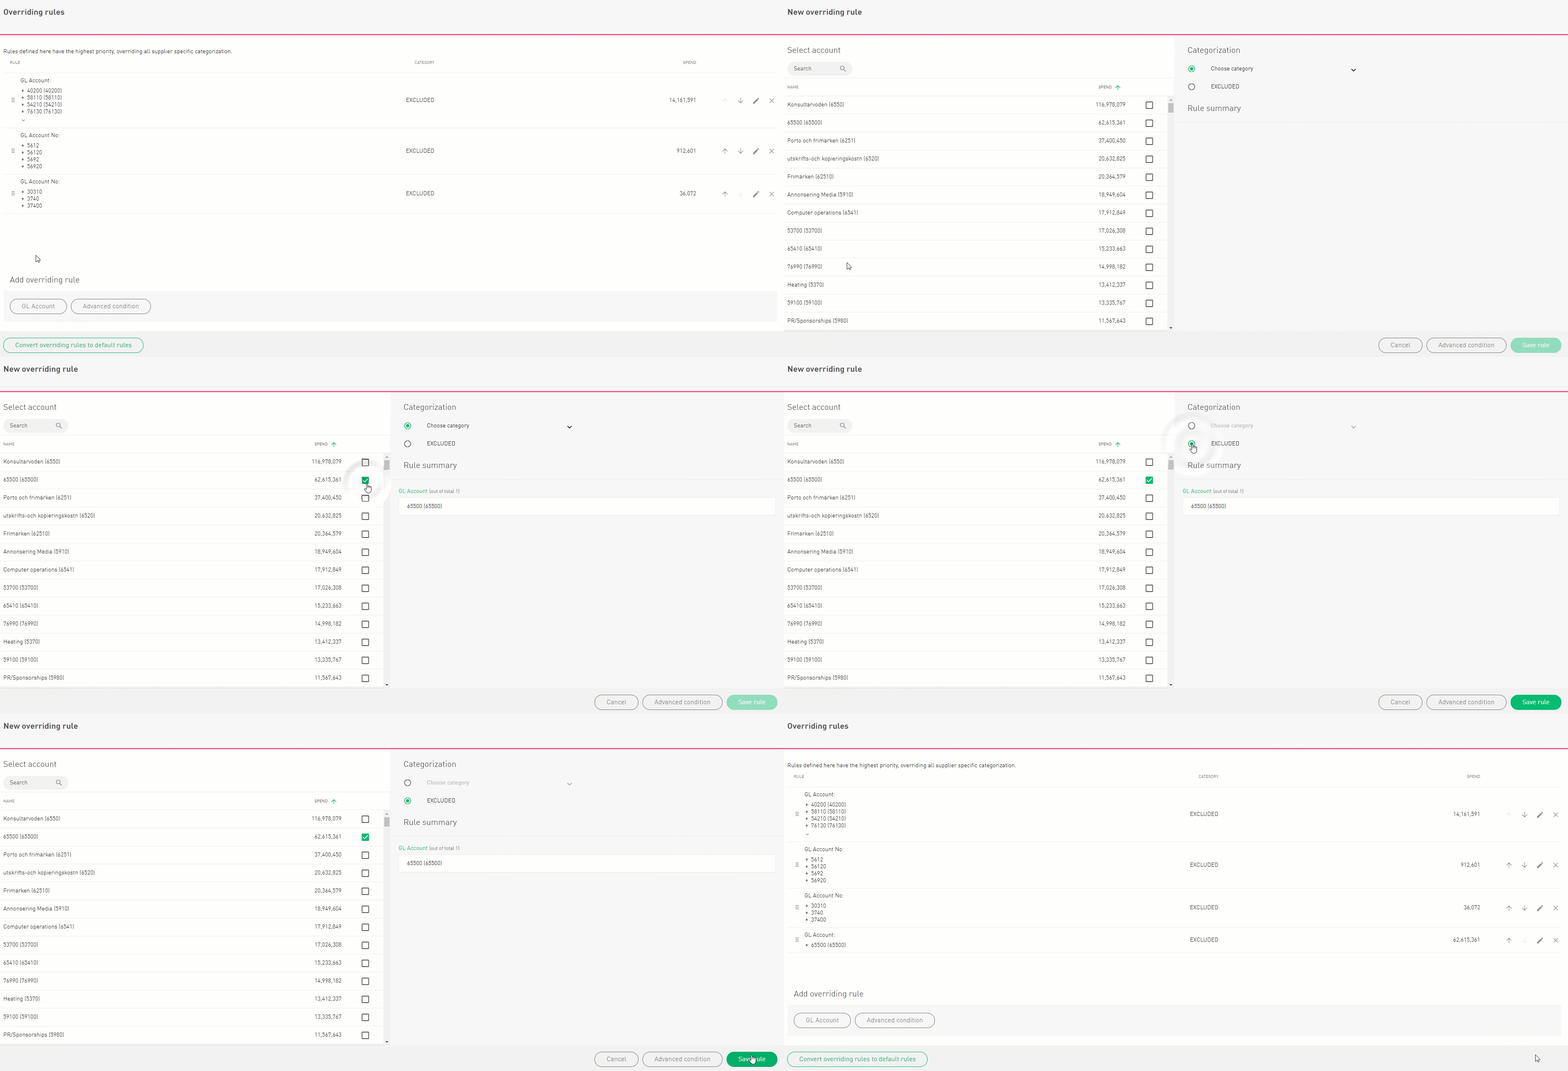
You can also categorise a specific GL account into a category by selecting “Choose Category”. Press advanced conditions to combine multiple conditions, for example, categorise or exclude account X if cost centre is Y and subsidiary is A.
Supplier rules
The spend remaining after the overriding rules have been applied is categorised by using Supplier rules. To categorise a supplier, select it and drag-and-drop it on the correct category. If a supplier should be excluded from the analyse, choose the Exclude option and not be included when analysing.

Supplier advanced rules
The spend remaining after the overriding rules have been applied is categorised by using Supplier rules. To categorise a supplier, select it and drag-and-drop it on the correct category. If a supplier should be excluded from the analyse, choose the Exclude option and not be included when analysing.
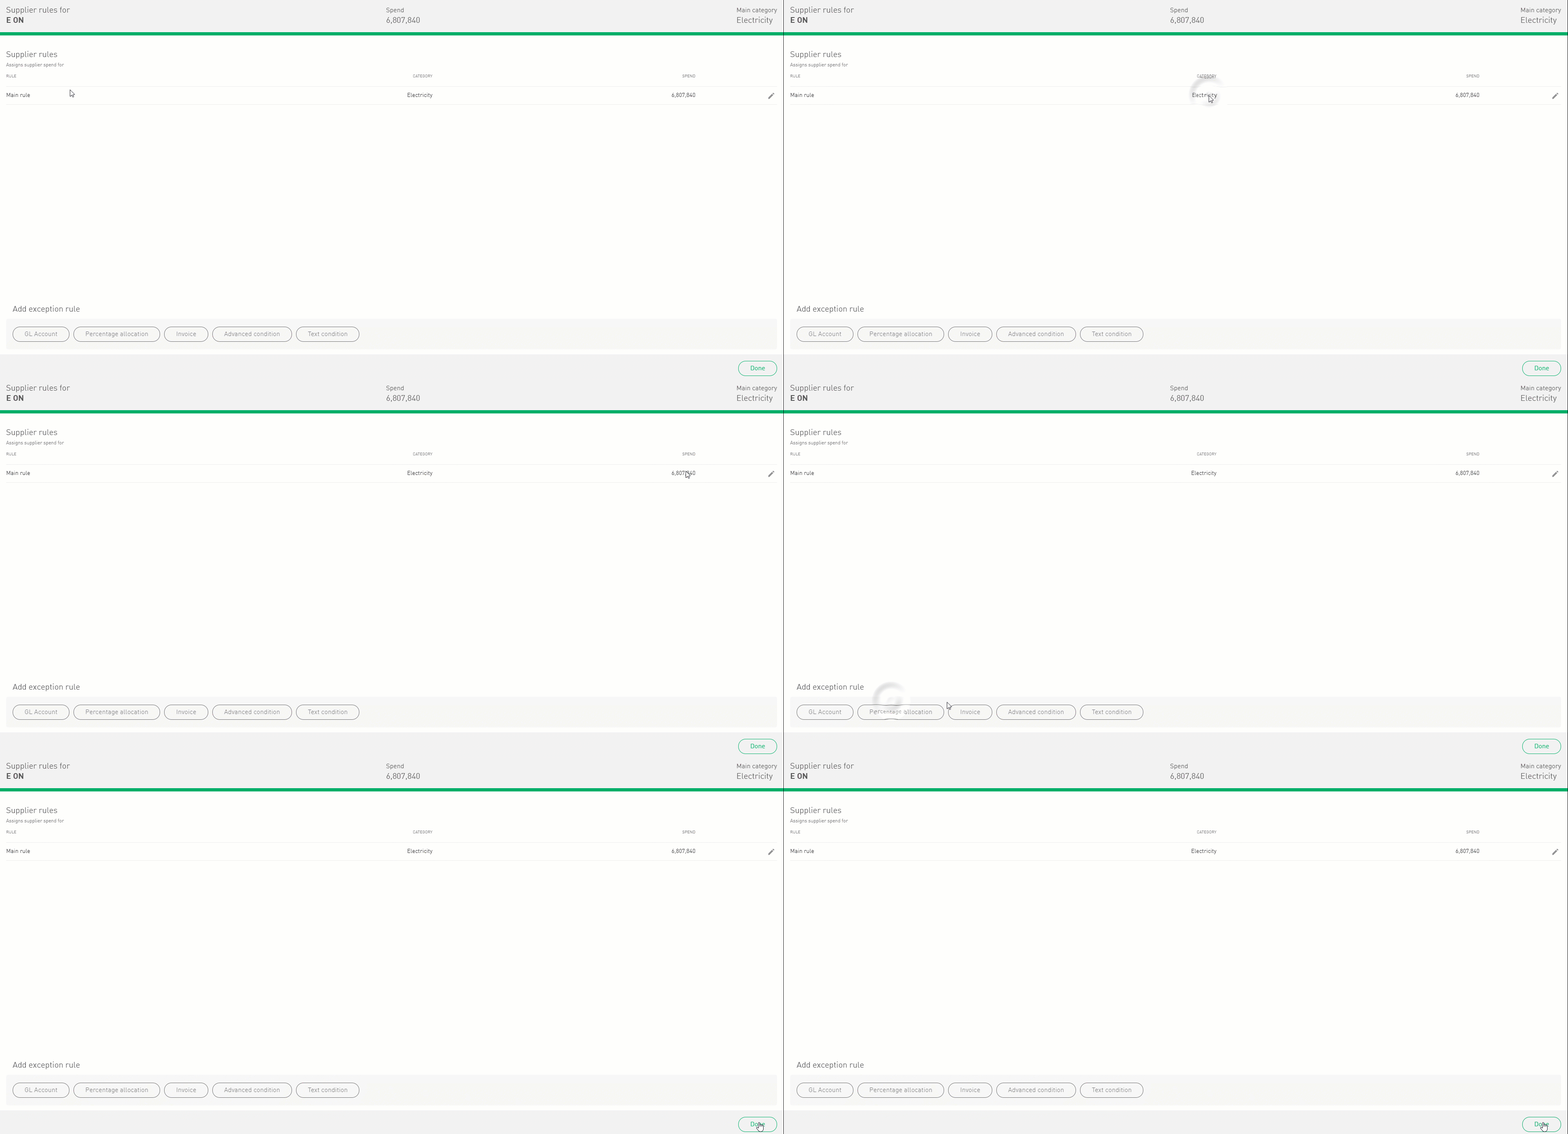
In this view, you can manage all the rules applied to a supplier, add and rove move exception rules. On the lower menu, you can find different types of exception rules. You can choose to split the spend through:
GL accounts, e.g., spend on account number X, shall be categorised under category Y
Percentage allocation, e.g., 30 % of the spend is categorised under category Y
Invoice level, e.g., invoice number X is categorised under category Y
Advanced conditions, categories the spend to category Y if GL account is X and cost centres is Y.
Text condition
GL-account example
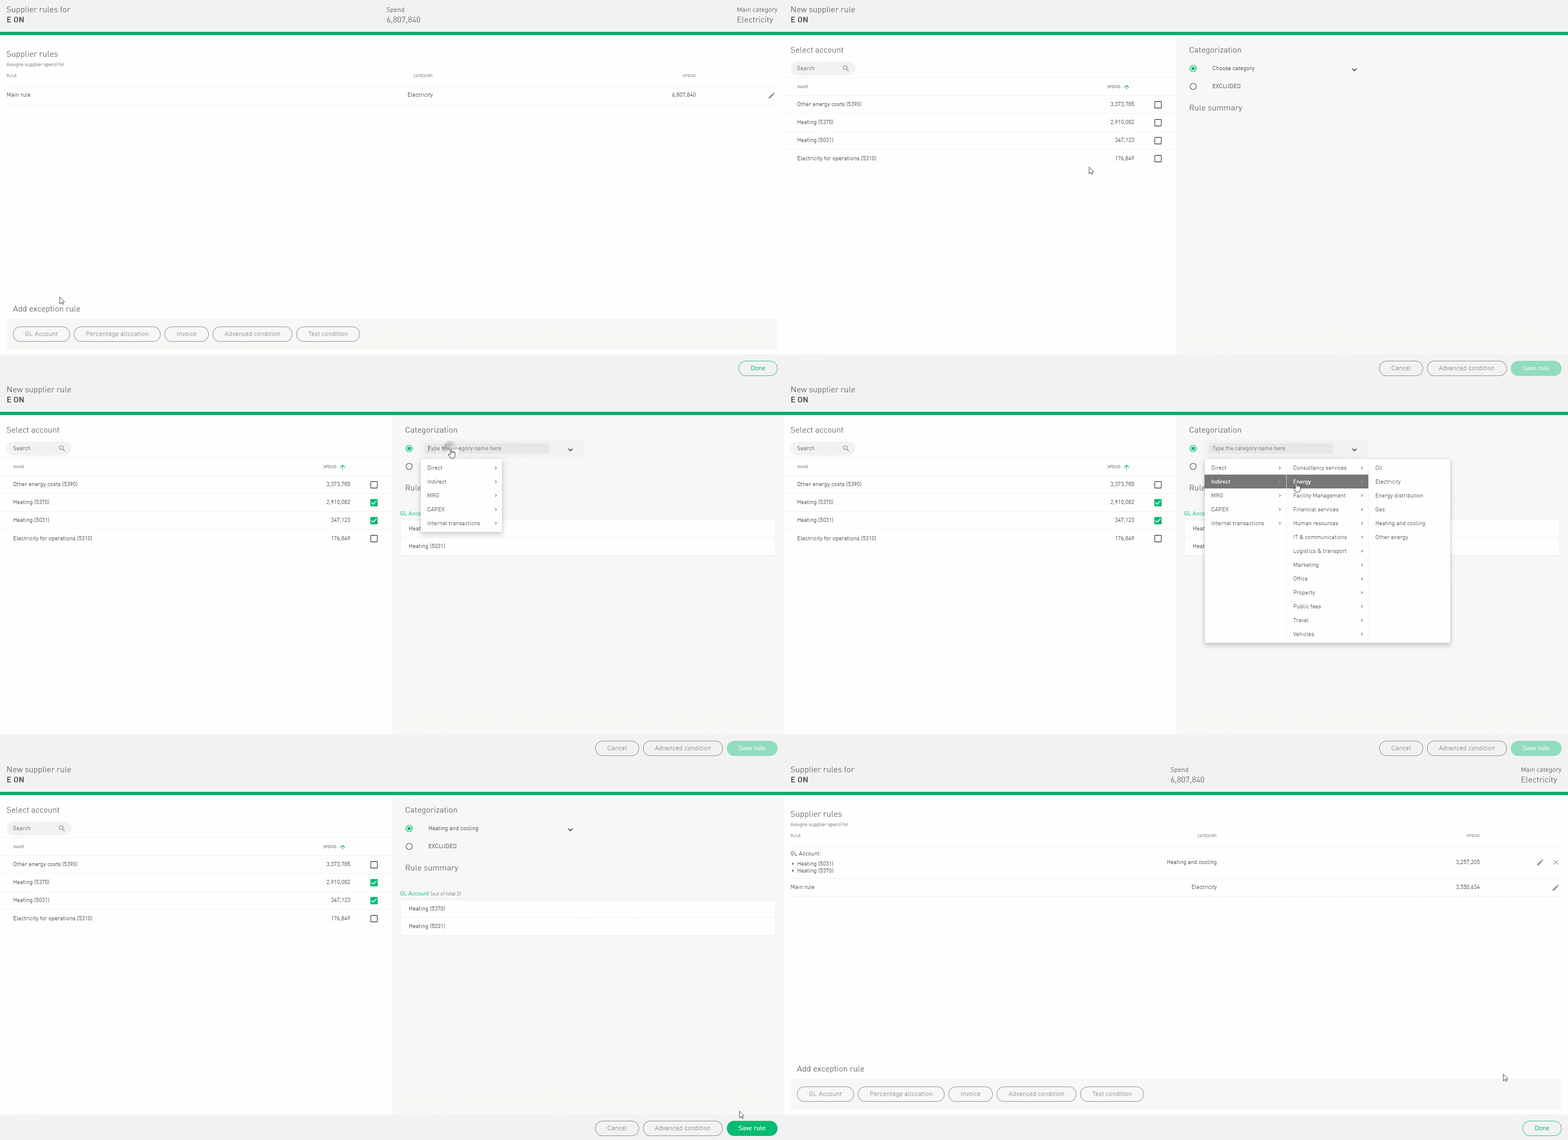
Let’s say that we want to split the spend for the supplier E ON into two categories as we want to enable a more detailed analysis of the companies energy consumption. The main rule is set to the Electricity category, which means that the entire spend is categorised under that category.

If we press the GL account, we can see two GL accounts named “heating”. Instead of viewing them as Electricity, we want to put them in a separate category. In the category tree, we can find a suitable category named Heating.
Select those two accounts and add them to the Heating category, and press save. The new rule appears in the overview, where we can see how the spend has been allocated between the two categories. The procedure for the other conditions is the same as GL accounts but with different variables.
Default rules
Default rules are the lowest rule in the order and will only apply if there are no overriding or supplier rules. You want to use this rule if you have many suppliers with low spend, also known as tail spend. The procedure for creating default rules is the same as creating an overriding rule.
