
Onventis 2025.4
The new Onventis 2025.4 release contains various enhancements, improvements, and bug fixes. Check out the complete list below!
Beta release date: Monday, May 12, 2025
Release date: Tuesday, May 27, 2025
Procure-to-pay
Introduction of “Incoterm Version” field to support 2010 and 2020 incoterm codes
With this release, our customers would be able to maintain both versions of Incoterm (2010 and 2020) and its related codes across Onventis Buyer for seamless experience. The changes are reflected in Supplier Management, Operational Purchasing and SAP integrations. The designed solution is scalable which means adapting to new versions in future will be a quick extension. Additionally, by default on all the customer environments, the Incoterm Version for all the existing Supplier records with Incoterm code in “Terms of delivery” will be set to 2010 thus reducing the manual effort for our customers. Below are the details of all the changes that has been introduced in different modules for end to end experience of our customers when using various Incoterms versions.
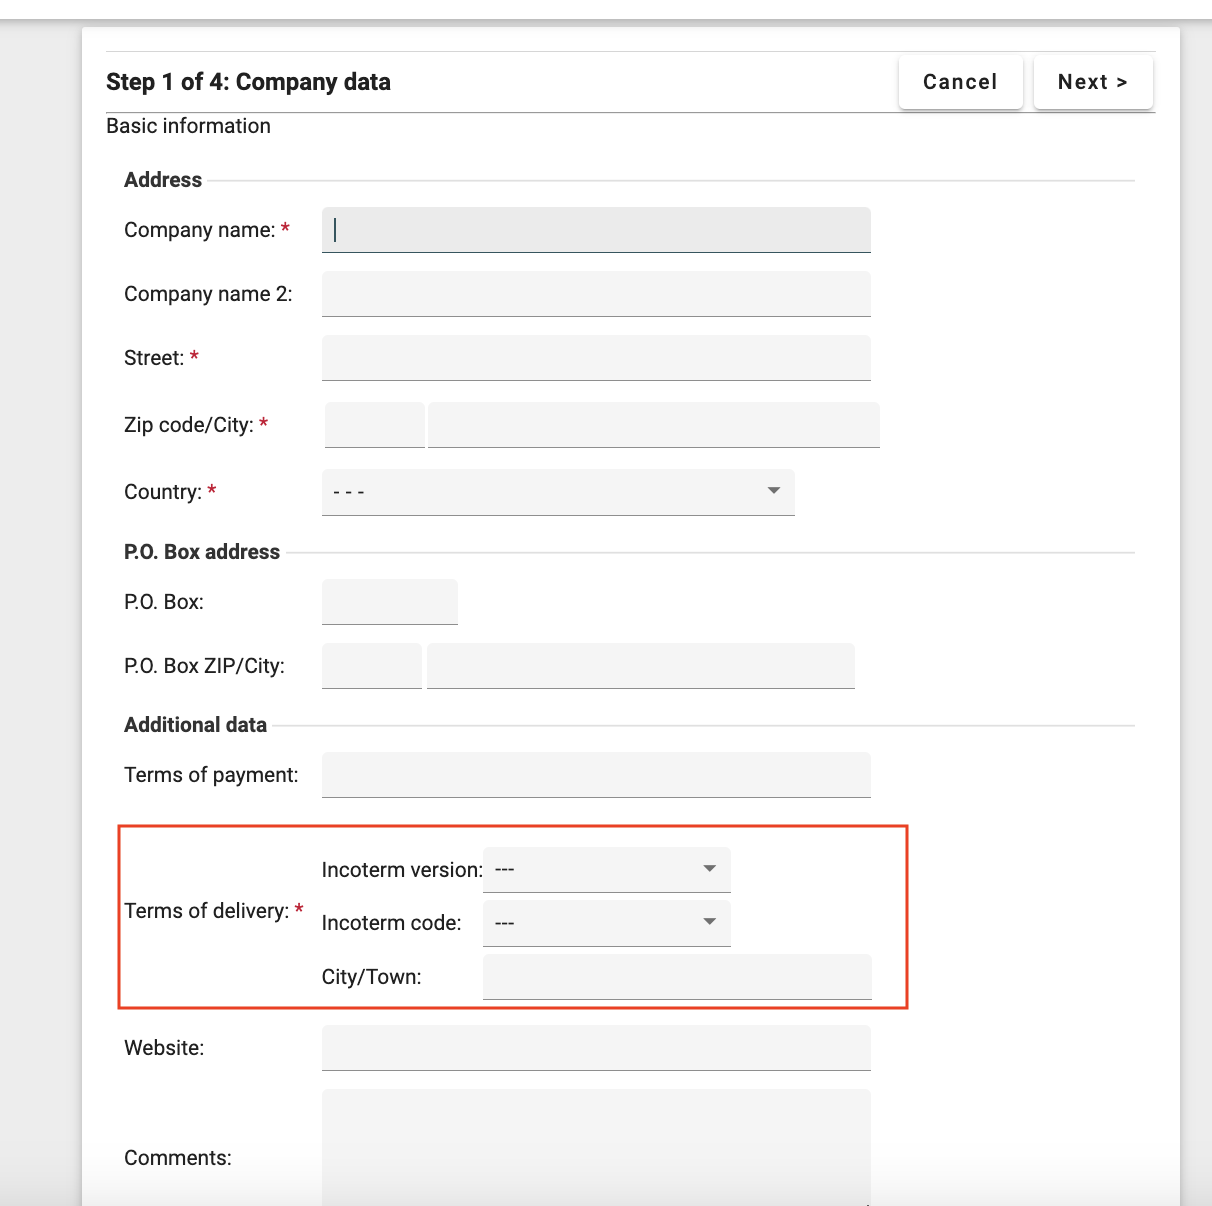
1. Supplier Management
For Non-SAP organization:
When the organisation is Non-SAP and in Organization Settings > Supplier> “Terms of delivery from Incoterms(r) selectable” setting is “ON” and “Allow multiple assignments specific to company codes and purchasing organizations in supplier management” setting is “OFF”

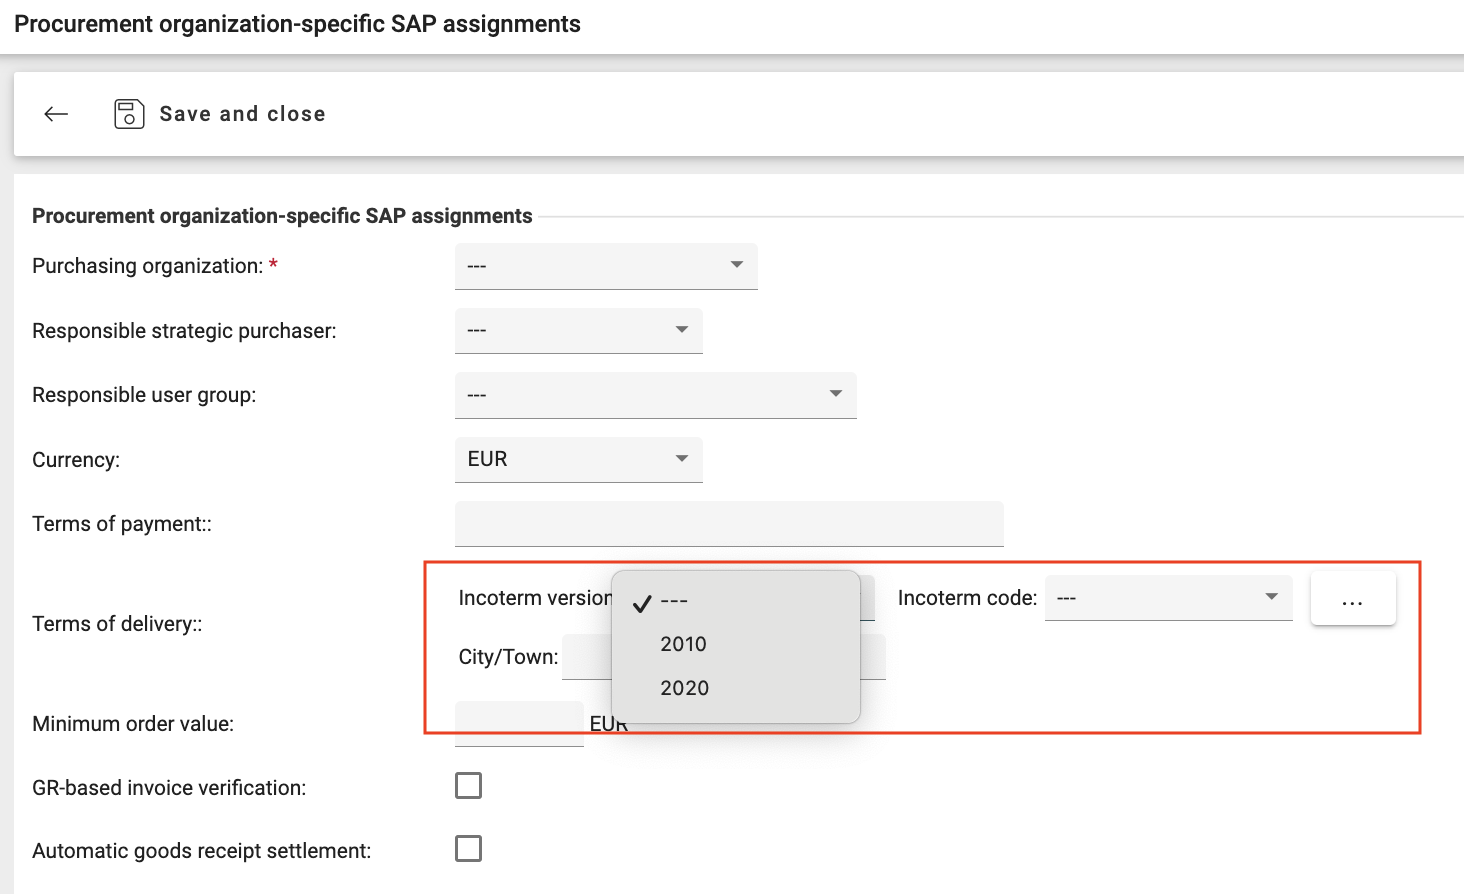
Within Supplier Management → Extended Tab → Conditions (Section), new dropdown “Incoterm Version” before the Incoterm Code selection field has been added. This dropdown will have values “---”, “2010” & “2020”. Based on the selection respective incoterm code will be populated. If the user chooses “---” as a value in Incoterm Version field, then the incoterm code field will be blank. However they would be able to enter City/Town in terms of delivery.
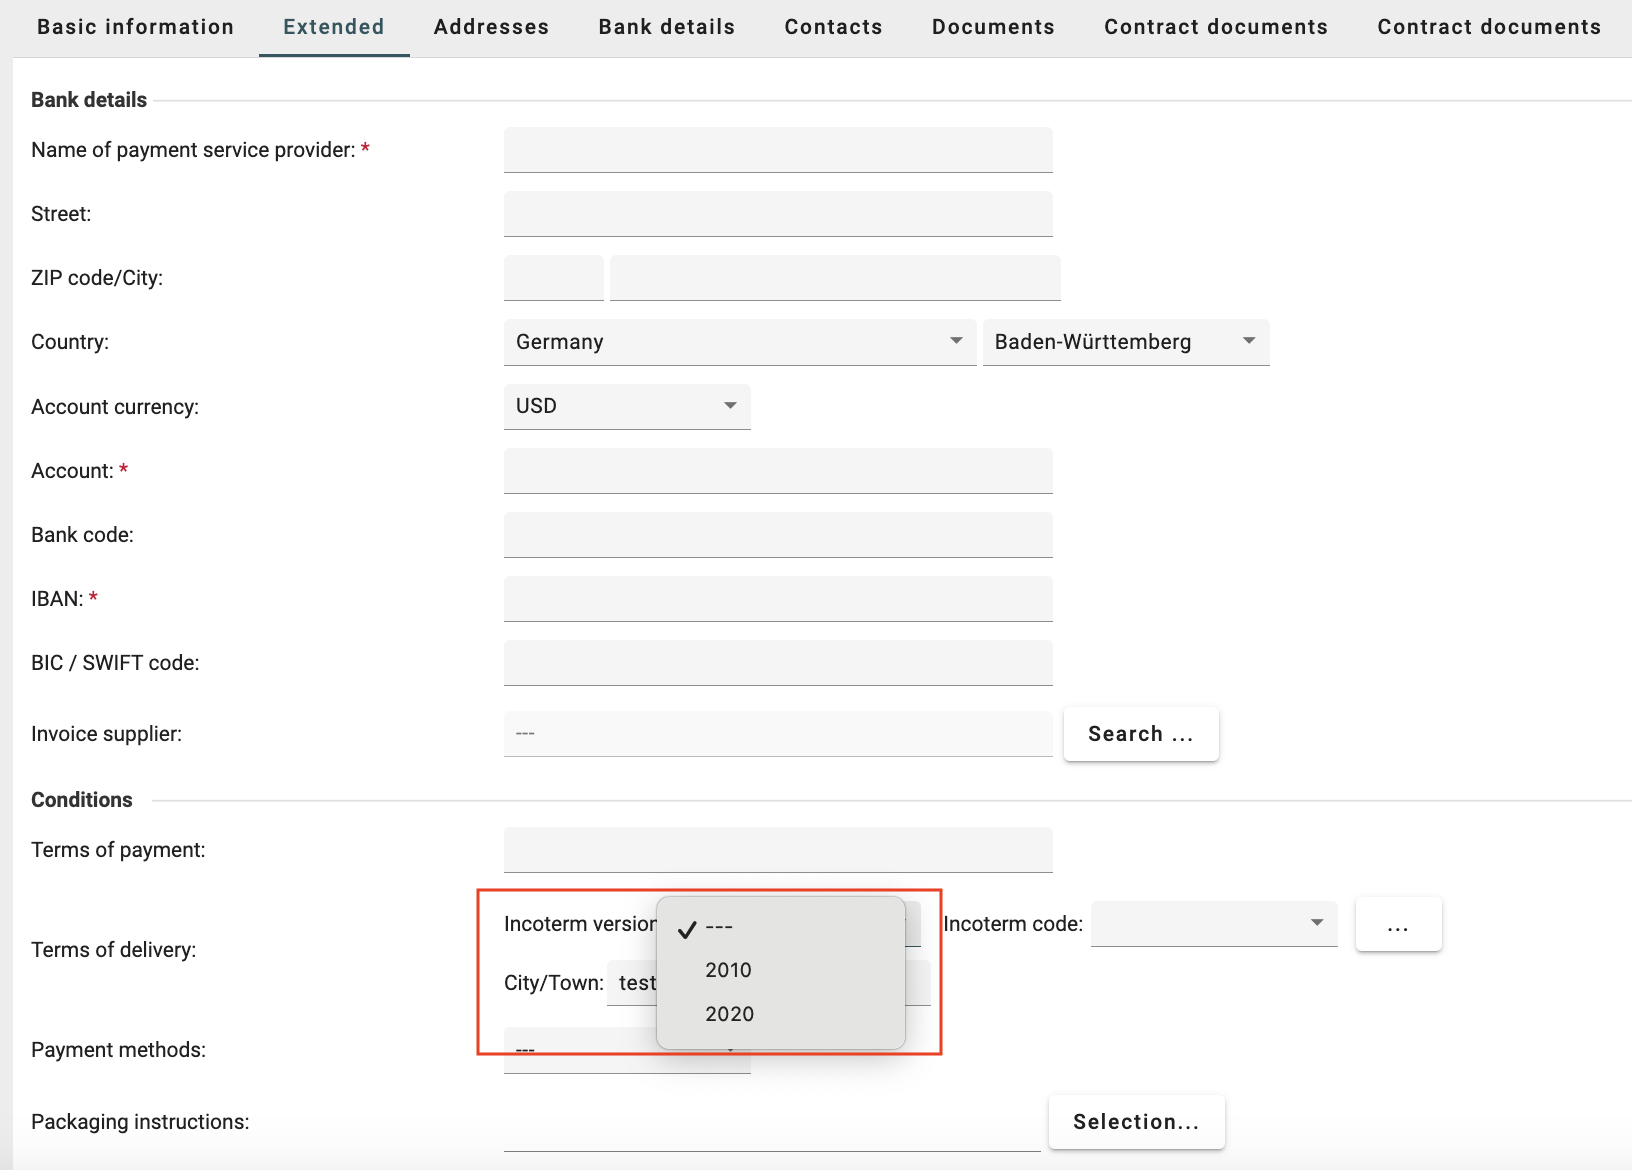
When 2010 is selected, the below Incoterm Code field will be displayed:
["EXW", "FCA", "FAS", "FOB", "CFR", "CIF", "CPT", "CIP", "DAP", "DAT", "DDP"]
When 2020 is selected, the Incoterm Code field will be displayed:
["EXW", "FCA", "FAS", "FOB", "CFR", "CIF", "CPT", "CIP", "DAP", "DPU", "DDP"]
(DAT is replaced with DPU in Incoterms 2020)
If a user had previously selected an Incoterm from 2010 (e.g., DAT) and switches to 2020, then system will reset the selection.
If a user had previously selected an Incoterm from 2020 (e.g., DDP) and switches to 2010, the system will reset the selection.
The above logic will also be reflected in “Mandatory Field Setting for location” based on selection of Incoterm Version
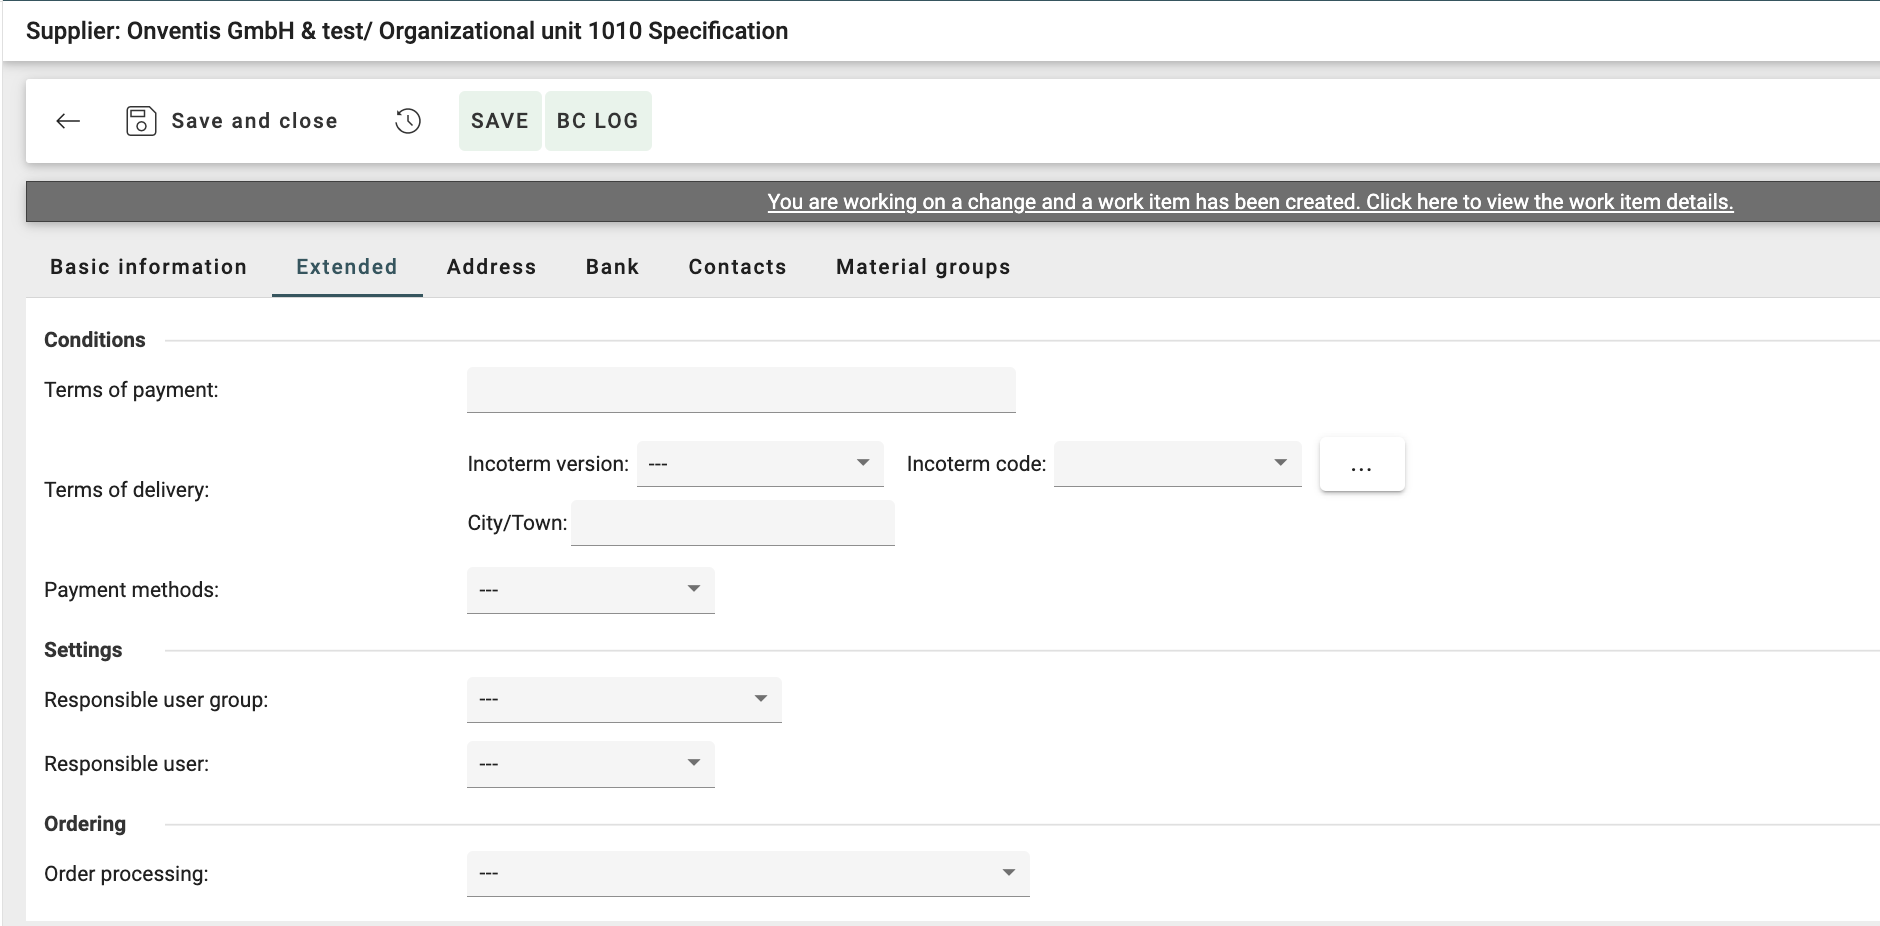
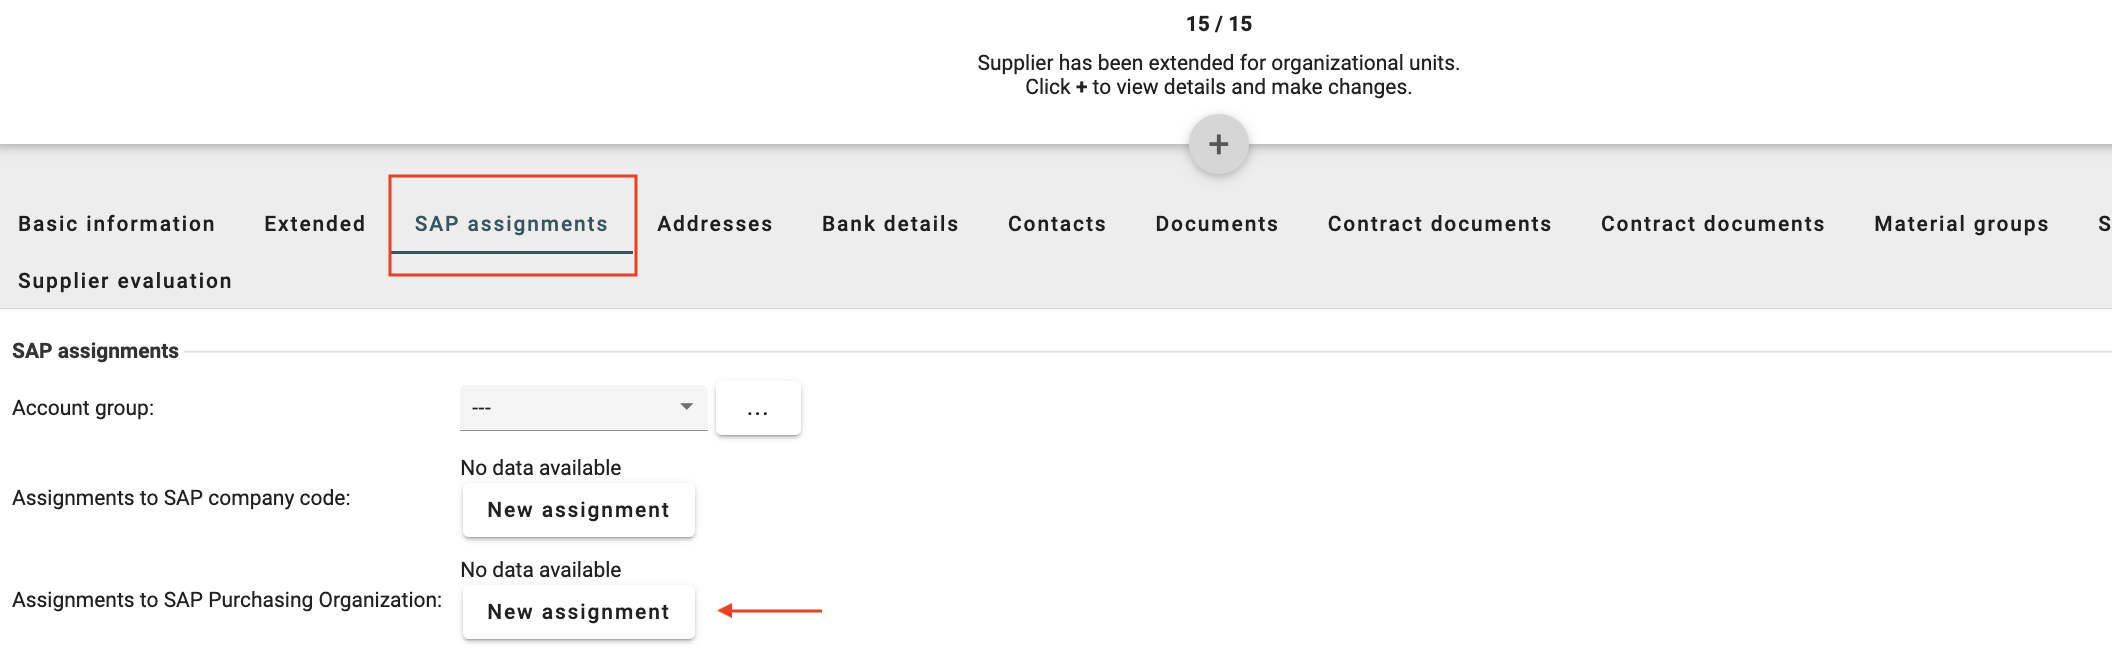
The same logic will follow when Supplier has been extended for organizational units and user Clicks + to view details and make changes i.e. in Supplier Management → Top + sign-> Extended Tab → Conditions block, the newly introduced dropdown “Incoterm Version” will be visible if the organisation is Non-SAP and in Organisation Settings > Supplier> “Terms of delivery from Incoterms(r) selectable” setting is “ON” and “Allow multiple assignments specific to company codes and purchasing organizations in supplier management” setting is “OFF”
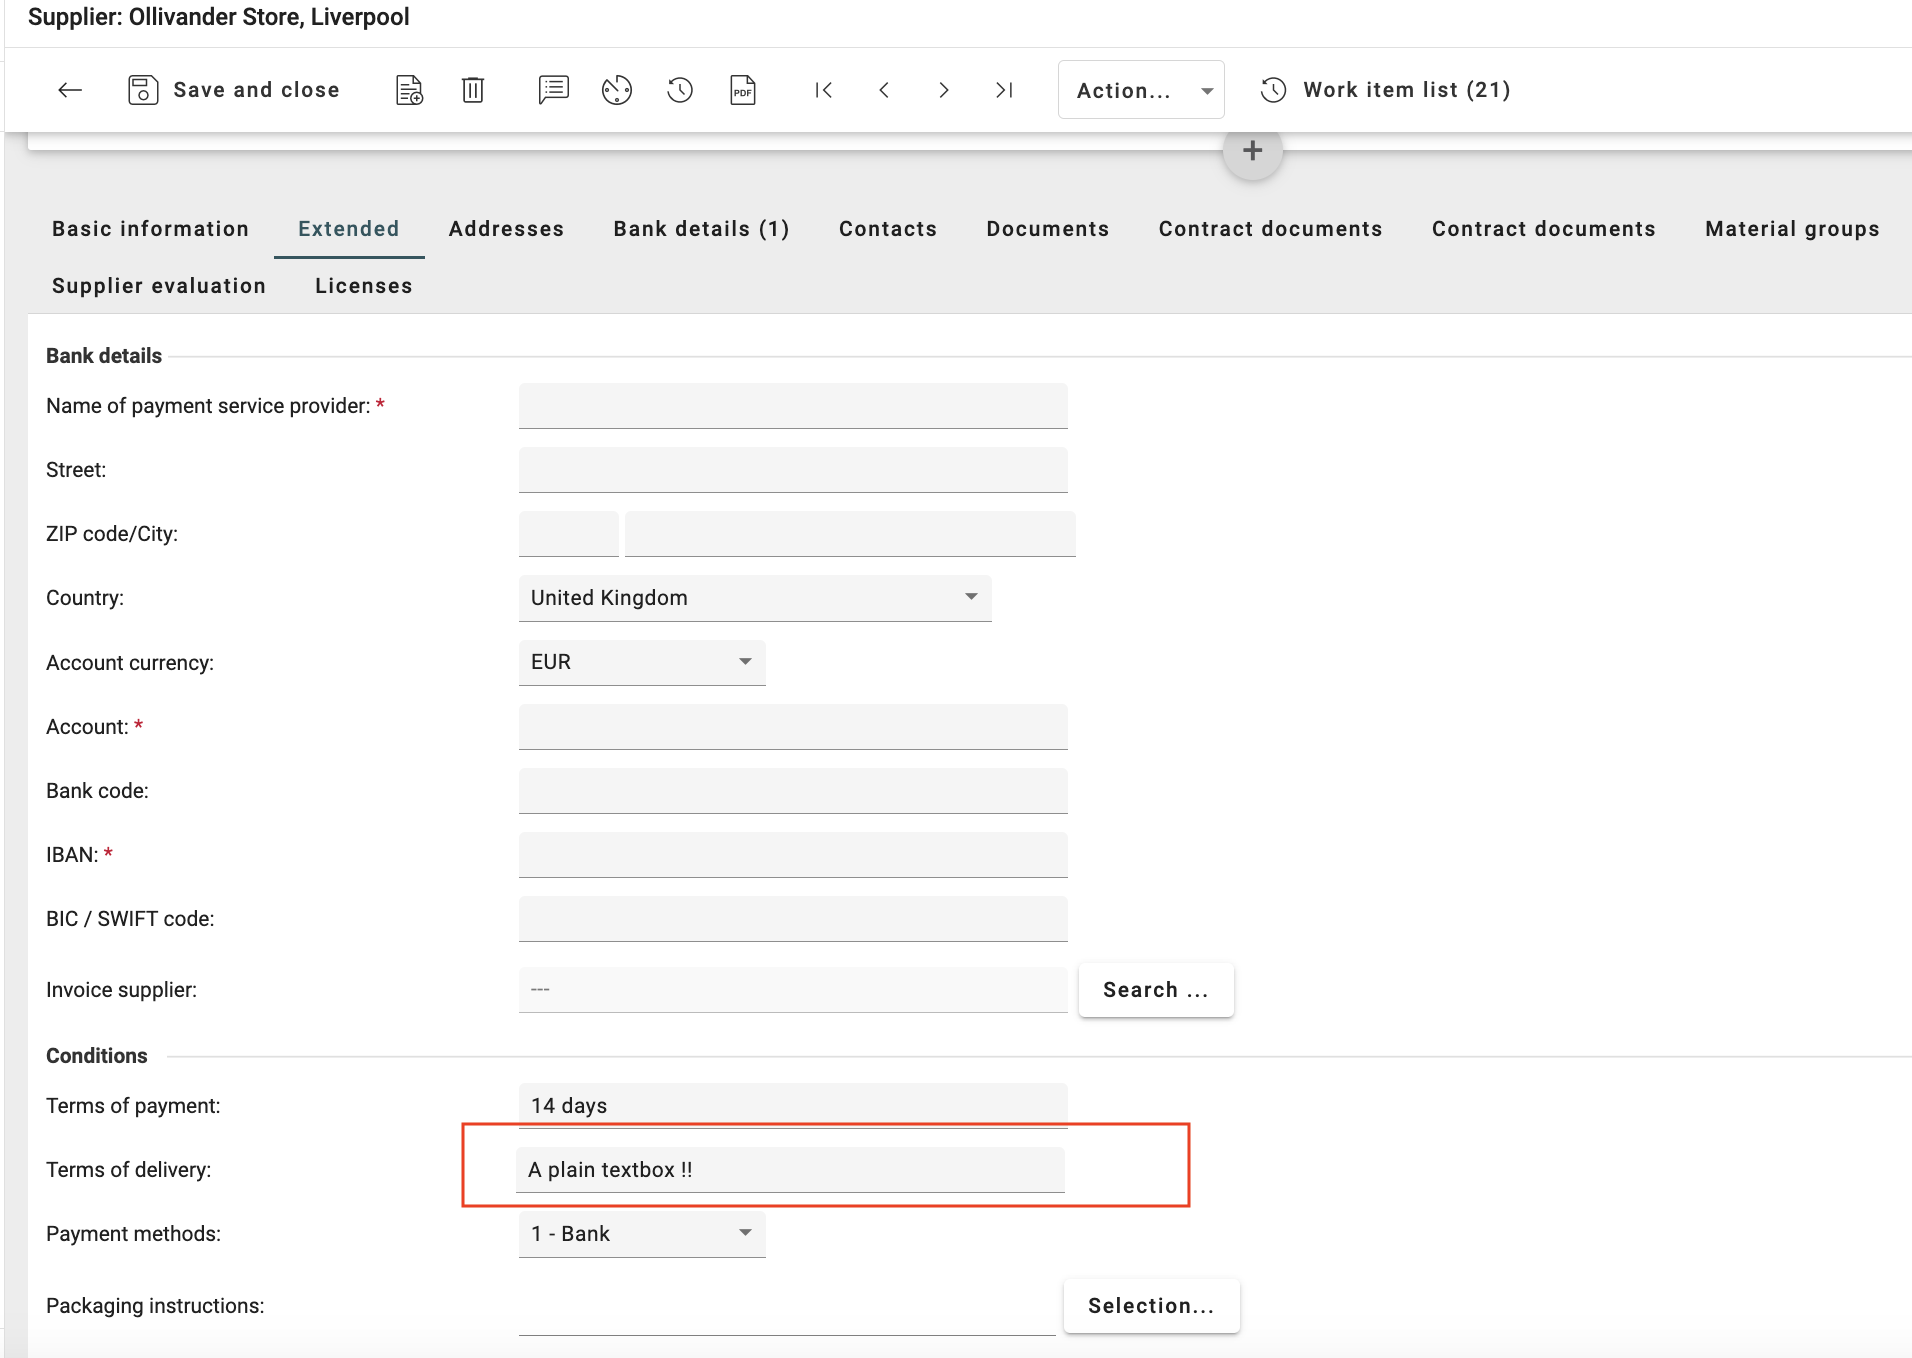
If in Organization Settings > Supplier> “Terms of delivery from Incoterms(r) selectable” setting is “OFF”, then Terms of delivery will appear as text box and user would be able to input any value.
If the “Allow multiple assignments specific to company codes and purchasing organizations in supplier management” setting is “ON” the Condition section is removed from Supplier Management → Extended tab and it is only visible when org is SAP enabled (already existing functionality).
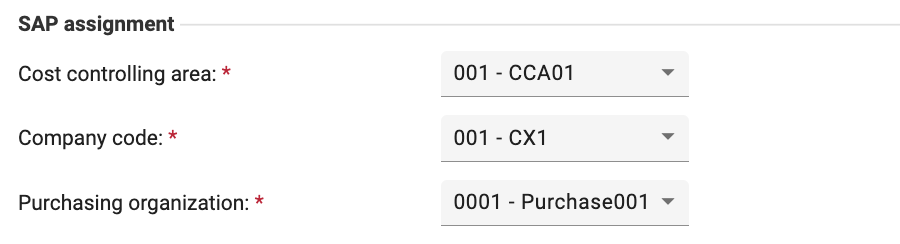
For SAP organization:
When the organisation is SAP and in Organisation Settings > Supplier> “Terms of delivery from Incoterms(r) selectable” setting is “ON” and “Allow multiple assignments specific to company codes and purchasing organizations in supplier management” setting is “ON”
Within Supplier Management → SAP Assignment → Assignments to SAP Purchasing Organization → New Assignment → Terms of delivery, new dropdown “Incoterm Version” before the Incoterm Code selection field has been added. This dropdown will have values “---”, “2010” & “2020”. Based on the selection respective incoterm code will be populated. If the user chooses “---” as a value in Incoterm Version field, then the incoterm code field will be blank. However they would be able to enter City/Town in terms of delivery.
When 2010 is selected, the below Incoterm Code field will be displayed:
["EXW", "FCA", "FAS", "FOB", "CFR", "CIF", "CPT", "CIP", "DAP", "DAT", "DDP"]
When 2020 is selected, the Incoterm Code field will be displayed:
["EXW", "FCA", "FAS", "FOB", "CFR", "CIF", "CPT", "CIP", "DAP", "DPU", "DDP"]
(DAT is replaced with DPU in Incoterms 2020)
If a user had previously selected an Incoterm from 2010 (e.g., DAT) and switches to 2020, then system will reset the selection.
If a user had previously selected an Incoterm from 2020 (e.g., DDP) and switches to 2010, the system will reset the selection.
The above logic will also be reflected in “Mandatory Field Setting for location” based on selection of Incoterm Version
If in Organisation Settings > Supplier> “Terms of delivery from Incoterms(r) selectable” setting is “OFF”, then Terms of delivery will appear as text box and user would be able to input any value.
2. Supplier Master Data Import and Export
Within the Supplier Master data import excel, in Supplier tab, OrgUnitSpecific tab and SapPurchaseOrgSettings:
DeliveryTermsVersion (Optional) column has been added (updated templates available in HelpCenter)
During the import if supplier record has a value for
DeliveryTermsCode, butDeliveryTermsVersionis missing or empty then by default as a fallback mechanism we consider this value as “2010”. In that case we validate if the Delivery code belongs to 2010 else an error is logged “Imported Incoterms Code <value> is not supported for version 2010”
Similarly if user exports the Supplier Master data, the
DeliveryTermsVersionwill be populated with value present in Supplier record within Onventis Buyer.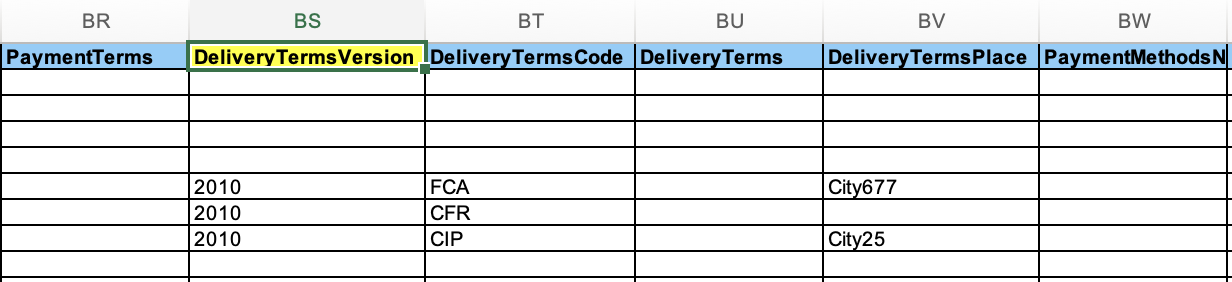
3. Supplier Registration
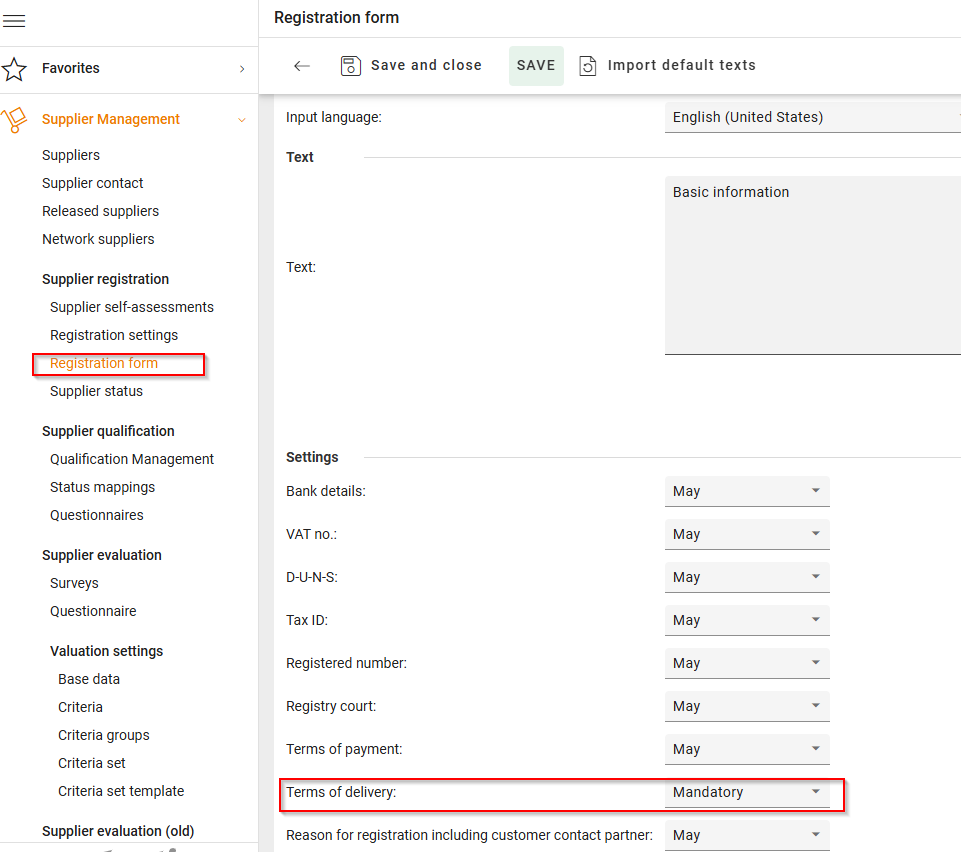
In SupplierManagement -> Supplier Registration -> Registration Form, Tab Company: Here customers can define if the supplier registration dialog should contain the delivery terms and if it should be mandatory for the supplier to fill in the data or not. If the selected options are “May” or “Mandatory” and along with this if Organization Settings -> General → Supplier -> Setting "Terms of delivery from Incoterms(r) selectable" is “ON” then the supplier registration form will have Incoterm Version dropdown in Terms of Delivery section which the Supplier will have to select and accordingly the Incoterm Code will be populated.
If in Organization Settings -> General → Supplier -> Setting "Terms of delivery from Incoterms(r) selectable" is “OFF” but the Supplier registration dialog contains the delivery terms as “May” or “Mandatory”. Then the registration form will only contain an editable text field for Terms of delivery.
4. Purchase Orders and Export
“Incoterm Version” field is added before the Terms of Delivery field in the Purchase Order Header. The version is retrieved from the version defined in Supplier record maintained in Supplier Management.
For SAP organizations:
In Purchase order, the Incoterm version will be automatically retrieved from Supplier Management i.e. if in Purchase order header, a supplier is selected and Purchasing Organization is also selected in SAP assignment block and then the system will look at the delivery term defined in Supplier Management → Supplier (same supplier as selected in PO) → SAP assignments → Assignments to SAP Purchasing Organization for same Purchasing Organization as selected in Purchase Order Header. Accordingly the values in “Incoterm Version”, “Incoterm code”, “City/Town” will be populated
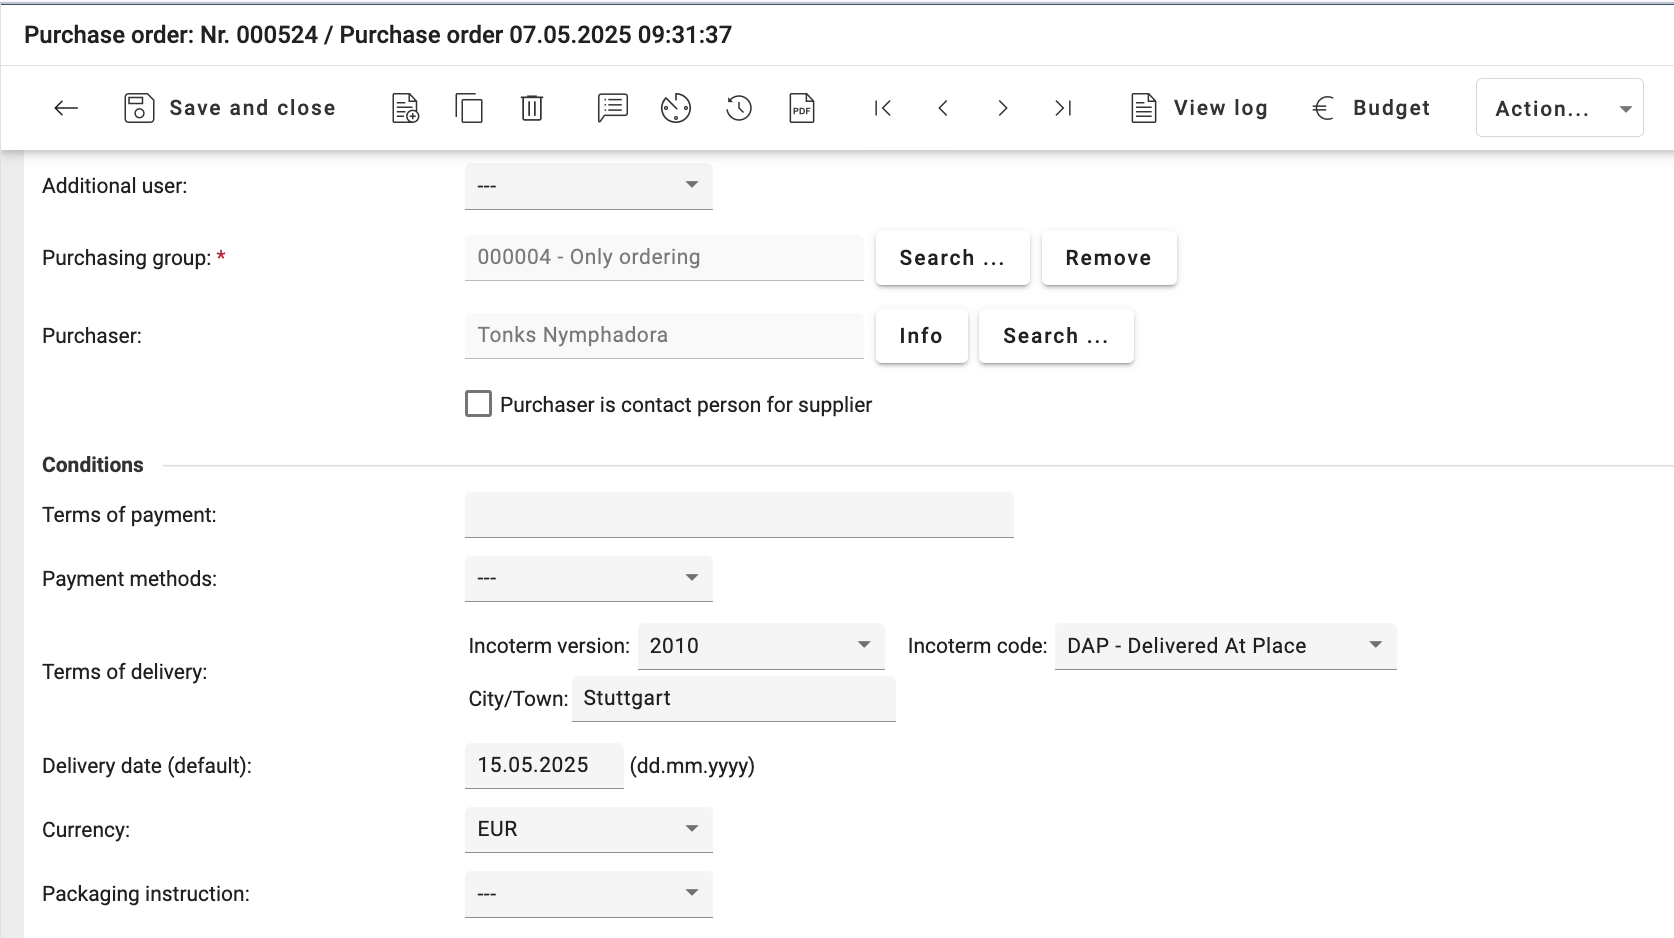
If the supplier doesn’t have a set delivery term in SAP assignments → Assignments to SAP Purchasing Organization for the selected purchasing organisation in SAP assignments on Purchase order header then the “Incoterm Version”, “Incoterm Code” drop downs will not have any default values and user can select any value from the dropdown.
For Non-SAP organisations:
If an Incoterm version is defined for the org unit in Supplier Management, it will override any default settings and will be used in the PO.
If an Incoterm version is NOT defined for the org unit, then:
The version is taken from Supplier Management Header info ( extended tab) (if available).
If neither the Supplier org unit nor Supplier Management Extended setting has a defined version, then the
'--'option from the dropdown is selected.Users cannot manually override this selection.
Purchase Order Export:
In purchase order export, the value present in “Incoterm Version” field on PO header is populated in newly added column DeliveryTermsVersion which will be added in between DeliveryTermsPlace & DeliveryTermsCode columns. If no version is set in purchase order then this column is left empty.

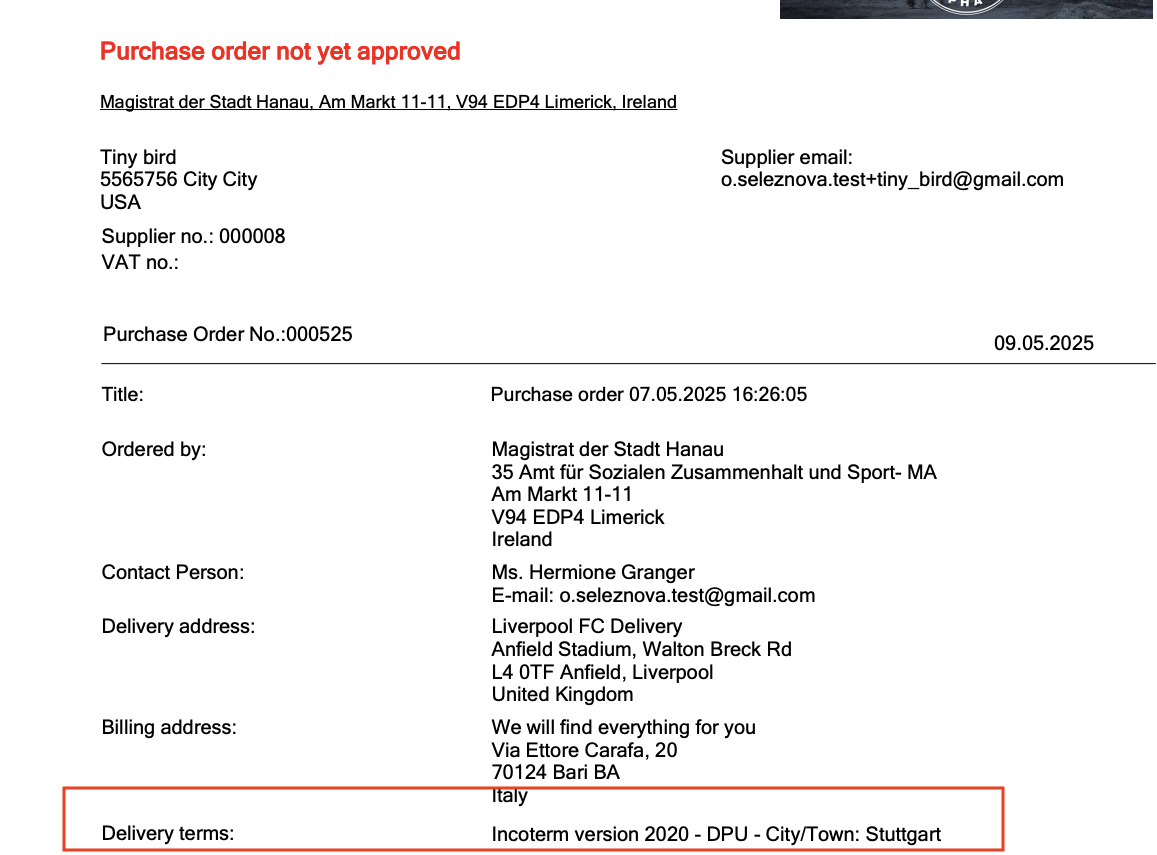
Purchase Order PDF:
When in Organization Settings > Supplier> “Terms of delivery from Incoterms(r) selectable” setting is “ON”
The Incoterms version (2010 or 2020) will be printed next to the delivery terms and delivery code/place in the Order PDF
If in PO, only version is selected and no incoterm code is selected then the terms of delivery section will not be printed in order PDF.
The Delivery terms section in Order PDF will be blank if the Incoterm version is missing in purchase order
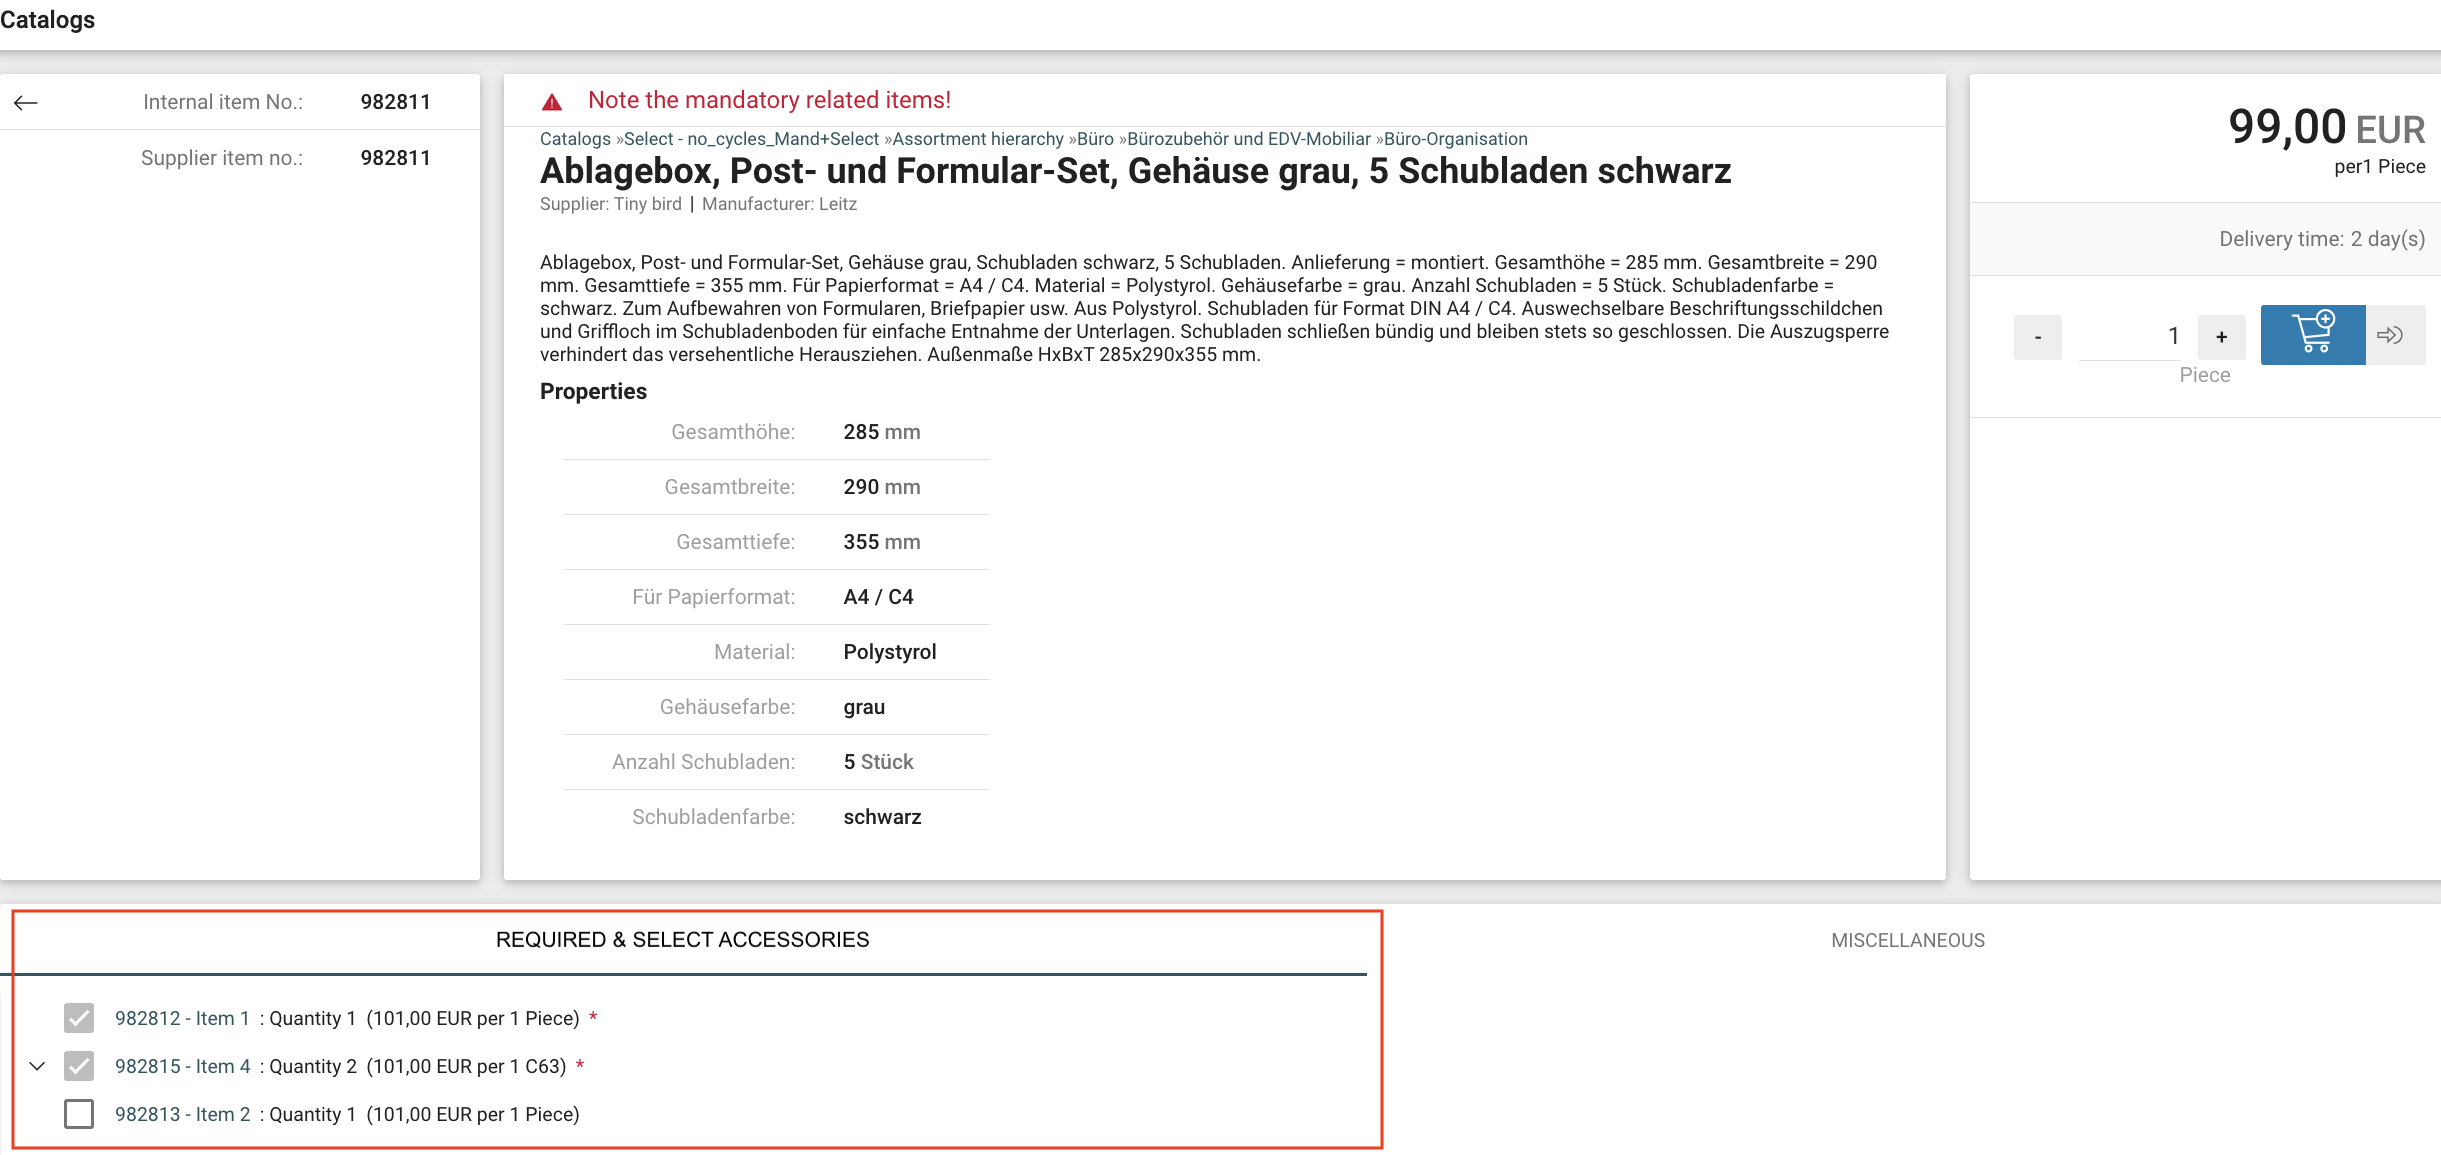
Article Reference type “Select” in Catalogs
This update introduces a range of improvements to the way select articles are handled within the system, ensuring a seamless and accurate ordering experience from catalog import to order processing. These changes ensure that articles marked as "Select" accessories are correctly retained, displayed, and managed during catalog imports, shopping cart additions, and order processing.
Catalog Import and its display in Catalogs
When a catalog is imported on Onventis buyer, the system now retains and displays articles marked as "Select" accessories alongside the source article.
The system now supports hierarchical relationships between articles (e.g., Article A > Article B (Select for A) > Article C (Select for A)). It displays these relationships in a tree-structured view, helping users understand the connections between linked articles.
Since there is a possibility that a source article can have multiple mandatory articles and those mandatory articles can have Select articles, the view for these accessories have been combined as one i.e. "Required & Select Accessories" in the catalog view. The mandatory articles in this tree view are shown as automatically selected and the select accessories are displayed with a checkbox where user can select atleast one accessory before transferring the article to Shopping cart.
Upon adding a source article to the shopping cart, users will see auto addition of the chosen Select articles in shopping cart with a message. This ensures transparency and clarity about the items being added.
Select article processing in Shopping Cart and Orders
Source item has label "Source article” and when a source article is added to the shopping cart or an order, any linked select articles are automatically included as separate line items. They are clearly labeled as "Select accessory for {Source article name}" to indicate their association.
The quantity and price mentioned for the article/s in the import are taken into account while replicating this structure in our catalogs. In case the quantity of the select article is not mentioned, default quantity 1 is considered.
Quantity update of the Source article and its associated Select articles is restricted in shopping cart to ensure there is no quantity mismatch within this relation. The info icon is added to quantity field of the line item: "The quantity of article related position could not be edited".
Additionally these select articles cannot be removed from the shopping cart or order as long as the source article remains. If the source article is deleted, the system automatically removes the associated Select articles.
If user tries to delete select accessory in shop cart then system checks that atleast one Select article for the source article is present. If its the only select article present in shop cart then we block the deletion and display message “Can not delete a position which has relation to Source Article: { }”
If a Select accessory has an associated mandatory article that was added in shop cart/order automatically then upon deletion of optional accessory this linked mandatory article should be deleted too.
If a user adds a select article separately from the catalog, the system treats it as an independent line item instead of altering the quantity of the automatically added select article. This distinction allows for more flexibility in managing orders.
In cases where there is a looped hierarchy (e.g., Article A > Article B (select for A) > Article C (select for B) > Article A (select for C)), the system detects this and drops the circular reference during the transfer to the shopping cart. The user is notified of the same to avoid confusion.
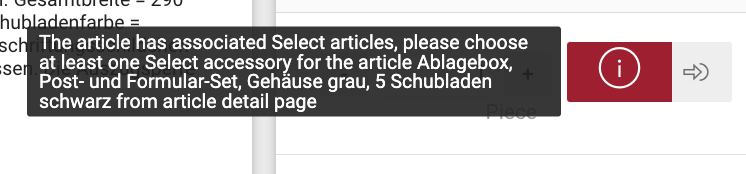
Scenarios where transfer of the articles with Select accessories to Shopping Cart will always end in error “The article has associated Select articles, please choose at least one Select accessory for the article { } from article detail page” to ensure ordering of the Select accessories is not missed in the ordering process and to avoid errors:
In Shopping Cart > Click “Add new Item” > By Article Number (user selects Article number that has Select accessories that needs to be selected)
User clicks “Adds the item to Shopping cart” button on Article List page for the article with Select accessories
User clicks “Adds the item to Shopping cart” button on Article Detail page for the article with Select accessories without making a selection
On Article list, user adds article from “Add to Selection > Selected items > Use > Transfer line item (s) to : Shopping Cart/ Purchase Order
From Shopping Cart > Add new Item > Catalog Item > Navigates to Article with Select accessories > clicks “Adds the item to Shopping Cart” icon
From Shopping Cart > Favourite Items > Selects article with Select accessories > clicks Use
Purchase Orders > Line Items > Catalog > Selects article with Select accessories > clicks Use
When the Source article is rejected during Purchase order Approval process, then select accessory items for this source article are also Rejected.
Select article processing in Demand Position
When a source article is added to the shopping cart and requisition line item is created from that source and select article :
Reference articles of the "select" reference type are always automatically added to the shopping cart which when transferred as requisition line item will be retained as one REQ .
Source item has label "Source article" and Select articles are labelled as “Select accessory for {Source article name}”
We have restricted Quantity change of the Source and select item in demand position. The info icon is added to quantity field of the line item: "The quantity of article related position could not be edit".
If the source article is deleted, the select article will be removed automatically. Short pop-up message is displayed “Select accessory article with Title { } related to the source article was deleted”.
If user tries to delete select accessory then we check that at least one Select article is present. if thats the only select article then we block the deletion and display message “Can not delete a position which has relation to Source Article: { }”
If any select accessory has a mandatory article that was added in demand position automatically then upon deletion of select accessory this linked mandatory article will be deleted too.
Select accessories can be ordered separately from Catalog, in that case we treat it as separate line item instead of increasing the quantity of optional accessory article already added in demand position.
Transfer of eClass number from external Webshop via OCI Outbound
Currently, the customer is using both Onventis-hosted catalogs and external OCI PunchOut catalogs (e.g., for workwear). For Onventis-hosted catalogs, the eClass number is stored and correctly returned in the NEW_ITEM-MATGROUP field when the OCI cart is transferred back. However, for external PunchOut catalogs, while the eClass number is visible in the Onventis shopping cart after returning from the supplier's webshop, it is not transferred in the field (NEW_ITEM-MATGROUP) to the customer's ERP system. As a result, the ERP cannot properly categorize the items.
From this release eClass will be transferred from external webshop to OCI Outbound. Details below:
When a user selects an item in an external OCI PunchOut webshop that includes an eClass number, that number will be returned in the
NEW_ITEM-MATGROUPfield in the OCI return data.The mapping will be controlled via the OCI Parameter Store using:
onvOCIEclassNr = NEW_ITEM-MATGROUP[%n]
The eClass number will be available in the Onventis outbound interface
If an eClass number is not returned by the external webshop, the system will not overwrite existing material group data or insert any other values.
Extension of order list export for framework orders (limit value, periods)
The special usage of framework orders are the delivery time for the invoicing plan and the order limit. We have noticed that it would be great benefit if the Customers can filter framework orders in the export, however before this release it was not possible since they couldn’t find a start of term, end of term and the limit; depending on the order type. To make the full use of the export in terms of analysis from this release, these fields will be populated for frame orders. We have introduced new columns at the end of orderlist export:
“FrameOrderStartDate”
“FrameOrderEndDate”
“FrameOrderBudget”
Extend Deviation Check function in Sales Order Confirmation step of Order Processing Workflow
Currently, within “Release of changes” deviation control is only present for Quantity changes, where a threshold percentage can be defined. In this release we extended the scope of this functionality to include Price and Delivery Dates deviations as well, allowing users to define threshold values for each of these fields.
For Price: Users can set an Percentage (%) threshold.
For Delivery Date: Users can set a number of days threshold (calendar days)
If deviation exceeds the threshold, the system will trigger release approval.
The Default values are 0% for Price and 0 Days for Delivery date. If any other values are keyed then it will trigger approval.
These fields will accept only Integer input fields and numbers.

Replacing Cancel button with Delete functionality for newly added line items in Order Change
At time during the process, the users mistakenly add wrong line item into an order change. As of today the only the possible action is to cancel that line item which theoretically wasn’t needed instead in these scenarios a delete function is a better fit. Hence in this scenario, the cancel button has been replaced by Delete button.
A delete record button/option is available for line items that have:
"Being processed" status
"(Modified)" label
"(New line item...)" label
When the delete record button is clicked:
The line item is completely removed from the Order Change document
The system shows a confirmation message
The deletion is reflected in the order Line item summary
The delete functionality is only available:
Before the Order Change is sent to the Supplier
For newly added line items only
Once the Order Change is sent to the Supplier, deletion is no longer possible
Existing line items (those from the original PO) cannot be deleted, only canceled
Auto stock receipt booking for service orders
The automatic entering of a goods receipt for service orders was not possible earlier hence the customers would book the stock receipts to service orders manually (if needed) or they were booked automatically after the service note has been released. In some SAP-cases, that order is flagged as “service order” only on ONV-side, but in SAP it is a normal order and the stock receipt was needed too (for the 3-way-match in the invoicing).
With this release, we add the service order to the logic for the auto creation and auto booking of stock receipt via schedule job. When ordering services, goods receipts can now be posted automatically (if the corresponding settings are active in the order processing workflow). The prerequisite for automatically posting goods receipts is that service records are not used (since these are not created automatically).
Asynchrounouse export Pattern
In the OB 2023.9 release, we introduced an asynchronous export pattern for user-requested data exports in the Order List. Over time, we have applied this pattern to other use cases, including Supplier List-, Complaints List-, and User List- Exports. With this release, we have updated the implementation of the Demand List, Sales Order List, Stock Receipt List and Service Note List-Exports to function in the same manner.
This change aims to prevent timeouts during export creation for larger data sets and ensures that users can continue working within the application while the export is being generated.
Source-to-Contract
Additional fields transfer
From now on, additional fields and their content from requisition lne items are taken into account when transferring them to a RfQ.
Furthermore, additional fields from catalog items are transferred to the RfQ when importing catalog items.
Supplier Management
Embedding Spend Analytics in Supplier Management
1. Supplier Dashboard
With this release, we have added a new menu item called ‘Dashboard’ inside Supplier Management. This menu item is only accessible to customers who have a ‘Spend Analytics’ connection. In order to view the dashboard, the user needs to have the access rights: ‘View widgets’ and ‘View suppliers’
The ‘Dashboard’ displays the same view, which is available in the menu Analytics > Spend Analytics > Analyze > Suppliers. It provides an overview of the entire supplier base to display KPIs such as: Suppliers with highest spend, Spend distribution, Suppliers with highest transactions etc. It's also possible to drill down on a single supplier and access the overview for that supplier.
2. Supplier 360° view
Apart from the dashboard which provides an overview of the entire supplier base, we have also introduced the supplier card which provides the 360° view of a particular supplier. This view is accessible after opening any supplier record from the ‘Supplier list’. This option is only accessible to customers who have a ‘Spend Analytics’ connection. In order to access the 360° view, the user needs to have the access rights: ‘View widgets'.
The Supplier 360° view can be accessed by:
Open the Suppliers list by clicking on Supplier management > Suppliers
Open any supplier record
Click on the highlighted 360° button in the right corner of the toolbar
To return back to the supplier master data, click the ‘Go back’ button and to return to the supplier list, click on the menu item ‘Suppliers’.
File Network Repository
1. Update in the ‘Valid Until’ date logic displayed in table view
If the file has multiple versions: expired, the current valid, and a future version, we display the valid until date of the latest version as the valid until date in the file table view. This allows both buyers and suppliers to have the correct overview regarding the file expiration. This logic is also respected during sorting and filtering in file table view.
2. Additional ‘Expires in Days’ filter
In the file table view for both buyers and suppliers, we have added another filter called ‘Expires in days’. This functionality allows users to filter the files based on the ‘Valid until’ date of the file.
Users can filter via standard values: ‘Expires in 90 days’, ‘Expires in 30 days’, and ‘Expires in 7 days’.
3. Central File Storage view inside Onventis Buyer
Earlier buyers could access all the files received for a particular supplier in the ‘Uploaded Files’ tab after opening a supplier record. With this release, we have added a central view in the Onventis Buyer which aggregates files for all suppliers received via qualification service. A new menu item called ‘File Storage’ is added. This view is accessible if the user has the access right: View file storage. To view can be accessed by Contract documents > Document Management > File Storage.
In the new table view, the user can search file via ‘File Title'. The table can be filtered by ‘Supplier Name’, ‘File Category’, ‘File Status', and ‘Expires in Days’. The table can be sorted by ‘Valid Until’ date.
If the user clicks on the file title, the user is navigated to the detailed file view.
4. Download file version via the detailed file view
File details can be viewed by clicking on the ‘File Title’ in the table view. Within the detailed view, there is another table to display the ‘File Version’ history. It shows all the versions that have been added for the file. The current version is highlighted as bold in the detailed view.
With this release, the user has the possibility to download individual file version in the version history table. File version can be downloaded by clicking on the ‘Download’ icon. This option is available to both buyers and suppliers.
📹 Latest updates in the File Network Repository
Qualification Management
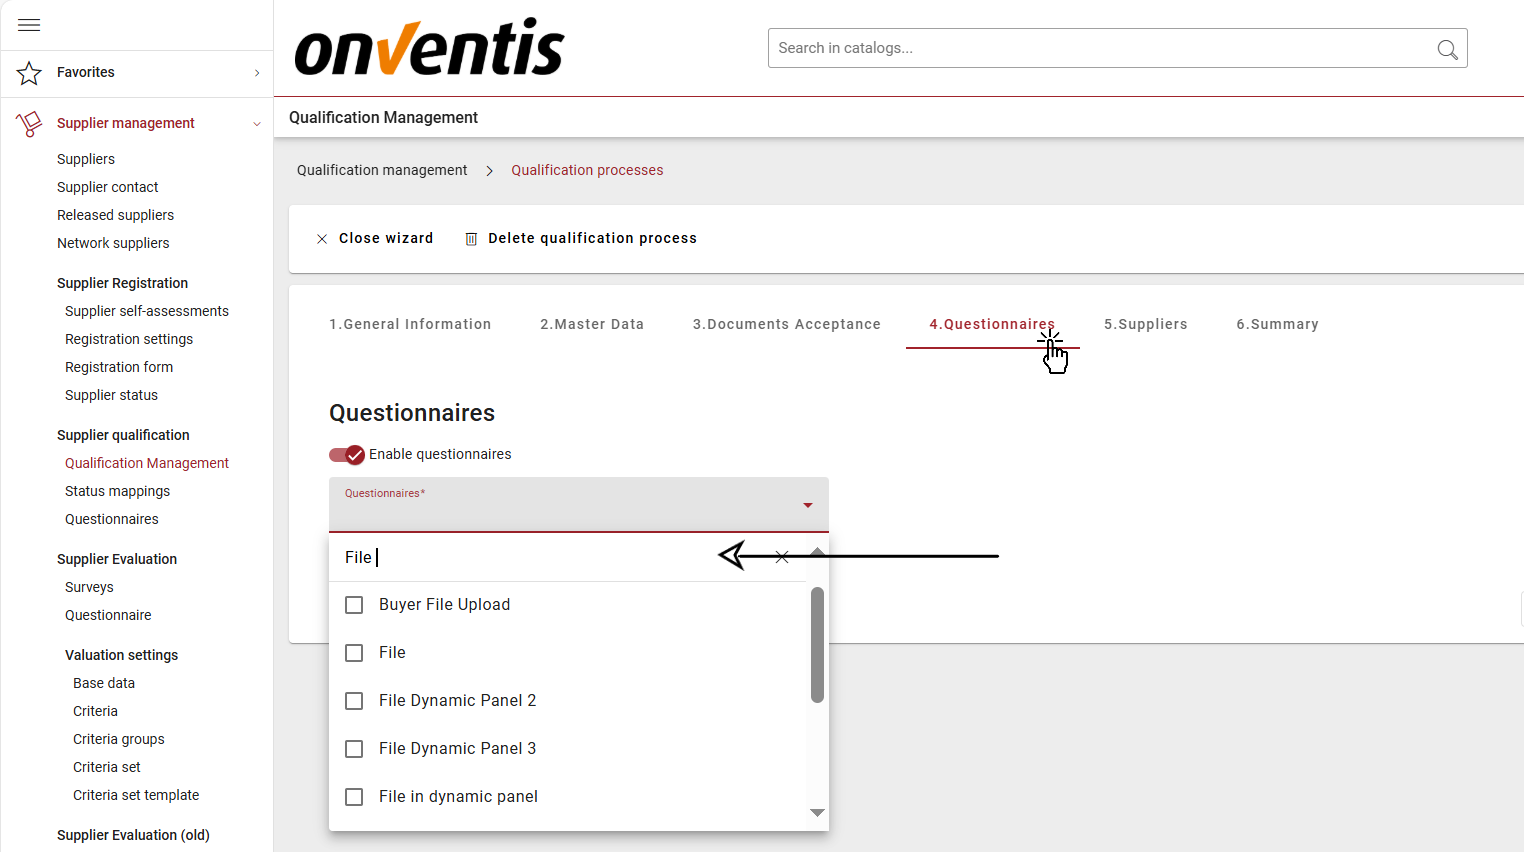
Search functionality while selecting questionnaires during configuring a qualification process
While configuring a qualification process, the users can configure different sections: Master data update, Document acceptance, and Questionnaires.
While configuring questionnaires, users can select which questionnaires needs to be sent to the suppliers. The users can also link the questionnaire to different material groups if needed.
With the new release, we have added a functionality to search the questionnaires via questionnaire title. This functionality is helpful when there are multiple questionnaires.
Industry Codes
Introduction of “Industry Codes” field
With this release, our customers will be able to maintain Industry Codes as a new field at supplier records. An industry code is a unique code that represents a specific industry. It is used to categorize and analyze suppliers and customers according to their to the focus of their economic activity. Sectors can be, for example, trade, banking, services, industry, healthcare, public services, media.
In SAP, the industry code or industry key is a classification feature that categorizes companies and organizations based on their industry or sector of activity. This helps to segment and analyze business partners, especially customers and suppliers.
Use of industry code
Segmentation: Industry codes are used to segment business partners and develop targeted marketing strategies or supplier management strategies.
Reporting: They enable detailed reporting and analysis to gain insight into business activities by industry.
Compliance: Some regulatory reporting may require industry classifications.
In SAP, there are several modules and tables in which industry codes can be used. Two of the most common areas are Customer Master Data and Vendor Master Data.
Changes in Onventis
The changes are reflected in Supplier Management including Supplier Interfaces. With following SAP ERP (ECC), it is allowed to assign one industry code per supplier in Onventis. An Industry code can only assigned on organizational level to a supplier. They cannot be assigned on organizational unit level.
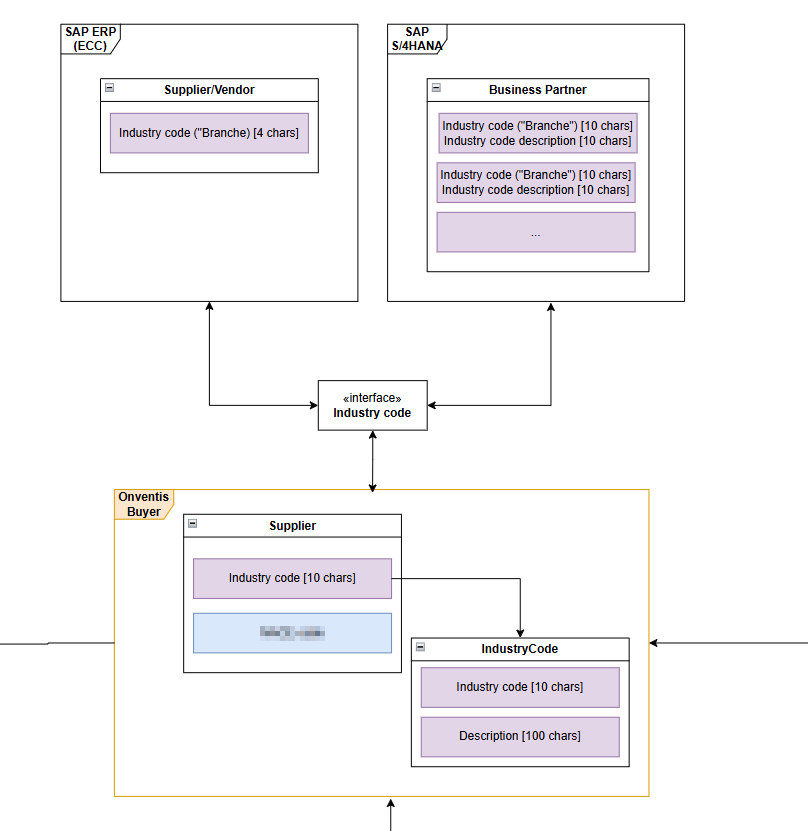
1:1 relationship between ERP supplier/business partner and the Onventis Supplier
Below you will find all the details of the changes that have been introduced.
01 Import and maintain Industry Codes per Onventis organization
The first step is to assign the the new access right “View Industry codes” to a user group. The access right can be found in the access right tree under Administration > Internal organization > Industry codes.
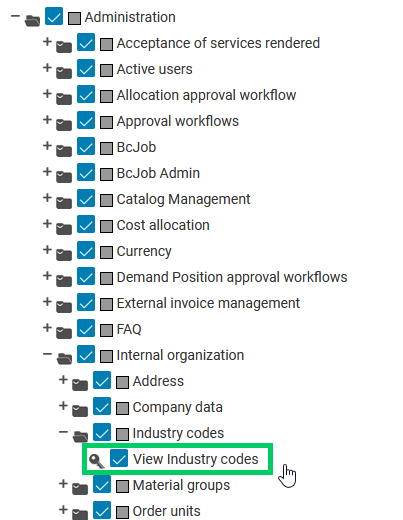
“View Industry codes” in the access right tree
A user with that access right will be able to see the new menu entry under Master data management > Master data > Industry codes.
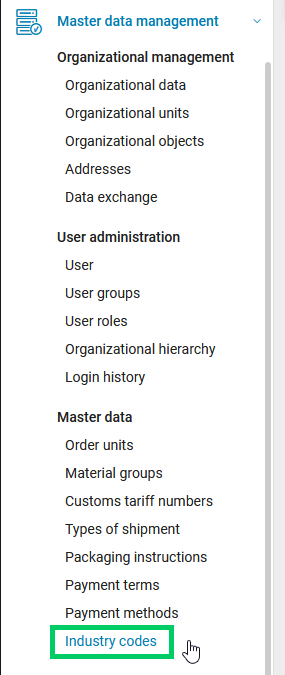
New menu entry “Industry codes”
By default the user will see an empty table.
02 Uploading a customized list of industry codes
You can find the new template to import a customized list of industry codes under Master data import templates : IndustryCode_Template
The template contains a column for the internal number, the IndustryCode (max. 10 characters) and the description text for different languages. For deleting an existing industry code you can set a “1” into the column “Deleted”.
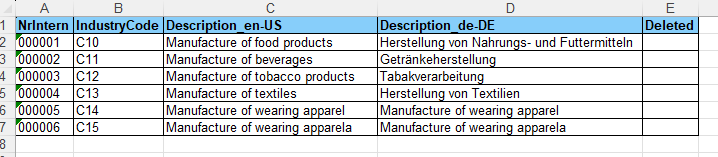
Industry code import template
To import the industry codes, follow that BcJob configuration:
Controller: | Import Controller |
Adapter: | IndustryCode Adapter |
Converter: | IndustryCode Converter |
Port: | Web Interface Input Port |
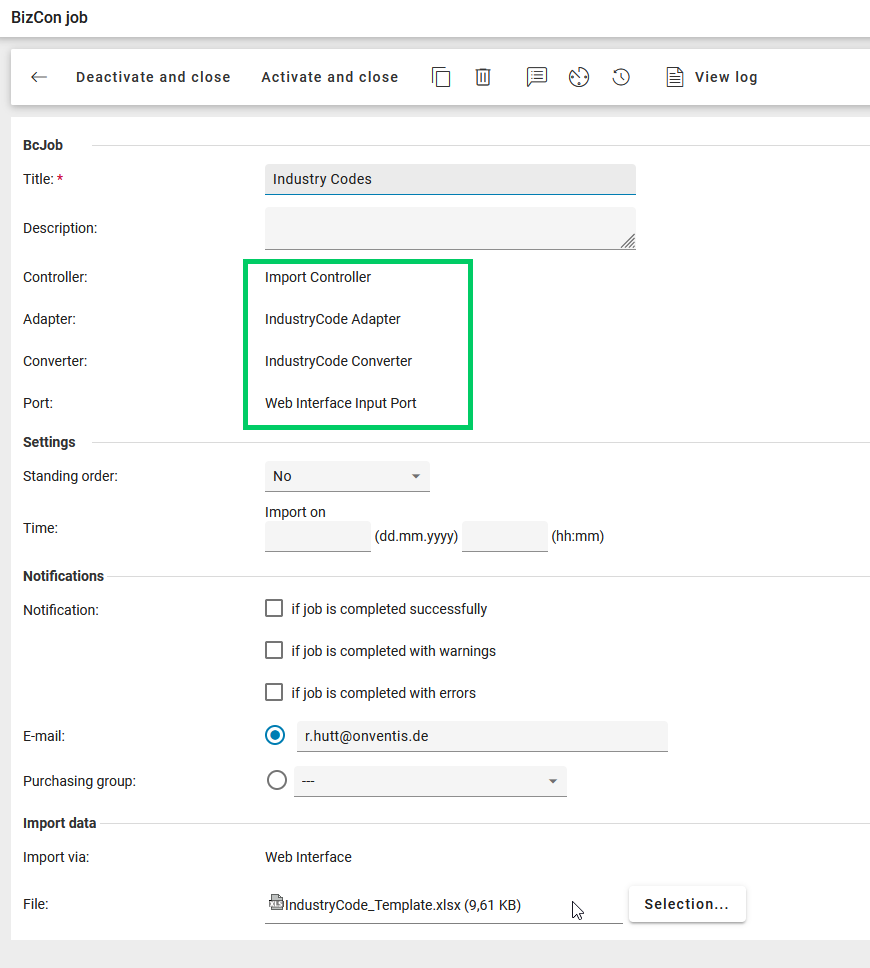
BcJob configuration for importing Industry codes
After importing the list, you will see the Industry codes in the table view in Master Data Management.
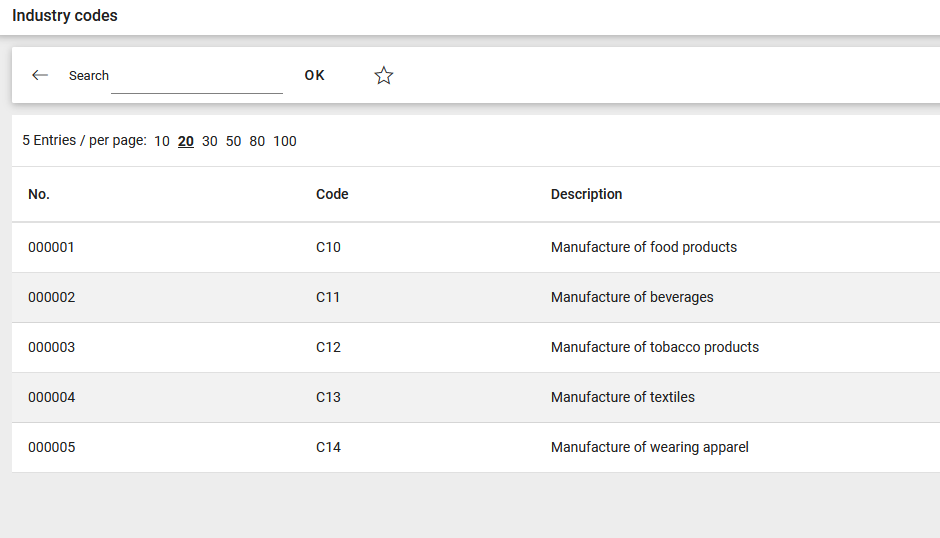
Industry code table view showing imported values
03 Organizational Setting to display Industry Codes at Supplier records
To be able to assign an Industry code to a supplier, either manually via the UI or via Supplier Import Jobs, you need to activate a new setting.
You can find this setting under Configuration > Organization settings > Tab: General > Section: Suppliers > Settings. Activate the checkbox to “Show industry codes in supplier management”.
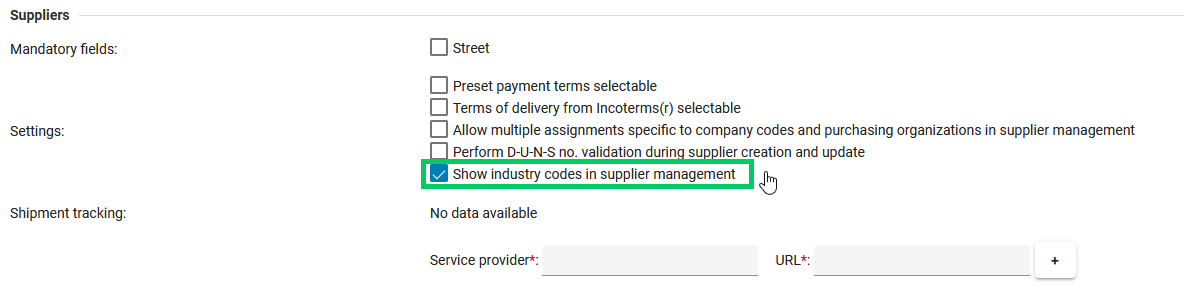
Select the organizational setting to show Industry codes per supplier
04 Assign Industry Codes to suppliers and Supplier work items
When you have imported Industry codes and activated the necessary organizational setting you will find the new field shown at all suppliers under the tab “Basic information”. Here you can assign one Industry code to one supplier manually or see imported assignments. No Industry code is assigned in the default setting (---).
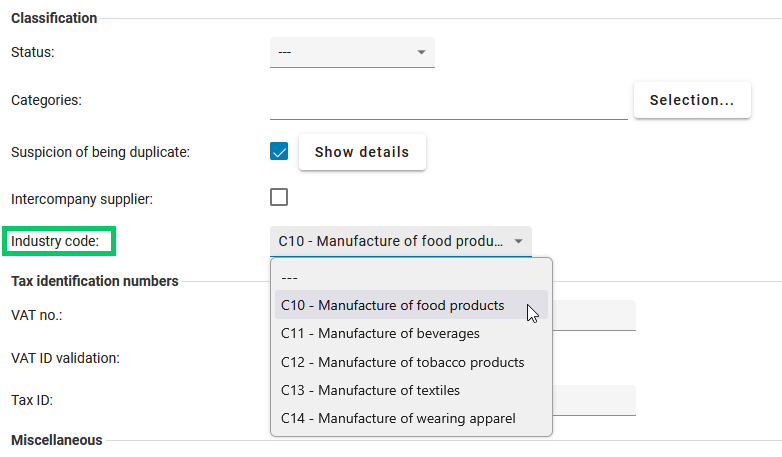
Assigning an industry code manually to a supplier
Supplier changes for Industry codes will be logged within supplier work items. Also the the approval workflow for supplier updates is triggered, in case the data update for “Classification” is activated in the workflow configuration.
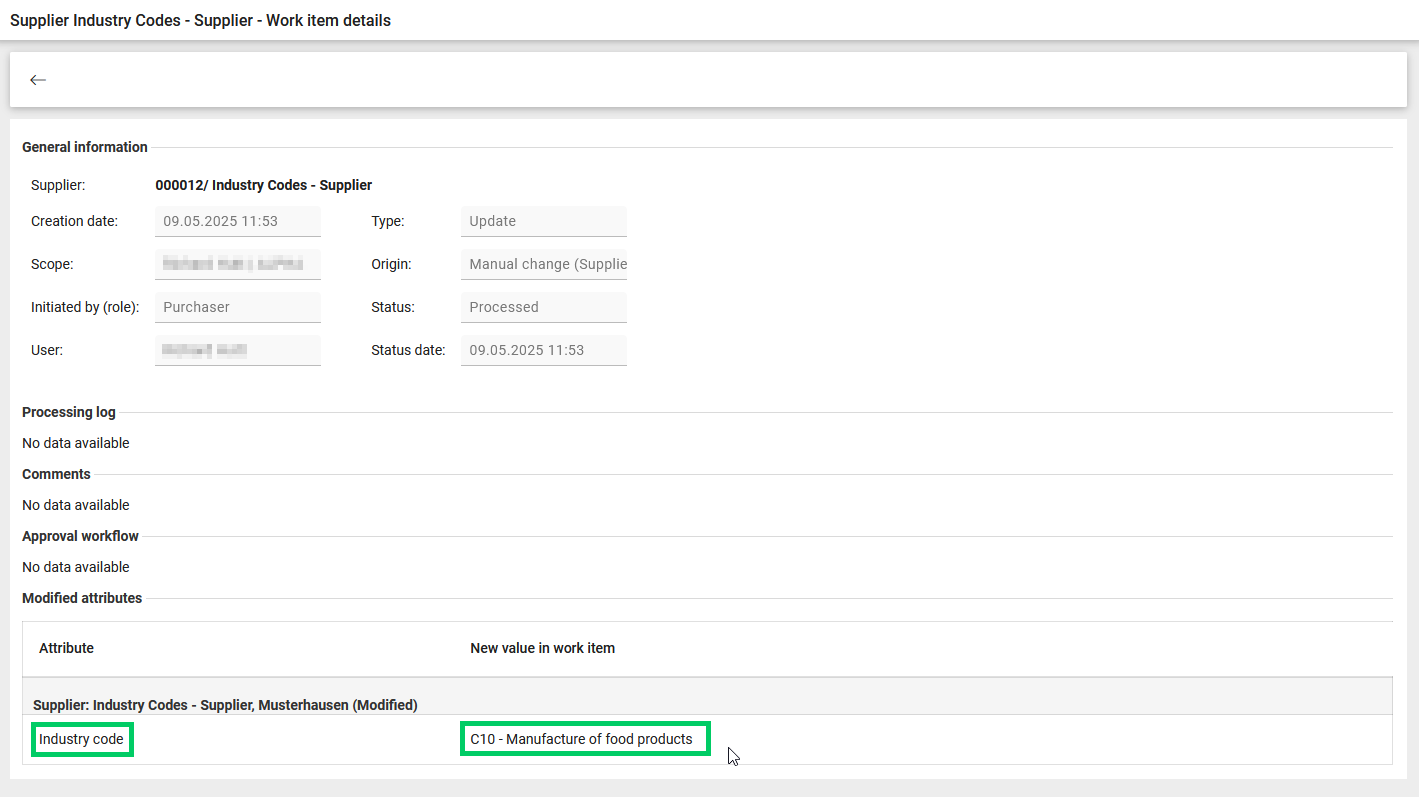
Supplier work item log for Industry code assignment
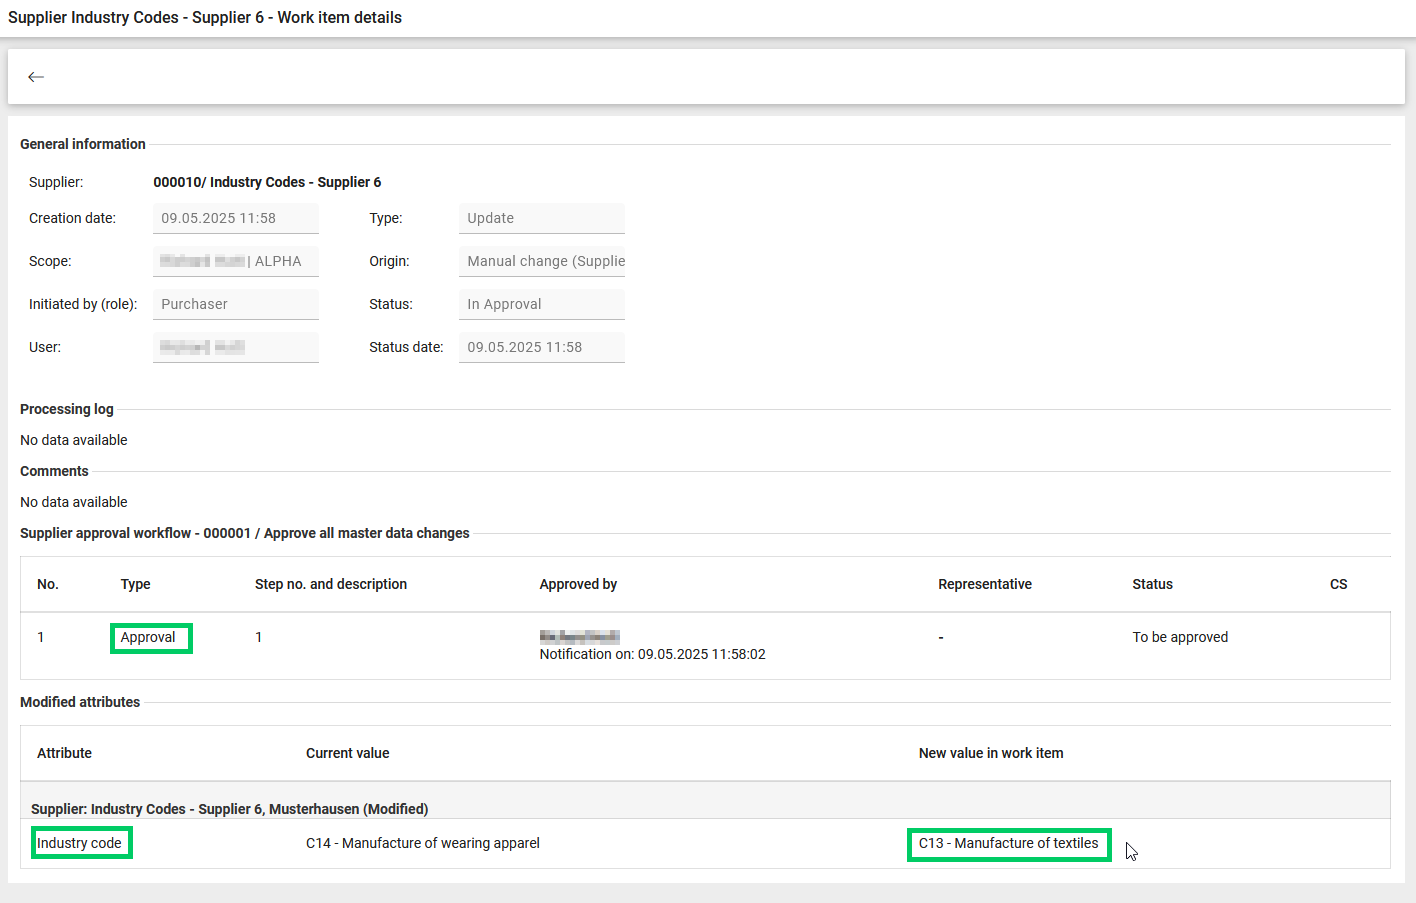
Supplier work item with approval workflow step when changing the industry code assignment
05 Import and Export Industry Codes with your Suppliers
We support to exchange the Industry codes via:
Supplier Excel/CSV Import
Find the updated template under: Master data import templates for SAP and non-SAP organizations. Tab “Supplier”.
It is an optional, alphanumeric field with max. 10 characters. It must contain the name of an existing industry code. And the function “Show industry codes in supplier management” must be activated in the “Organization settings”, “General” tab, “Suppliers” area. Only one industry code can be assigned per supplier.
Supplier Excel Import Template
Supplier Excel Export
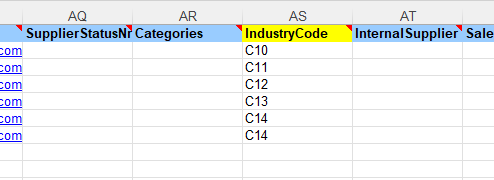
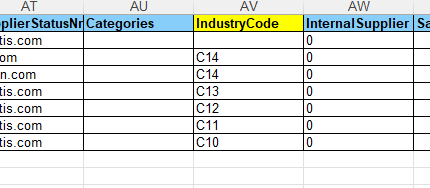
Within the Supplier Excel Export you will find an assigned industry code in the column AV per supplier.
SAP interface (Export/Import)
Export <IfIndustryCode> via /ONV/BP_CREATE & /ONV/VENDOR_MAINTAIN
There is a new parameter Export_IndustryCode” with default value “false”. If the parameter is set to “true”, the XML node <IfIndustryCode> is added to the structure (line 17). The node is transferred if a value is set in the GUI <IfIndustryCode>XYZ</IfIndustryCode>. The node is transferred if no value is set in the GUI <IfIndustryCode/>.
<?xml version="1.0" encoding="utf-8"?>
<soapenv:Envelope xmlns:soapenv="http://schemas.xmlsoap.org/soap/envelope/">
  <soapenv:Header />
  <soapenv:Body>
    <urn:_-onv_-bpCreate xmlns:urn="urn:sap-com:document:sap:soap:functions:mc-style">
      <CfLifnr>0001001232</CfLifnr>
      <IfDuns>DunsNumber</IfDuns>
      <IfKtokk>SUPL</IfKtokk>
      <IfName1>Vollausprägung 14.03.2025</IfName1>
      <IfName2>Zusatz1</IfName2>
      <IfOnvIdentification>ONV</IfOnvIdentification>
      <IfRegistergericht>CommercialCourt</IfRegistergericht>
      <IfRegisternummer>DistrictCourt</IfRegisternummer>
      <IfSort1>Vollausprägung 14.03</IfSort1>
      <IfStceg>DE123456781</IfStceg>
      <IfStenr>1234567891</IfStenr>
      <IfIndustryCode>XYZ</IfIndustryCode>
      <IfSperr>X</IfSperr>
      ...
    </urn:_-onv_-bpCreate>
  </soapenv:Body>
</soapenv:Envelope>
Import <BRSCH> via /ONV/CREMAS05 with ImportXslResource: SAP/ONVENTIS/ZCREMAS05_IN_SAPSupplier.xsl
Field description:
Field Onventis | DB-Field Onventis | XML Segment | XML | Type (SAP) |
|---|---|---|---|---|
IndustryCode | IndustryCode; L: 10 | E1LFA1M | BRSCH | char10 |
XML interface Enterprise structure (Import/Export)
Export <IndustryCode> via Supplier Enterprise Structure; ExportXslResource: EnterpriseStructure/XSL_OUT_Supplier.xsl
Example (line 12):
<?xml version="1.0" encoding="utf-8"?>
<Supplier>
        ...
		<Classification>
			<Status>
				<NrIntern>00a</NrIntern>
				<Title>00a - Neuanlage für Forms-Prozess</Title>
			</Status>
			<Category/>
			<DuplicateSuspect>1</DuplicateSuspect>
			<InternalSupplier>0</InternalSupplier>
			<IndustryCode>0101</IndustryCode>
		</Classification>
        ...
</Supplier>
Field description:
Field Onventis | DB-Field Onventis | XML Segment | XML | Type (SAP) |
|---|---|---|---|---|
IndustryCode | IndustryCode; L: 10 | Classification | IndustryCode | char10 |
Import <IndustryCode> via Supplier Enterprise Structure; ImportXslResource: EnterpriseStructure/SQL_Supplier.xml
Example (line 12):
<?xml version="1.0" encoding="utf-8"?>
<Supplier>
        ...
		<Classification>
			<Status>
				<NrIntern>00a</NrIntern>
				<Title>00a - Neuanlage für Forms-Prozess</Title>
			</Status>
			<Category/>
			<DuplicateSuspect>1</DuplicateSuspect>
			<InternalSupplier>0</InternalSupplier>
			<IndustryCode>0101</IndustryCode>
		</Classification>
        ...
</Supplier>
Field description:
Field Onventis | DB-Field Onventis | XML Segment | XML | Type (SAP) |
|---|---|---|---|---|
IndustryCode | IndustryCode; L: 10 | Classification | IndustryCode | char10 |
Supplier Evaluation
With this release two bugs were fixed for the module Supplier Evaluation:
Fix 1: Supplier evaluation surveys containing third party criteria calculated wrong results for that specific criterion in case the supplier evaluation was ended automatically by the system at the defined end date of the survey. The workaround was to reopen the evaluation survey cycle and end it manually as coordinator user of that survey. This behaviour is fixed with this release. The correct results are calculated now by the system also for the case the evaluation survey is ended automatically by the system.
Fix 2: Within the configuration for performance achievement score in hard fact criteria (Quantity compliance and Delivery date compliance) an error message appeared also in case the the score correctly. It showed the error message that the “Values must be consistent”. This issue is fixed, so that the performance achievement scores can be saved again without any error message.