Catalogues and articles
Under Master Data Management → Catalog Management → Catalogs you can see all available catalogs as an Onventis administrator.
You can search for items within catalogs and transfer the items to an order or the shopping cart, for example. In Catalog Management, you can create, edit, and delete new catalogs, catalog directories, categories, and articles.
Hint Catalogs that are administered by the supplier and have been uploaded to Onventis can only be viewed if the supplier has assigned them to you in the catalog view and customer management. These settings can only be made in the supplier’s account. |
Creation of catalog categories
Catalog categories allow you to group a vendor’s catalogs by item category.
In contrast to a catalog directory, in which the catalogs of several suppliers can be created below a directory, the articles of only one supplier can be combined into one category within a category.
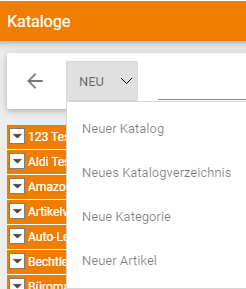
To create a catalog category, you must select the desired catalog.
You can then create a new catalog category using the drop-down menu via the
New category
Create button.
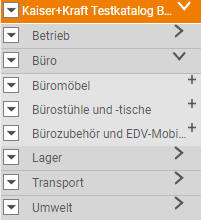
Within a catalog category, you can create multiple subcategories and refine the grouping of catalogs.
The illustration shows an example of the category “Stationery” with the subcategories “Letter tray”, “Hole punch” and “Waste paper basket”.
For more information on creating and maintaining categories, please refer to the chapter Creating and Editing Catalogs and Categories.
Creation of catalog directories
Catalog directories allow you to group catalogs from multiple suppliers by topic, for example.
In contrast to a catalog category, which can only be created below a catalog, the catalogs of several suppliers can be combined in subdirectories.
You can create a new catalog directory under Master Data Management → Catalog Management → Catalogs .
Create catalog directory
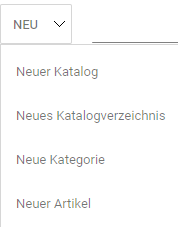
To create a new catalog directory, select the New Catalog Directory button from the Catalogs drop-down menu and fill in the appropriate fields.
The following fields are available for creating catalog directories:
Input language: Selection of the language in which the catalog directory is to be entered and displayed.
No.: Catalog Directory Number. If you leave this field blank, Onventis will automatically generate a number.
Title: Title for the catalogue index. This field is mandatory and must be filled in.
Description: optional, more detailed description for the catalog directory.
Catalog directory: if you have already created catalog directories, they will be displayed in the drop-down menu for selection. Within a catalog directory, you can create several subdirectories and refine the grouping.
Picture: You have the possibility to upload a picture to the catalogue directory.
Settings area
Display rank: with the help of the rank, the order for the display of the catalog directories can be defined. Directories with the same display rank are automatically sorted by the system in alphabetical order.
If catalogs are assigned to a catalog directory at the vendor, the catalog directories are also displayed for customers to whom the included catalogs were assigned in the catalog view.
If these catalogs are assigned to a different catalog directory at the customer, the previous directory is no longer displayed.
Create and edit catalog and categories
In the area Master Data Management → Catalog Management → Catalogs you have the possibility to create, edit and delete new catalogs, categories, articles and conditions.
You have the following options for managing catalogs in Onventis:
New creation: Using the drop-down menu and the New selection, you can create new catalogs, catalog directories, categories and articles. To create categories and articles, you must first select the catalog by clicking on it.
Edit: You can edit catalogs and categories by clicking the arrow icon on the catalog or category. You have the option to change and delete the record.

Edit article: you can edit an article by selecting it. For detailed information on editing articles and storing conditions, see Articles and Article Settings.
Creation of a new catalog
You can create a new catalog using the drop-down menu and selecting New Catalog.
The following fields are available for catalog creation:
Input language: Selection of the language in which the catalog is entered and displayed.
No.: Catalogue number, automatically generated by Onventis.
Import no.: you can either enter the import number manually or import it via a catalog import. The import number is an identification number from an external system that identifies the root category of this catalog.
Title: Allocation of a catalogue title.
Description: Enter a catalog description.
Image: the selection button can be used to upload an image to the catalog in Onventis.
Display rank: with the help of the rank, the order for the display of the catalogs in the catalog directory can be determined. Catalogs with the same display rank are automatically sorted by Onventis in alphabetical order.
Catalog directory: if you have created a catalog directory, you can assign the new catalog to this directory by selecting the catalog directory.
Only articles with valid conditions can be ordered: if this checkbox is activated, articles for which the conditions are no longer valid cannot be ordered.
Highlight category: this option will highlight this category / catalog in bold in the catalog directory.
Available quantity in article: if this checkbox is activated, the quantity still available for individual articles can be administered and displayed in the catalogue. The quantities still available can only be maintained by manual entry.
Execute external service for article price query: if this checkbox is activated, the conditions (price and availability) for all articles from this catalog will be queried via web service in a third party system. The conditions in the catalog are then updated and overwritten with the current price.
This update/price query takes place in the search, in the shopping cart, when sending goods from the shopping cart and when placing orders.
eClass-No.: Assignment of the catalog to an eClass-No. If an eClass no. is entered, this is automatically preset for purchase orders.
UNSPSC: Assignment of the catalog to an UNSPSC. If an UNSPSC is entered, this is automatically preassigned for orders. The UNSPSC (United Nations Standard Products and Services Code) is an internationally used classification system for merchandise management. The UNSPSC system is used in e-procurement, especially in the US, for the cross-company classification of goods and services of all kinds.
ProfiClass-No.: Assignment of the catalogue to a ProfiClass-No. If a ProfiClass No. is entered, this is automatically preset for purchase orders.
Material group: Assignment of the catalog to a material group. If a material group is entered, this is automatically preset for purchase orders.
If you define a material group on catalogue level or in a category within a catalogue, this material group will be defined for all articles within this catalogue or this category branch. This only applies to catalogs and categories to which no material group has been assigned. The check is always carried out in ascending order, that is, a material group stored directly on the article always has priority. Then the category tree and finally the catalog are checked and the material group stored here is drawn in each case. |
Cost element: Assignment of the catalog to a cost element. If a cost element is entered, it is automatically preset for purchase orders.
With the Save and Close button the changes are saved and the newly created catalog is visible in the catalog list.
Below the catalog, new, additional catalogs, catalog directories, categories or articles can be created. To do this, the desired catalog must be selected by clicking on it.
Using the selection in the drop-down menu, a new catalog, a new catalog directory, a new category or a new article can be created in the selected catalog.
Create article
Once you have created a catalog in Onventis, you can create new items as well as modify existing items and their settings.
You can create new articles under Master Data Management → Catalog Management → Catalogs.
To add an item to a catalog or category, first select the desired catalog or category. You can then select the New Article buttonfrom the drop-down menu and create a new article.
Create article – Article tab
In the Article tab, you can create and maintain all important information about the article.
Input language: Selection of the language in which the article is to be entered and displayed.
Article type: via the article type you can define whether the article can only be ordered in a service order or in all order types. To do this, you can make the selection using the drop-down menu:
Service type: Articles can be created as service items in catalog management. Using an Excel import, an article is created as a service article using the ArticleType field with the value 1. To create a service article, the article category “Service” is selected when creating the article. The article is thus created as a service item and is transferred as such to the ordering process.
Type –: no selection. The article can be ordered in all orders.
Part number range
Internal article number: here you can assign an own number to the article. This number is not visible to the vendor when a purchase order is placed with the vendor.
Import article number: Article number that was imported via the BC job.
Supplier article number: This number can only be created or changed by the catalog owner. It is entered in a purchase order with the supplier as the article number. displayed.
Manufacturer No.: Enter the manufacturer article number.
Hinweis Not all numbers need to be maintained. In the catalog search, only one article number is displayed at a time. If all four, only three, only two or one number(s) are maintained, the display sequence is as follows:
|
EAN/GTIN: global article number. This is usually printed as a machine-readable barcode on the goods packaging and can be decoded by barcode scanners.
eClass No.: the eClass number for the item. “eClass” is a cross-industry product data standard for the classification and description of products and services
UNSPSC No.: the UNSPSC number for the article. The UNSPSC (United Nations Standard Products and Services Code) is an internationally used classification system for merchandise management. The UNSPSC system is used in e-procurement, especially in the US, for the cross-company classification of goods and services of all kinds.
Further article number(s): Further article numbers can be maintained.
Hint In order to perform the number search, the database must be indexed. This is usually done at night, as extensive processes have to be carried out. This means that the search for the numbers or the article description is usually possible the next day. |
Article area
Title: Name of the article
Description: in the description further article information can be maintained
Manufacturer name: the name of the manufacturer for the article
Search terms: in this mask you can define under which search term (so-called “keywords”) the article should be displayed. Keywords are terms that are usually searched for when a product is to be found, e.g. “ink cartridge”, “printer cartridge”, “cartridge”, “ink” etc.
VATdue: selecting this checkbox specifies that VAT is due on this item. In the order item the value added tax is then a mandatory field
Checkbox “transfer free position”: if this checkbox is activated, the article can be ordered with 0,- Euro and transferred to your ERP system as a free position.
Article image: via the selection button, an image can be imported to the article and then displayed in the catalog. Alternatively, the article images can also be imported using a template via the BC job (for detailed information on BC jobs, see Importing Master Data).
Customs data area
Customs tariff number: the customs tariff number for the article. The customs tariff number is used, according to the Harmonized System, to describe and code the goods.
Country of origin: the country of origin of the article must be indicated in the 2-digit ISO code according to ISO 3166, column ALPHA-2 (e.g. AT for Austria).
Weight: the weight of the article
Checkbox “Customs declarable”: if this checkbox is active, the article will be defined as customs declarable. It is then mandatory to include a customs tariff number and the country of origin in the item with this article in the order.
Area Purchasing KPIs in purchase orders
You can also define five KPI criteria for each article:
Savings type
Award category
Reason for price increase
Comparison price (in order currency)
Price increase (in order currency)
The visibility of the KPI fields can be activated under Master data → Own settings → Orders → Block “Order item”. The KPIs can only be used in purchase orders (direct creation of purchase orders with catalog items and/or free text items or creation of purchase orders via the shopping cart). The KPIs cannot be transferred from inquiry items to purchase order items and from purchase order items to invoice items. The KPI criteria are created either by import or manually in the purchase order item. Default values can be defined for the KPI criteria so that they are already filled in when a new order item is created. The KPIs are optional. For catalog items, editing of KPIs is only possible in the shopping cart. After transfer to the order item, the KPI fields are read-only. The evaluation of the purchasing KPIs takes place via Smart Report.
Other area
Unit of measure: here you can maintain an order unit, e.g. “1 bag with 10 screws”: in this case, the customer can only order in bags as a unit of measure.
Property group: if available, the properties of the item are displayed here and can be selected via a drop-down menu.
Article group(s): Article groups can be used to assign special conditions to several articles at the same time. Each article can be assigned to a specific article group. Special conditions can then be stored in article groups for each catalog and assigned to the customer. In the article group conditions, it is possible to define surcharges and discounts.
Material group: an article can be assigned to a material group. This is then automatically preassigned for all documents. This means that the user does not have to select the material group manually, for example, for purchase orders.
Cost type/general ledger account: the article can be assigned to a cost type or a general ledger account. This (these) is then automatically preset for all documents. This means that the user does not have to select the cost element or G/L account manually, for example, for purchase orders.
Task: the article can be assigned to a task. This is then automatically preset for all documents. This means that the user does not have to select the task manually, e.g. for orders.
Inventory-managed: if this checkbox is activated, the article will be marked as an “inventory-managed article”. With an ERP connection, a warehouse receipt would be posted when an order is placed. For an article to be marked as an “inventory-managed article”, a material number must exist.
Test tool: if this checkbox is activated, the article is marked as a test tool.
Special article: if this checkbox is activated, the article is marked as a special article.
Core assortment: if this checkbox is activated, the article is marked as belonging to the core assortment. A core assortment can only be created using a BC job import.
Lock article: if this checkbox is activated, this article is marked as “locked article” and can no longer be ordered.
Attachments area
Data sheets: via the selection, file attachments, such as drawings, can be added to the article.
Logos: a logo can be assigned to the article via the selection.
Pictograms: a picture can be attached to the article via the selection.
Other attachments: documents can be attached to the article via the selection.
Create article – Conditions tab
In the Conditions tab, the condition information for the respective article is displayed, if available. The conditions are usually loaded via a catalog import. You can also maintain the conditions manually.
You can create new conditions using the New Condition button in the Conditions tab.
Hint It is possible to create one or more conditions per article. |
Category: describes the condition category and determines whether it is a sales or purchasing condition.
Organizational unit: Assignment of the condition to an organizational unit.
Remarks: internal remarks are displayed here. If the condition was imported by BC job, the remarks will say “Import”.
Name: The name of the vendor to which the condition is assigned.
Valid from – Valid to: describes the period, from date to date, for which the condition is valid.
Creation date: Information on which day (date) the condition was entered.
Status: two states can be distinguished:
In recording: the condition has been recorded and saved, but not yet released. This condition is not visible to the user in the catalog.
Released: the condition has been released and is available in the relevant catalog and article.
Create new condition
Category: describes the condition category and determines whether it is a sales or purchasing condition.
Outline agreement: if an outline agreement exists for this article, the condition can be marked as an outline agreement by activating this checkbox. In the case of an outline agreement created in Onventis, the ordered quantity is deducted accordingly from the outline agreement quantity when the order is placed.
Status: provides information on whether this condition is “In entry” or whether it has been “Released”. The condition is determined by the release button is released and the status is adjusted accordingly.
Internal remarks: internal remarks can be stored for the article; these are then visible for the users
External remarks: external remarks can be stored for the article; these are visible for users as well as for external partners, e.g. suppliers.
Organizational unit: the condition can be assigned to one or more organizational units within the company.
Vendor: Depending on the selected condition category, it is possible to select a customer or a customer group or a vendor for which this condition is valid.
Currency: Defines the currency in which the specified prices apply. For example, if EUR is selected here and the item is added to an order with the base currency GBP, the price will automatically be converted to GBP.
VAT: Entry of the applicable value added tax for the item in percent.
Price unit: Indication of the quantity to which the prices refer.
Order interval: Specification of the quantity by which the total quantity of an order for this article must be divisible. Example: the order interval is 20 pieces, then the orderer can only order an order quantity that is divisible by 20, e.g. 20, 40, 60 etc.
Minimum order quantity: The minimum order quantity is the smallest purchase quantity. This minimum order quantity is automatically entered for an order and shopping cart item.
Available quantity: for inventory-managed material, the quantity still available is displayed here.
Availability: The availability of an item can have four different statuses: “Not managed”, “Available”, “Conditionally available” and “Not available”. Availability is displayed in the catalog in the form of a traffic light and is managed by the catalog owner.
Delivery time: If a delivery time is stored in day(s), the delivery date is automatically calculated in an order and shopping cart item.
Validity: Entry of a period for which this condition is valid. After the expiration of the validity, the article can no longer be ordered.
Condition may be changed in the shopping cart: if this checkbox is activated, it is determined that the article condition can be overwritten by the user in the shopping cart.
Price: at least the price per price unit must be stored.
Other prices: Maintenance of other prices which apply to other quantities, e.g. graduated prices. The prices always refer to the indicated price unit.
After you have entered all the data, you can end the condition by clicking on Save and Close or you can release the condition immediately by clicking on the Release button.
Hint Only released conditions are visible in the catalog articles. |
Create article – Properties tab
Properties are characteristics of an article, e.g. ballpoint pen with the property color = red or monitor with the property = 19 inch.
In the Properties tab, you can see the properties of the article, if available. The properties can be created with the help of the import template.
You can download the import templates under the following link Excel Templates for Catalog Data Import.
Marking of dangerous goods
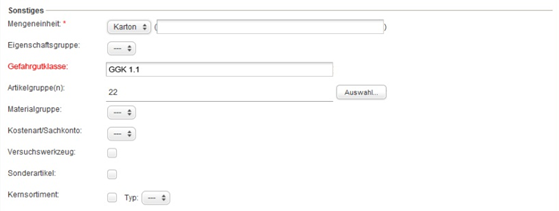
In the catalogs you have the possibility to mark dangerous goods articles. You can use this indicator to release ordered dangerous goods articles, for example, using an order approval workflow.
The Dangerous goods class field can be displayed and filled by importing data:
BMEcat
Field: SPECIAL_TREATMENT_CLASS
Excel import
Field: SpecialTreatmentClass
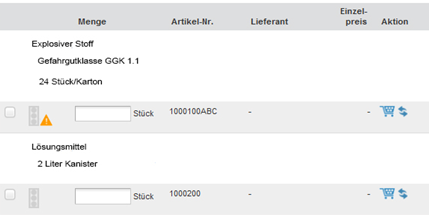
If the field is filled, it is displayed in Onventis and marked in the documents, e.g. in the item view, in the sales order (order) or the delivery note (PDF view):
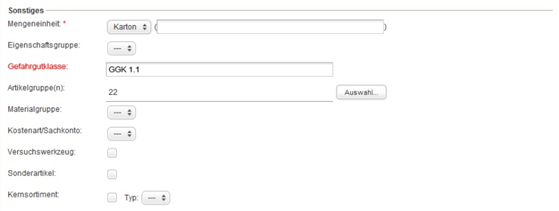

An article marked as “dangerous goods” is additionally highlighted by a special symbol in the article view:
Create additional fields in catalog articles
In the tab Additional fields you have the possibility to add freely definable fields to an article and to display them as forms. The defined additional fields are filled in the shopping cart per item. When an order is placed, the data is transmitted to the supplier.
You can create a new additional field using the New additional field button.
Rank: The rank is a mandatory field and must be entered. You can use the rank to specify the order of the additional fields.
Title: Title of the additional field; is displayed with the catalog items.
Heading: Heading for the additional field. The heading is displayed above the additional field.
Field property: By activating the checkbox “Mandatory field” you can define the field as a mandatory entry.
Define field types within the additional fields
Text: with the field type Text you can create an additional field as a text field.
Number: with the field type Number you can create an additional field as a number field.
Date: with the field type Date you can create an additional field as a date field.
Selection as dropdown menu: with the field type Dropdown menu you can create an additional field as a selection field with predefined values. In a dropdown menu, only one value can be selected per item at a time.
Selection as checkbox: with the field type Checkbox you can create an additional field as a checkbox with predefined values. In the case of a checkbox, there is the possibility of multiple selection.
Field group: you can create a field group with the field type Field group.
Blank line: you can create blank lines with the field type Blank line.
Unit text: in the Unit text field you can specify a unit (e.g. unit of quantity, currency or time) for the response field. The unit is displayed behind the answer field
Number of text lines: in the field Number of text lines you can define the number of text lines for the selected field type
Length of text lines: in the field Length of text lines you can define the number of characters within a text line for the selected field type.
