
Onventis 2024.1
The new Onventis 2024.1 release contains various enhancements, improvements, and bug fixes. Check out the complete list below!
Beta-Release date: Friday, December 22, 2023
Release date: Tuesday, January 9, 2024
Qualify all your Supplier from now on fully automated!
Onventis sees Supplier Management as one of the most important and differentiating areas in Source to Pay software. Due to this emerging importance Onventis re-invents it’s entire Supplier Lifecycle Management and implement it on a modern and highly scalable microservices architecture.
The first step was the implementation of the new Qualification Process, followed by a new Questionnaire service that allows flexible modelling of questions and a modern UX. With the 2023.7 and 2023.8 release we have added scoring, weighting and KO criteria to the questionnaire creation using the new Questionnaire service.
From this release our Onventis All-in-One Procurement Platform provide our customers the ability to automate the entire Supplier Qualification process by using objective internal assessments without any human involvement to empower sustainable supplier collaboration.
In addition, we would like to mention that future releases will add much more value for our customers regarding improving our Supplier Lifecycle Management capabilities. New functionality and configuration features will be added incrementally to our releases.
The main areas for improvement for the 2024.1 release are:
- Automating supplier qualification as much as possible, including:
- Auto-Start
- Automatically initiating qualification requests based on Supplier Status.
- Auto-Scope
- Automatically defining the qualification request scope using scope rules.
- Auto-Assessment
- Automatically assessing all scores including weighting from questionnaires.
- Auto-Start
- All Automation “rules” can be configured by the customer itself in the so-called rulebook to boost flexibility and self-maintenance by the customer.
- Use a self-defined template for general configuration that is used for each new qualification request sent to a supplier.
The 3 main drivers for this new development are:
- Automation
- Empowering supplier collaboration
- Objective assessments

How to take advantage of this new functionality can be read in the Qualification Management section of the Supplier Management domain in this release notes.
Supplier Management
To make all this new functionality available to our customers, we built several new screens and added a menu item. The new menu item is called: Qualification management.
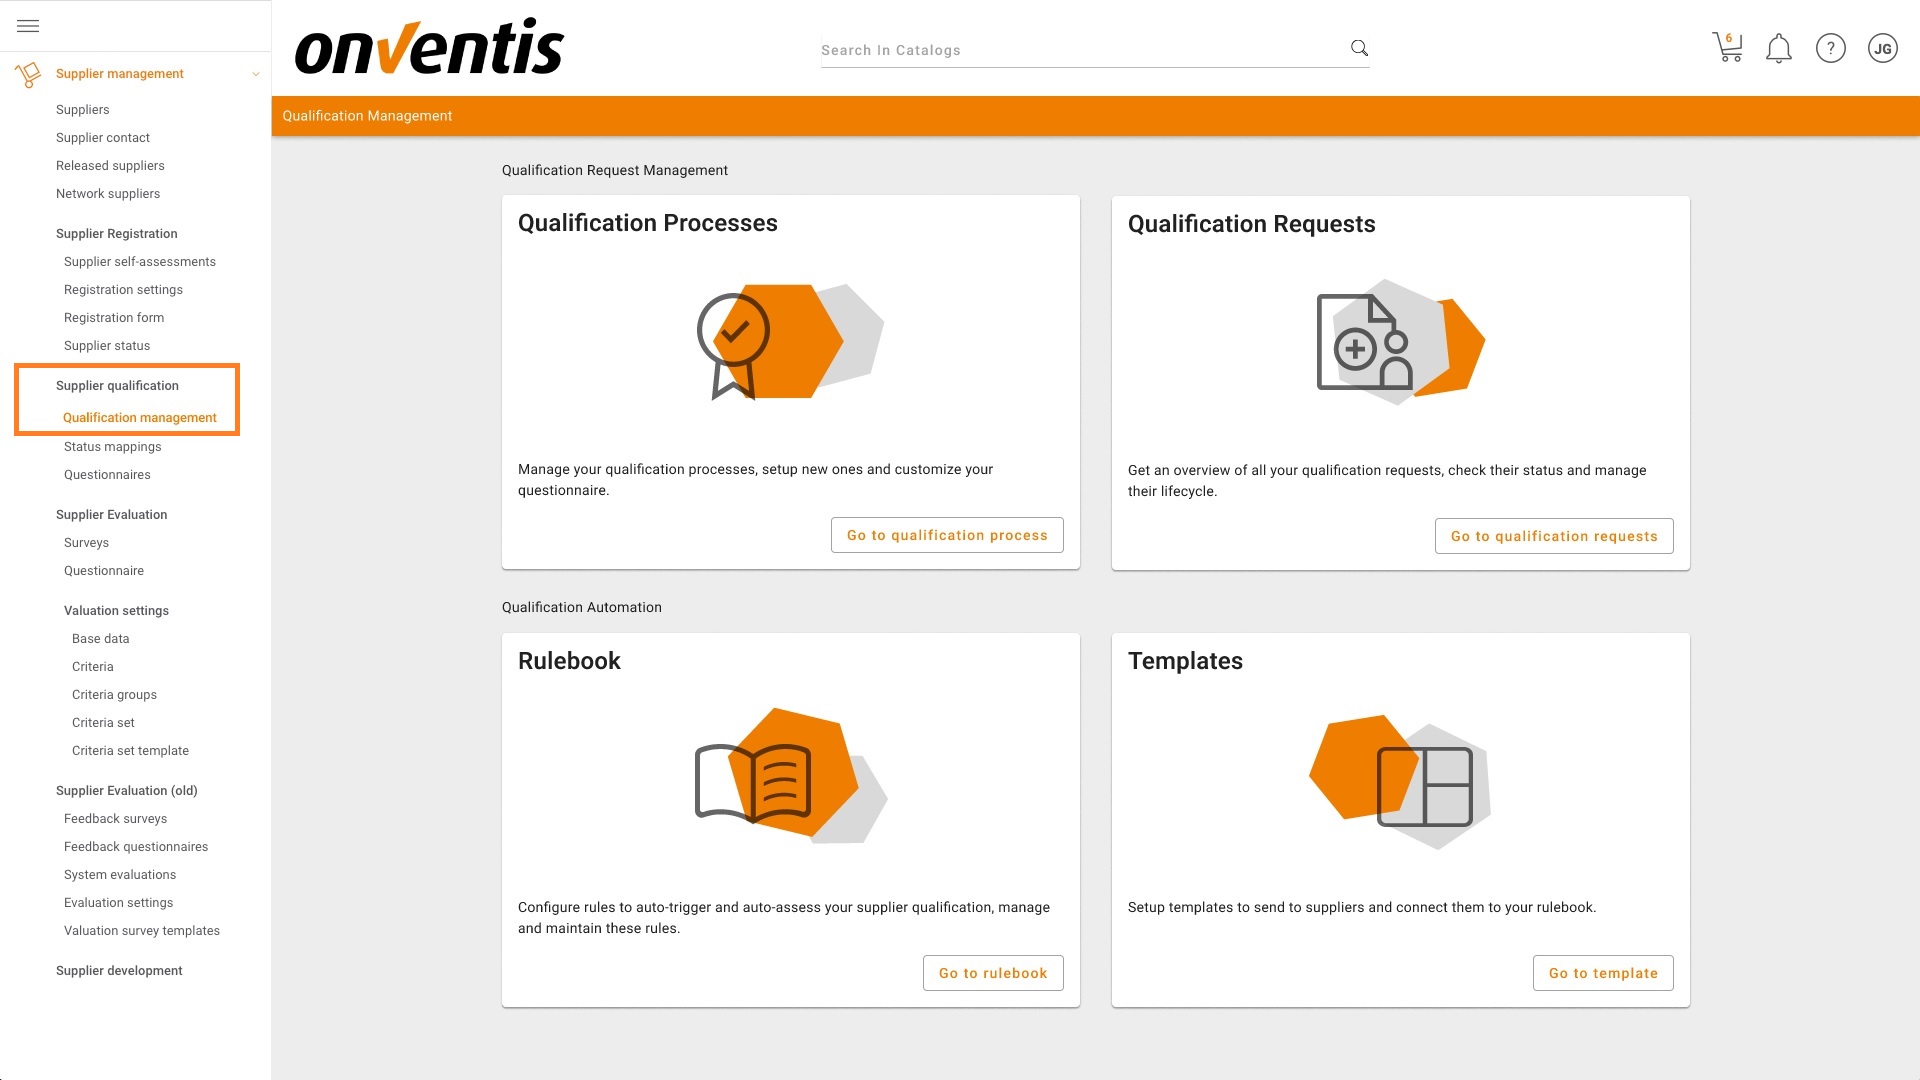
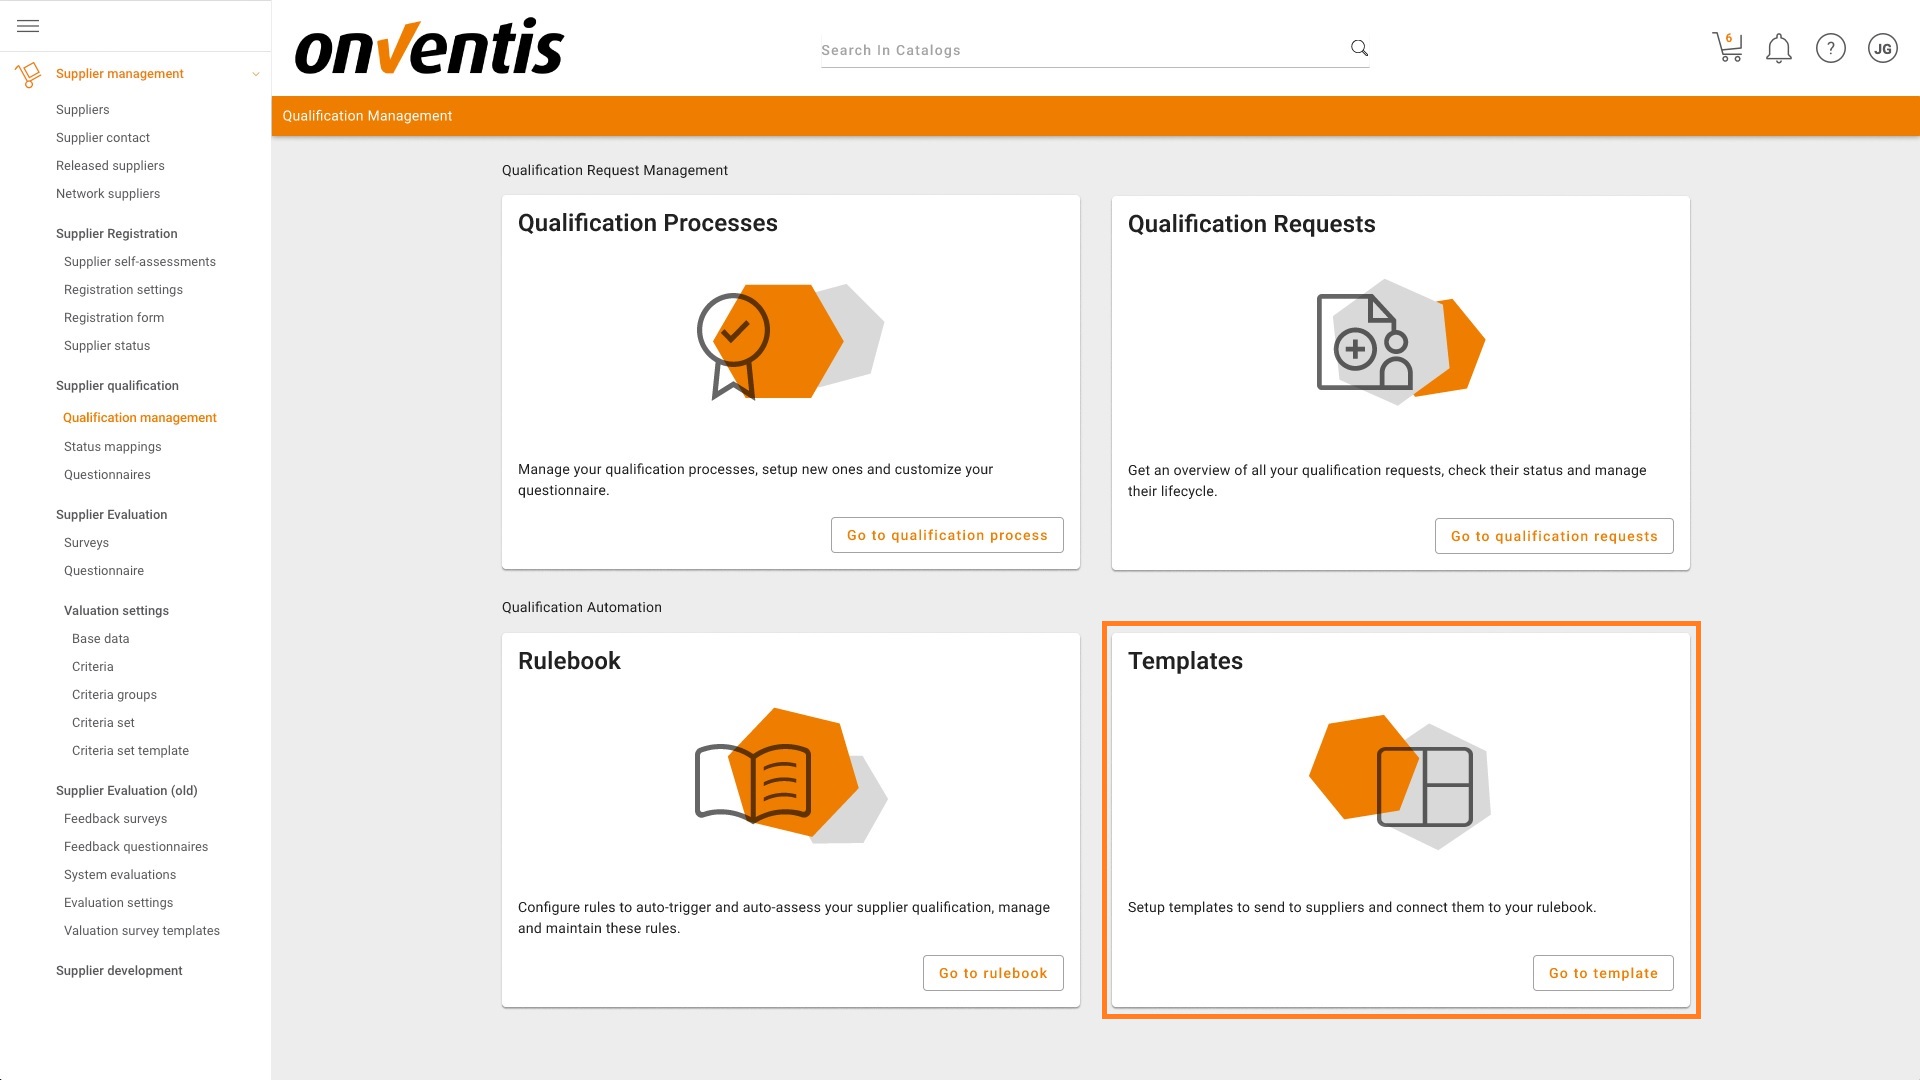
The Qualification management page then offers 4 tiles to choose from depending on your need. The 4 menu options will be explianed in the following paragraphs.
Qualification Processes
This was in previous releases a separate menu item in the menu tree and as of this release has been moved into the Qualification management page. The content is still exactly the same as before and shows you all existing Qualification processes which you have already setup with previously existing functionality. The functionality itself has also not changed to date and can still be used in case you prefer a more manual qualification process.
Qualification Requests
This menu option shows you a complete overview of all automatically started qualification requests that have been created using the new functionality including the status and other important information.
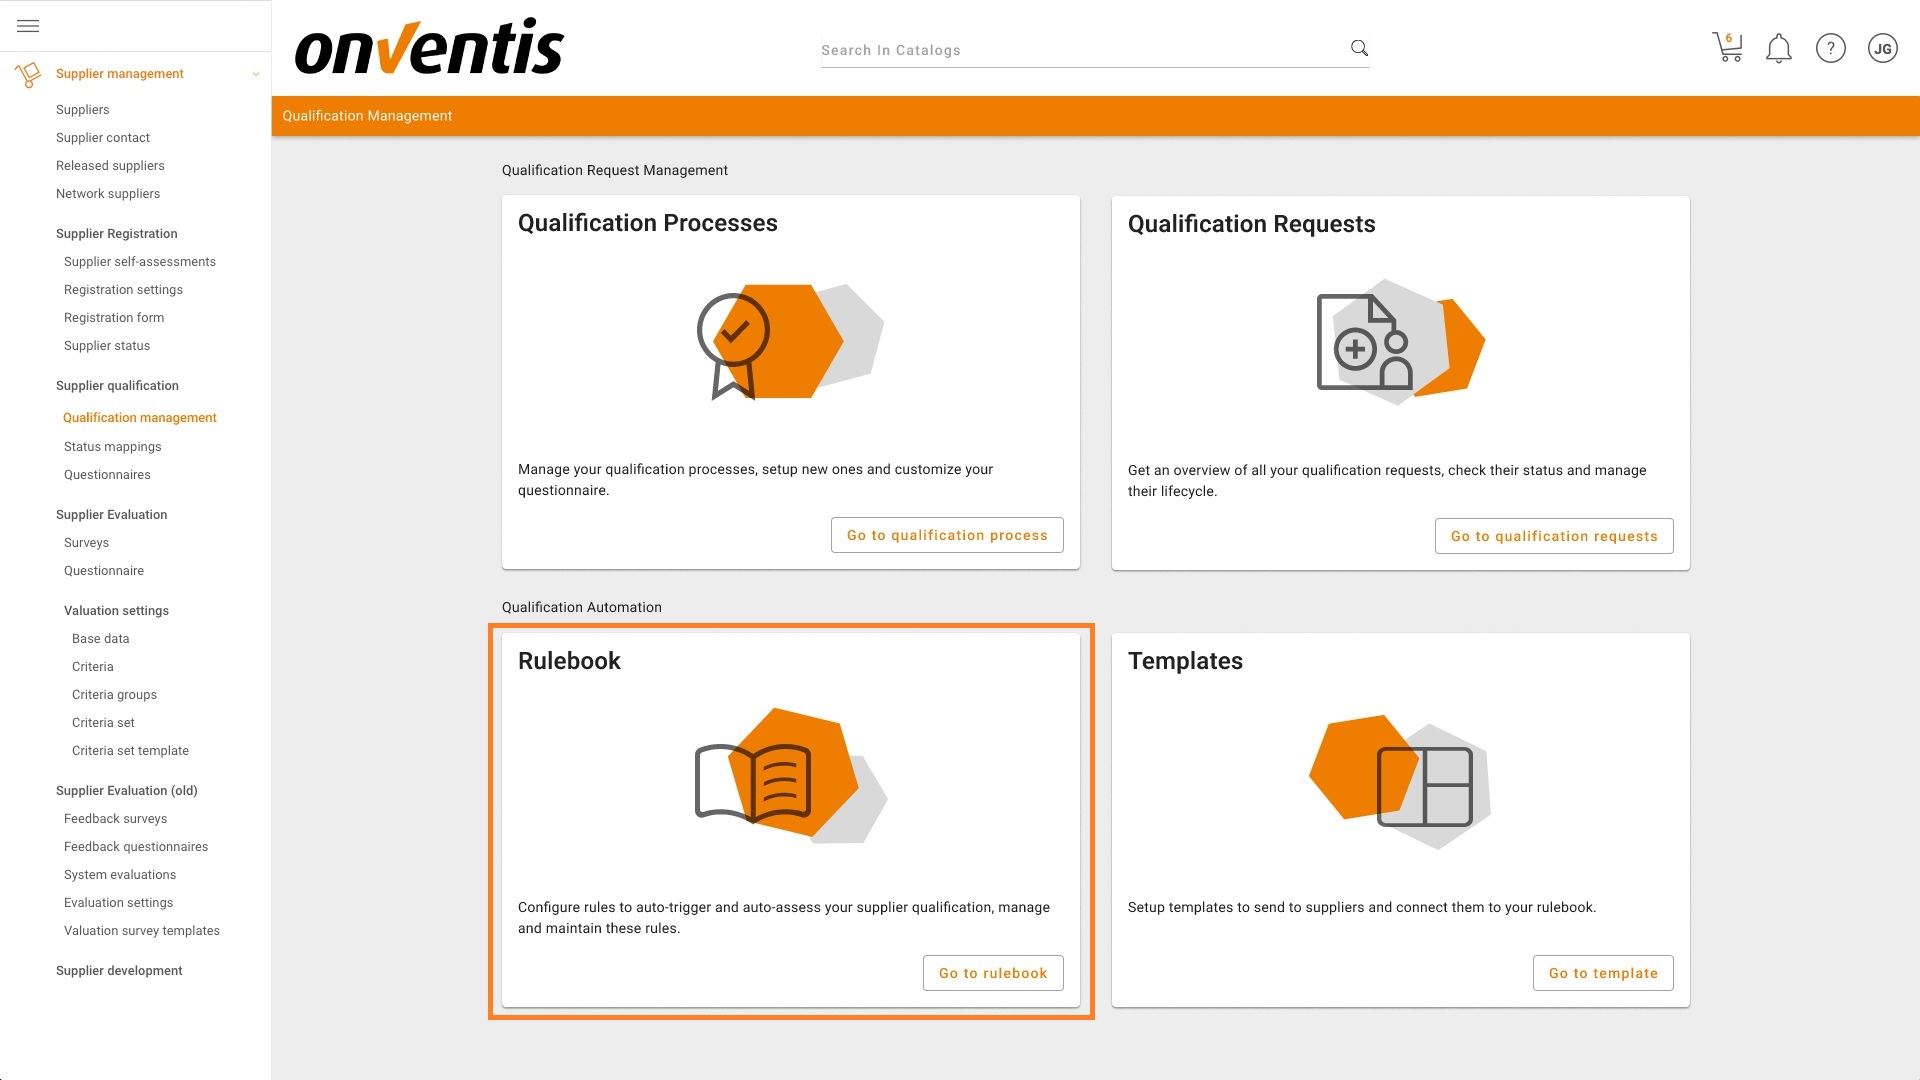
Rulebook
All Automation “rules” can be configured by the customer itself in the so-called rulebook to boost flexibility and self-maintenance by the customer. In this rulebook, the customer needs to configure his rules once which is then used fully automatically for sending, scoping and assessing qualification requests.
We will walk you step-by-step through the various configurations to guide you through the rulebook.
1. Select the Menu option by selecting the button “Go to rulebook”:
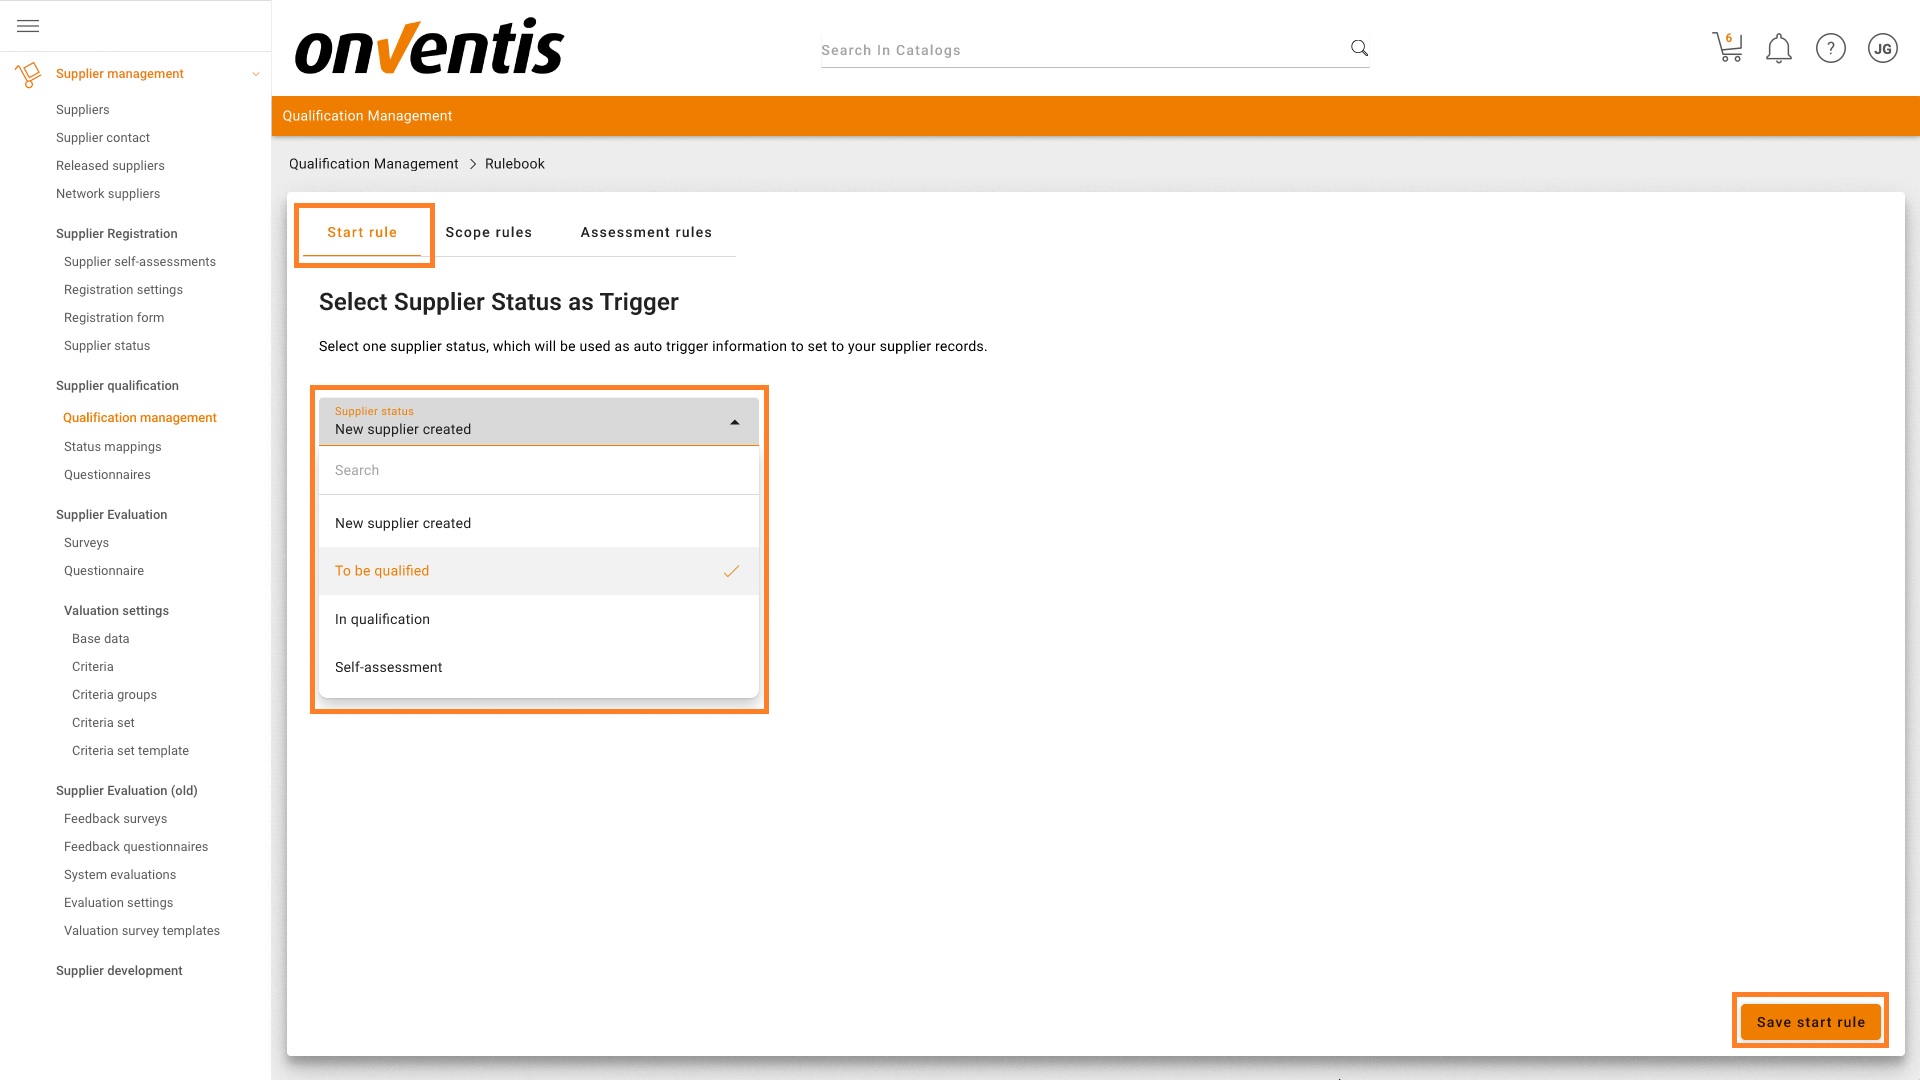
2.Define the Start rule
The moment you open the rulebook, you can start configuring the Start rule, Scope roles and Assessment rules. It is recommended that you follow this order during creation. Currently a Start Rule can only be created using the supplier status field at the organization level as a start-trigger. When a particular supplier gets the selected status assigned, a qualification request will automatically be created that uses all other rules and configurations.
Select the supplier status you wish to use as the Start Rule and click the button “Save start rule”. Supplier statuses can be created and maintained in the Supplier status menu item; this is just a selection.
3. Define the Scope rules
After you have defined the start rule, we can start putting together the various Scope rules. Select the next tab Scope rules and select the button “Create new scope rule”.
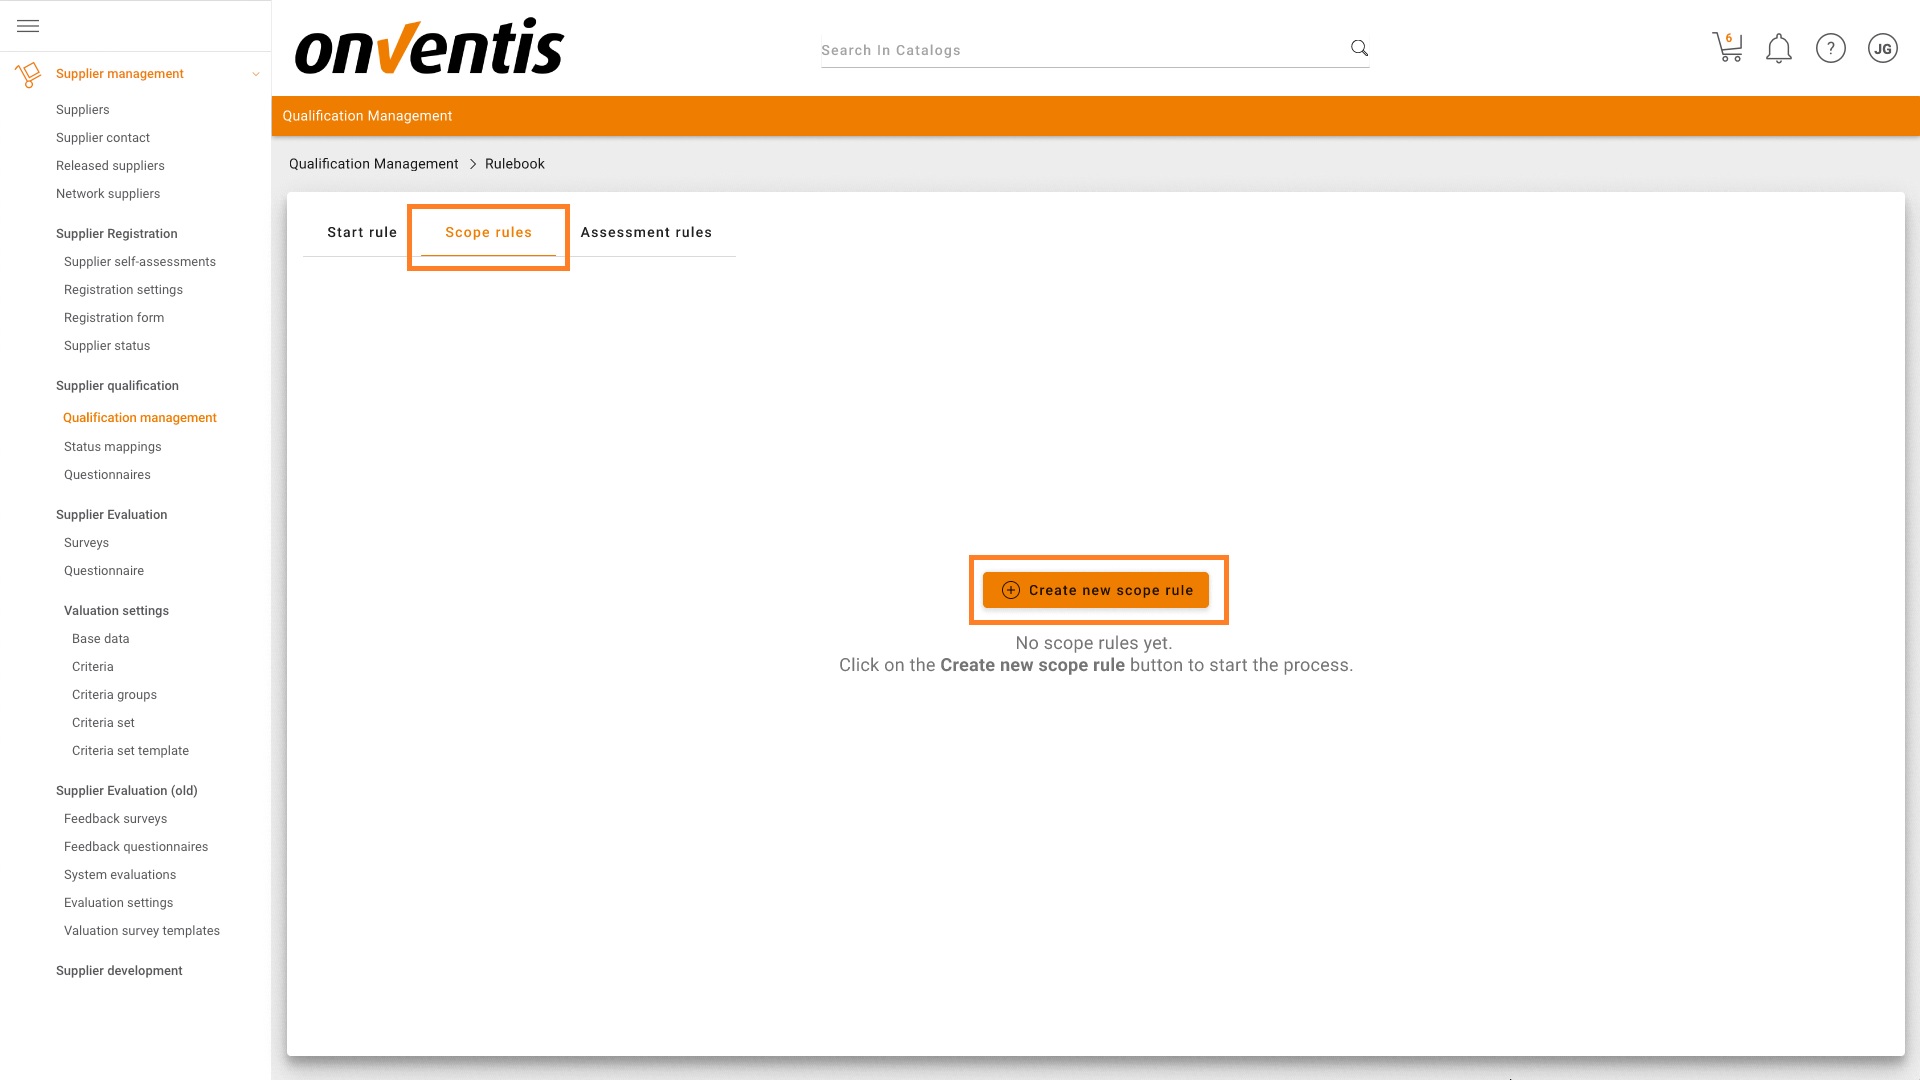
The following screen is shown:
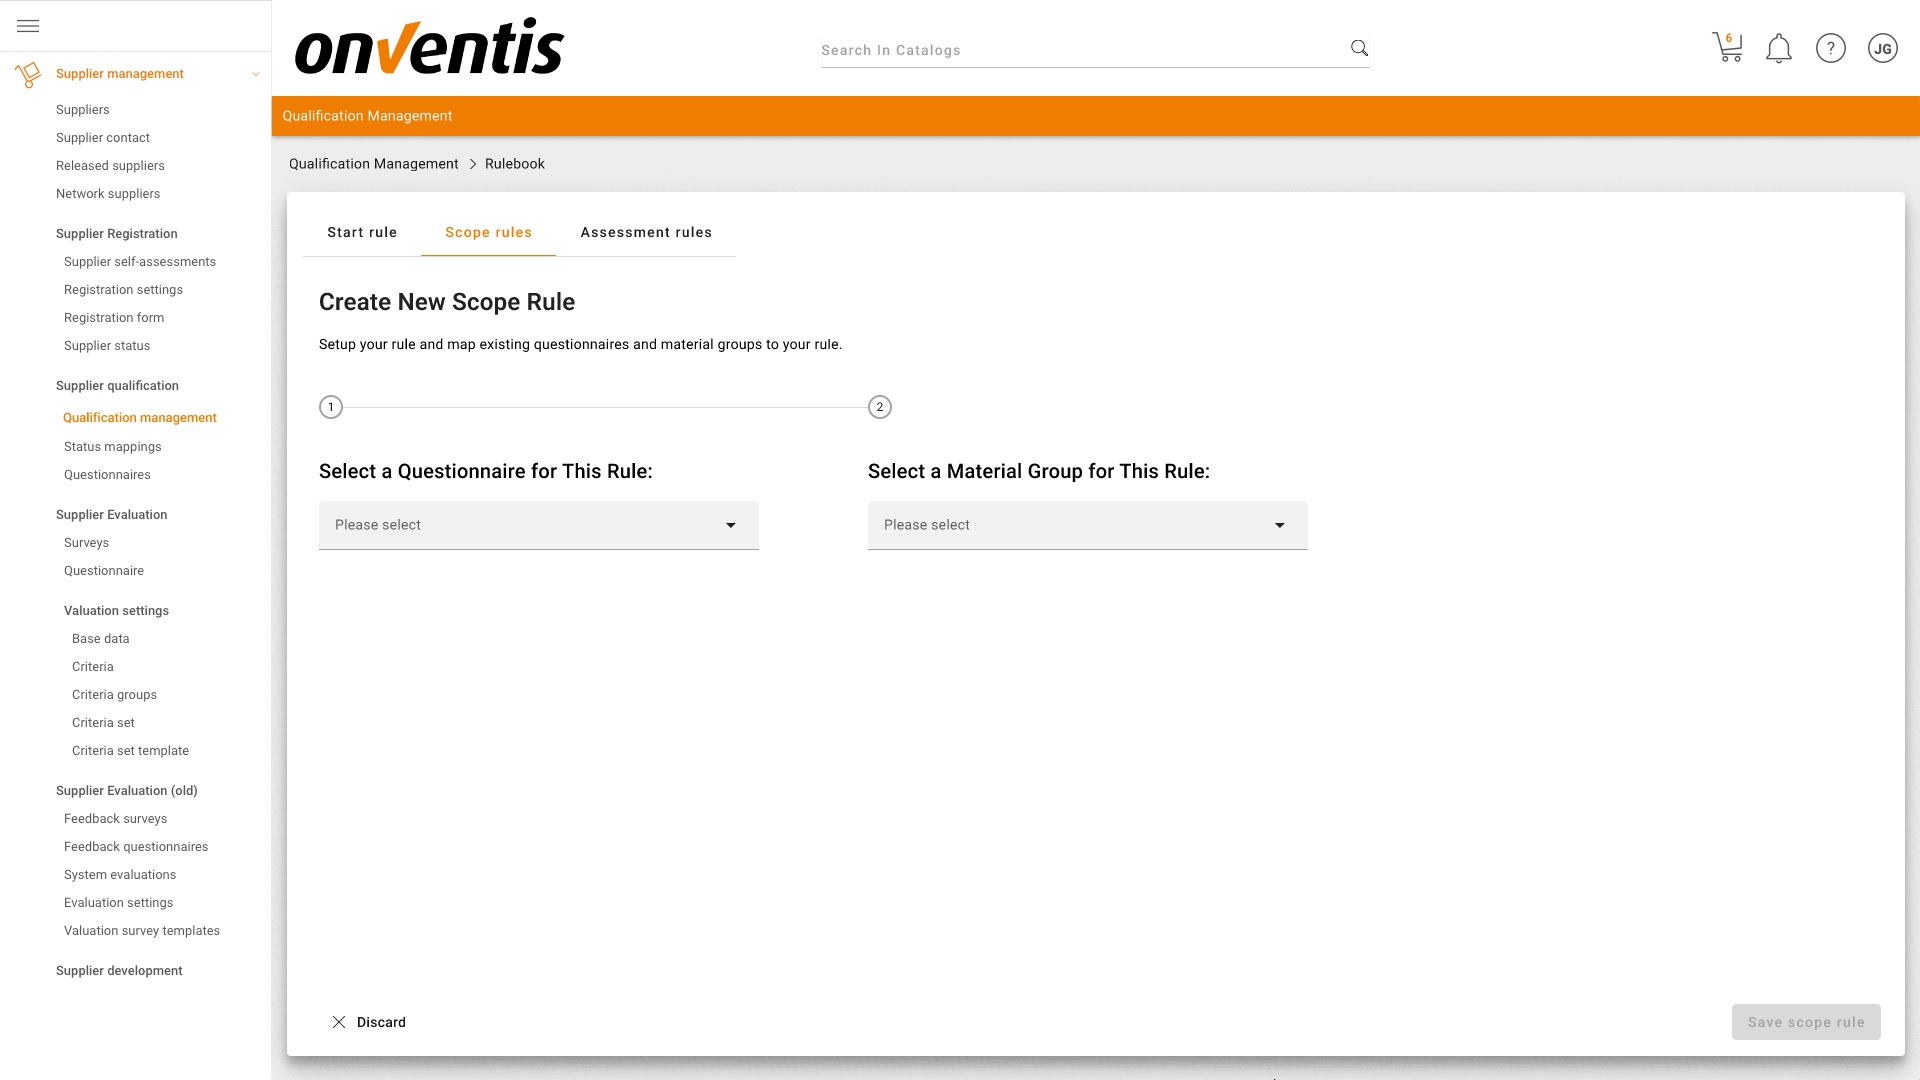
Now you can start compiling various scope rules. With these rules you can map existing questionnaires available in your system to 1-n material groups. This means that if you want a specific supplier to be qualified for particular material groups, the mapping set up is looking up the material groups assigned to such supplier and auto-selects the corresponding questionnaires that are designed to allow for such a material group specific qualification.
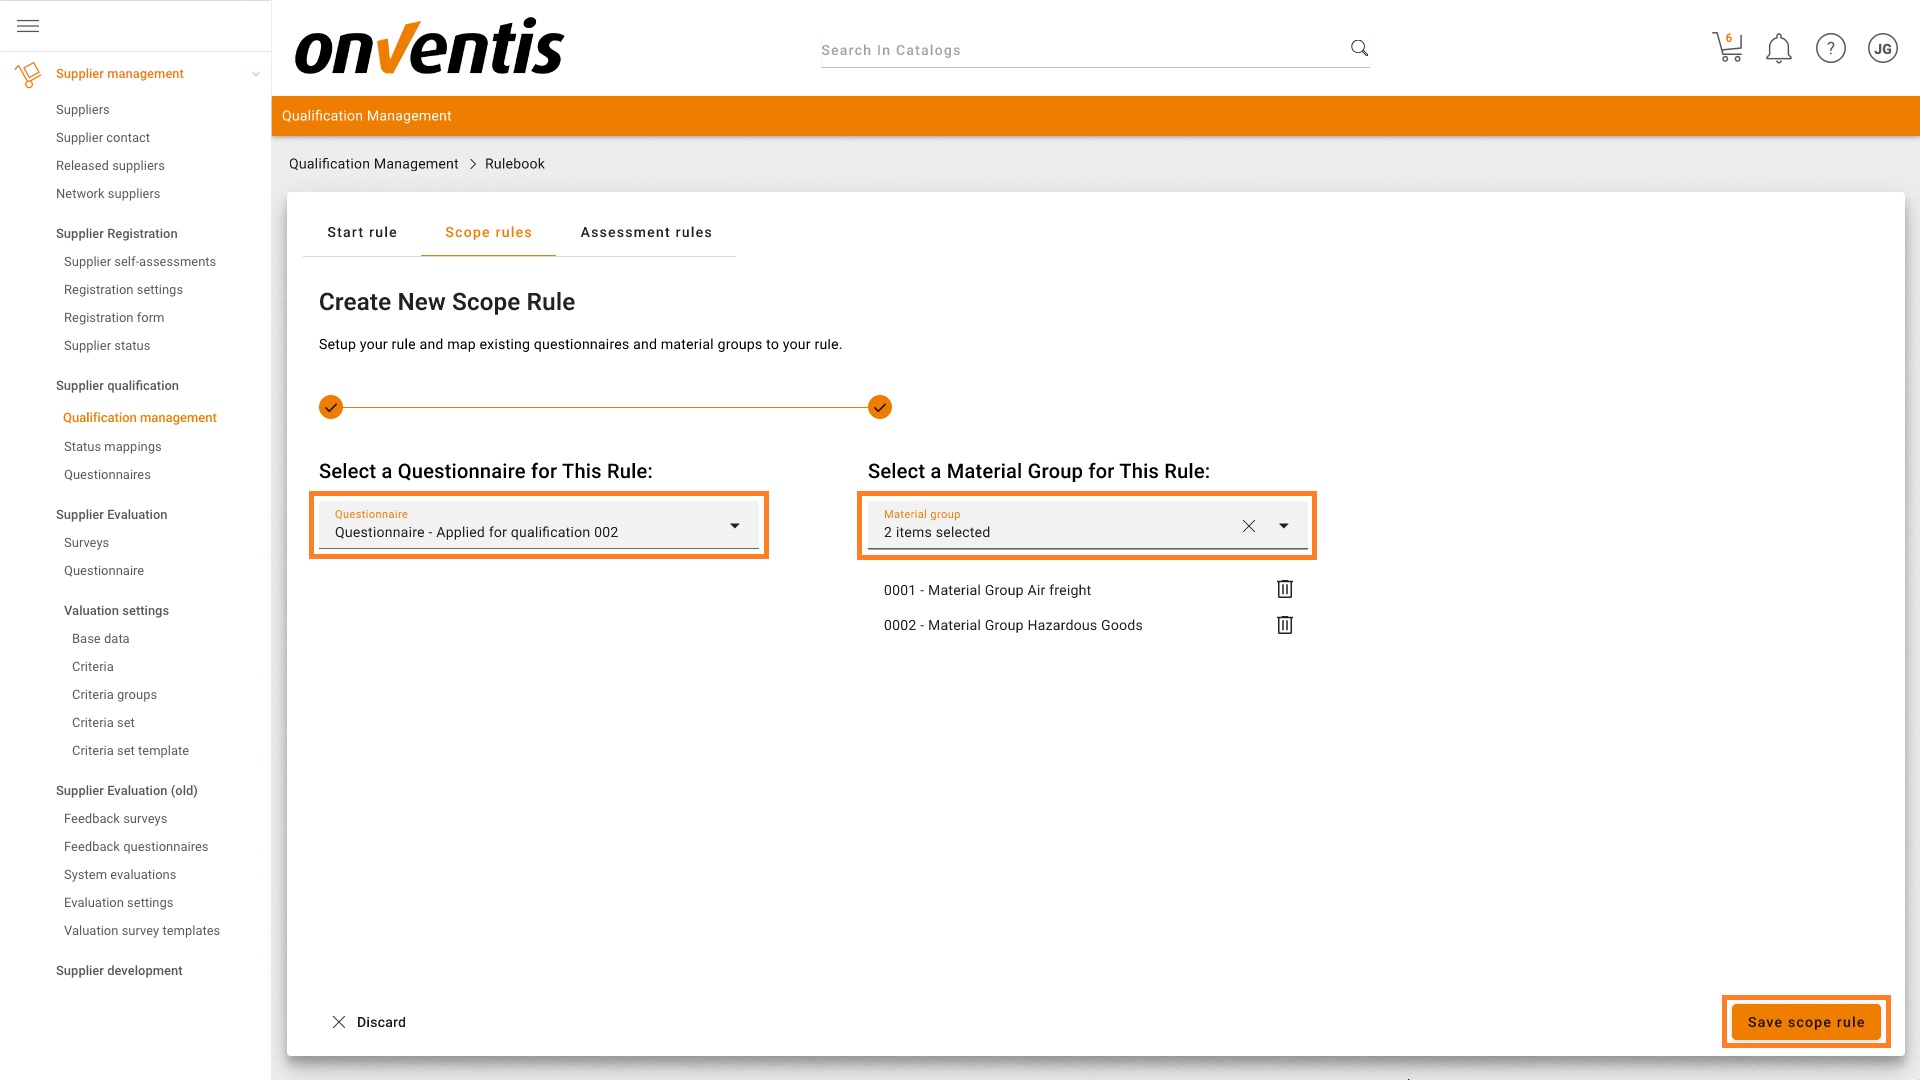
When defining a rule, you need to select 1 questionnaire and then mark the material group(s) that will be mapped to this questionnaire. After configuring a rule, you should press the button “Save scope rule”. Should you have checked multiple material groups, the supplier will be sent the questionnaire as soon as he wishes to be qualified for at least one of the selected material groups.
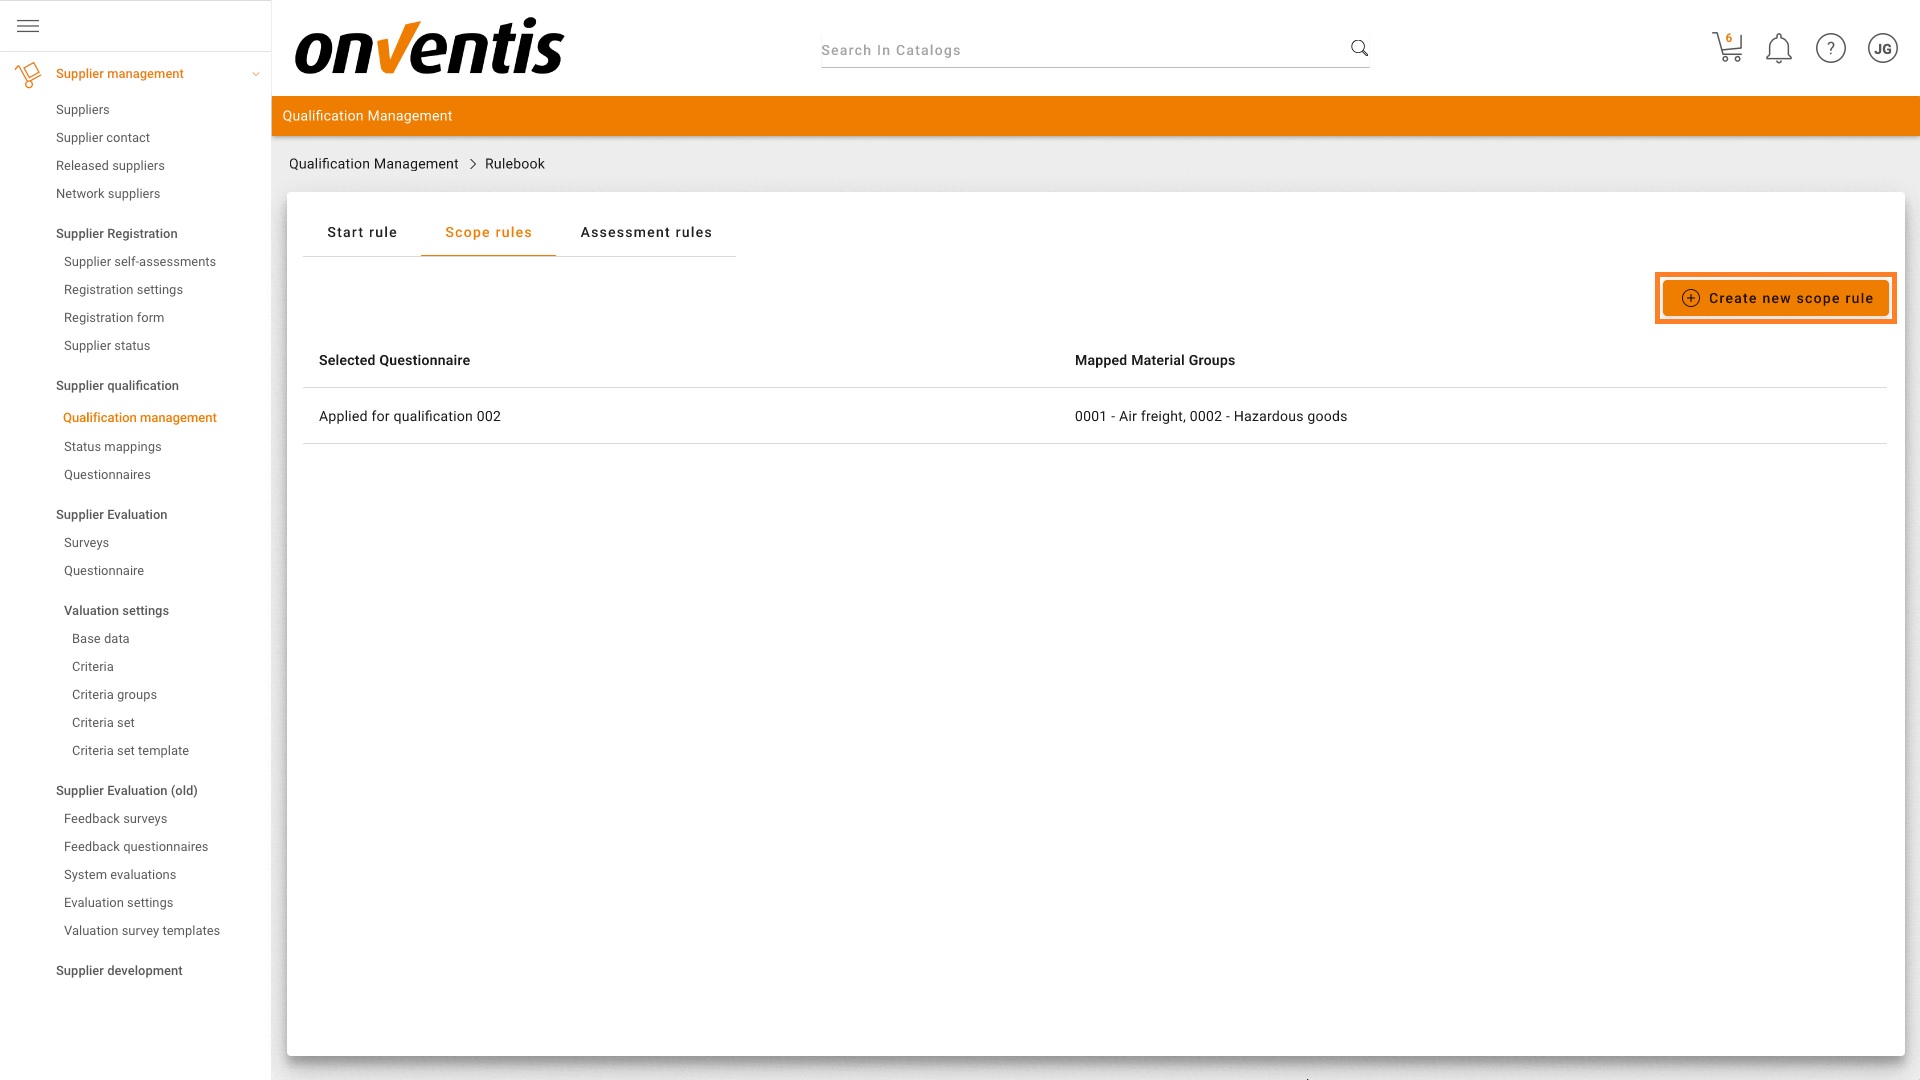
If at least 1 scope rule exists, the rules are displayed in a list. This screen looks as follows. It is possible to create multiple scope rules. To do so, use the “Create new scope rule” button.
Note
Once a scope for a given questionnaire or material group has been saved, the same questionnaire or material group cannot be used again in another scope rule.
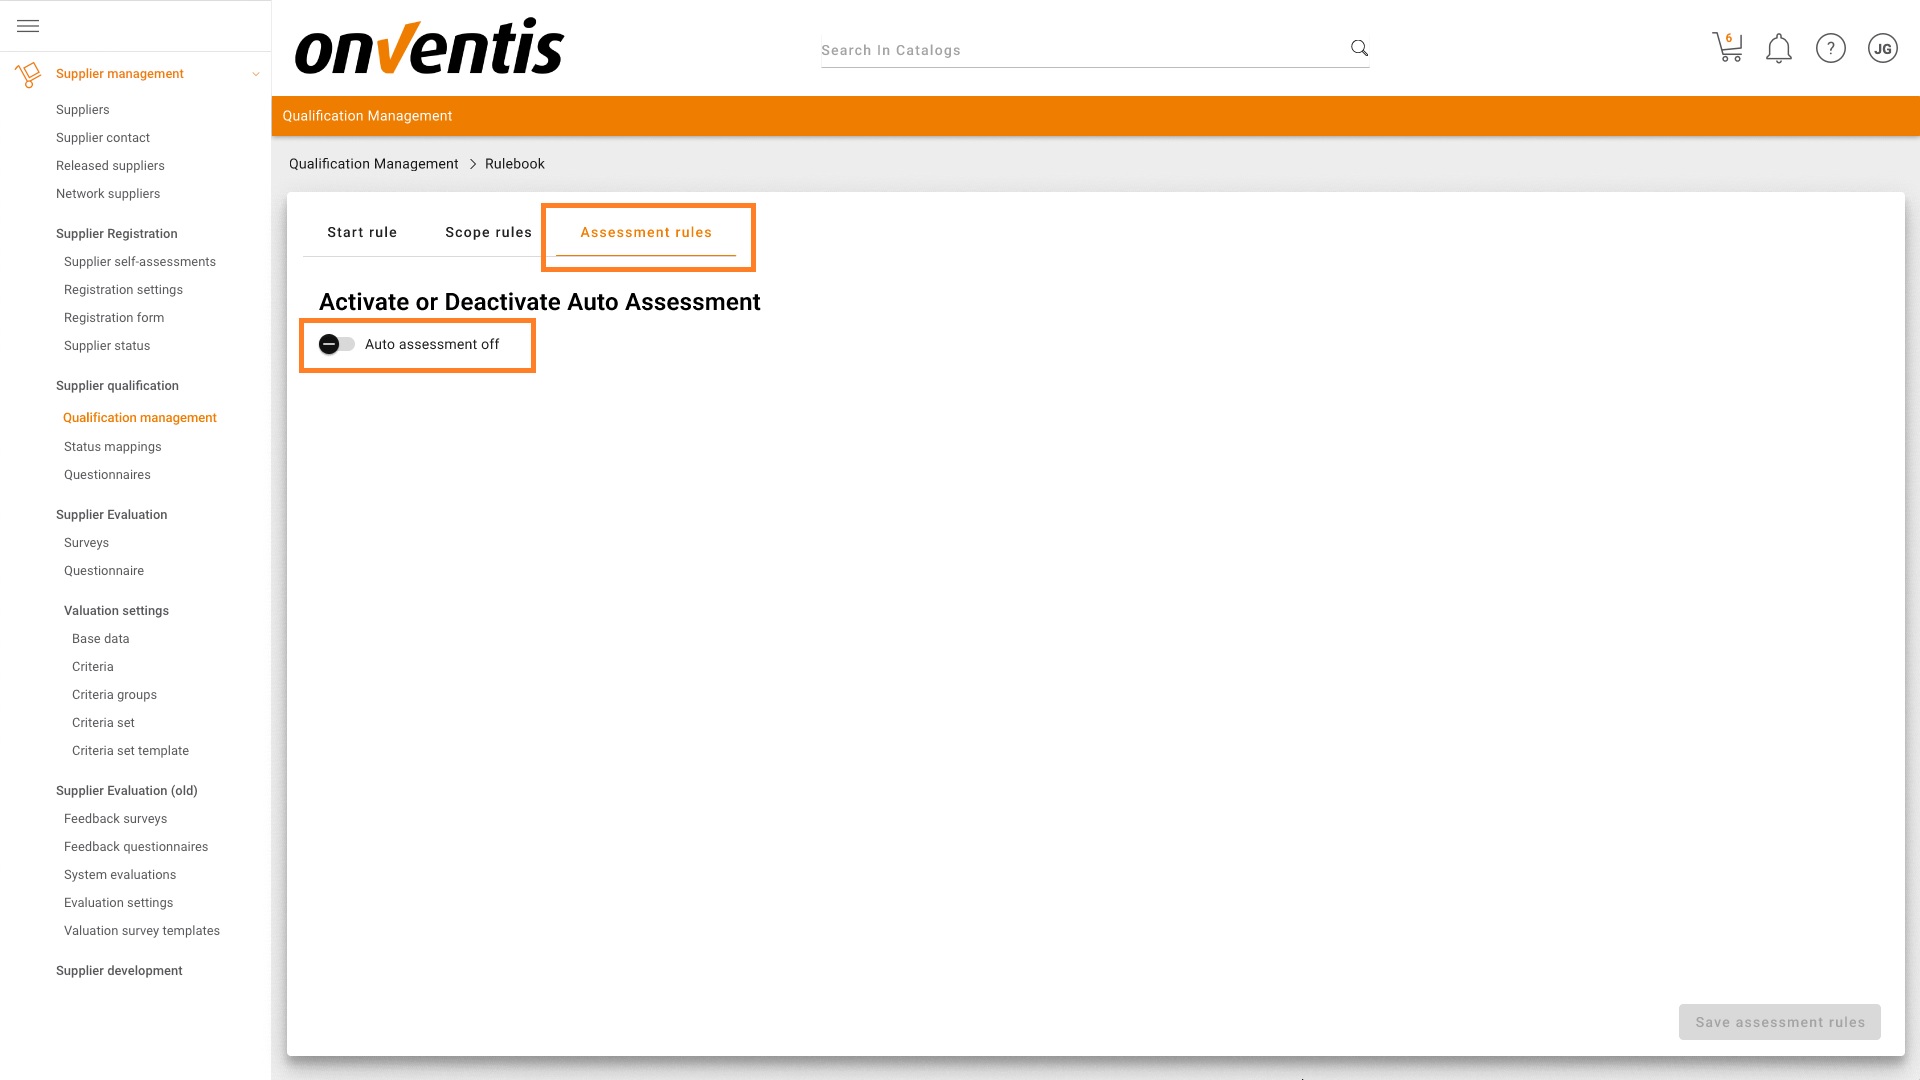
4. Define the Assessment rules
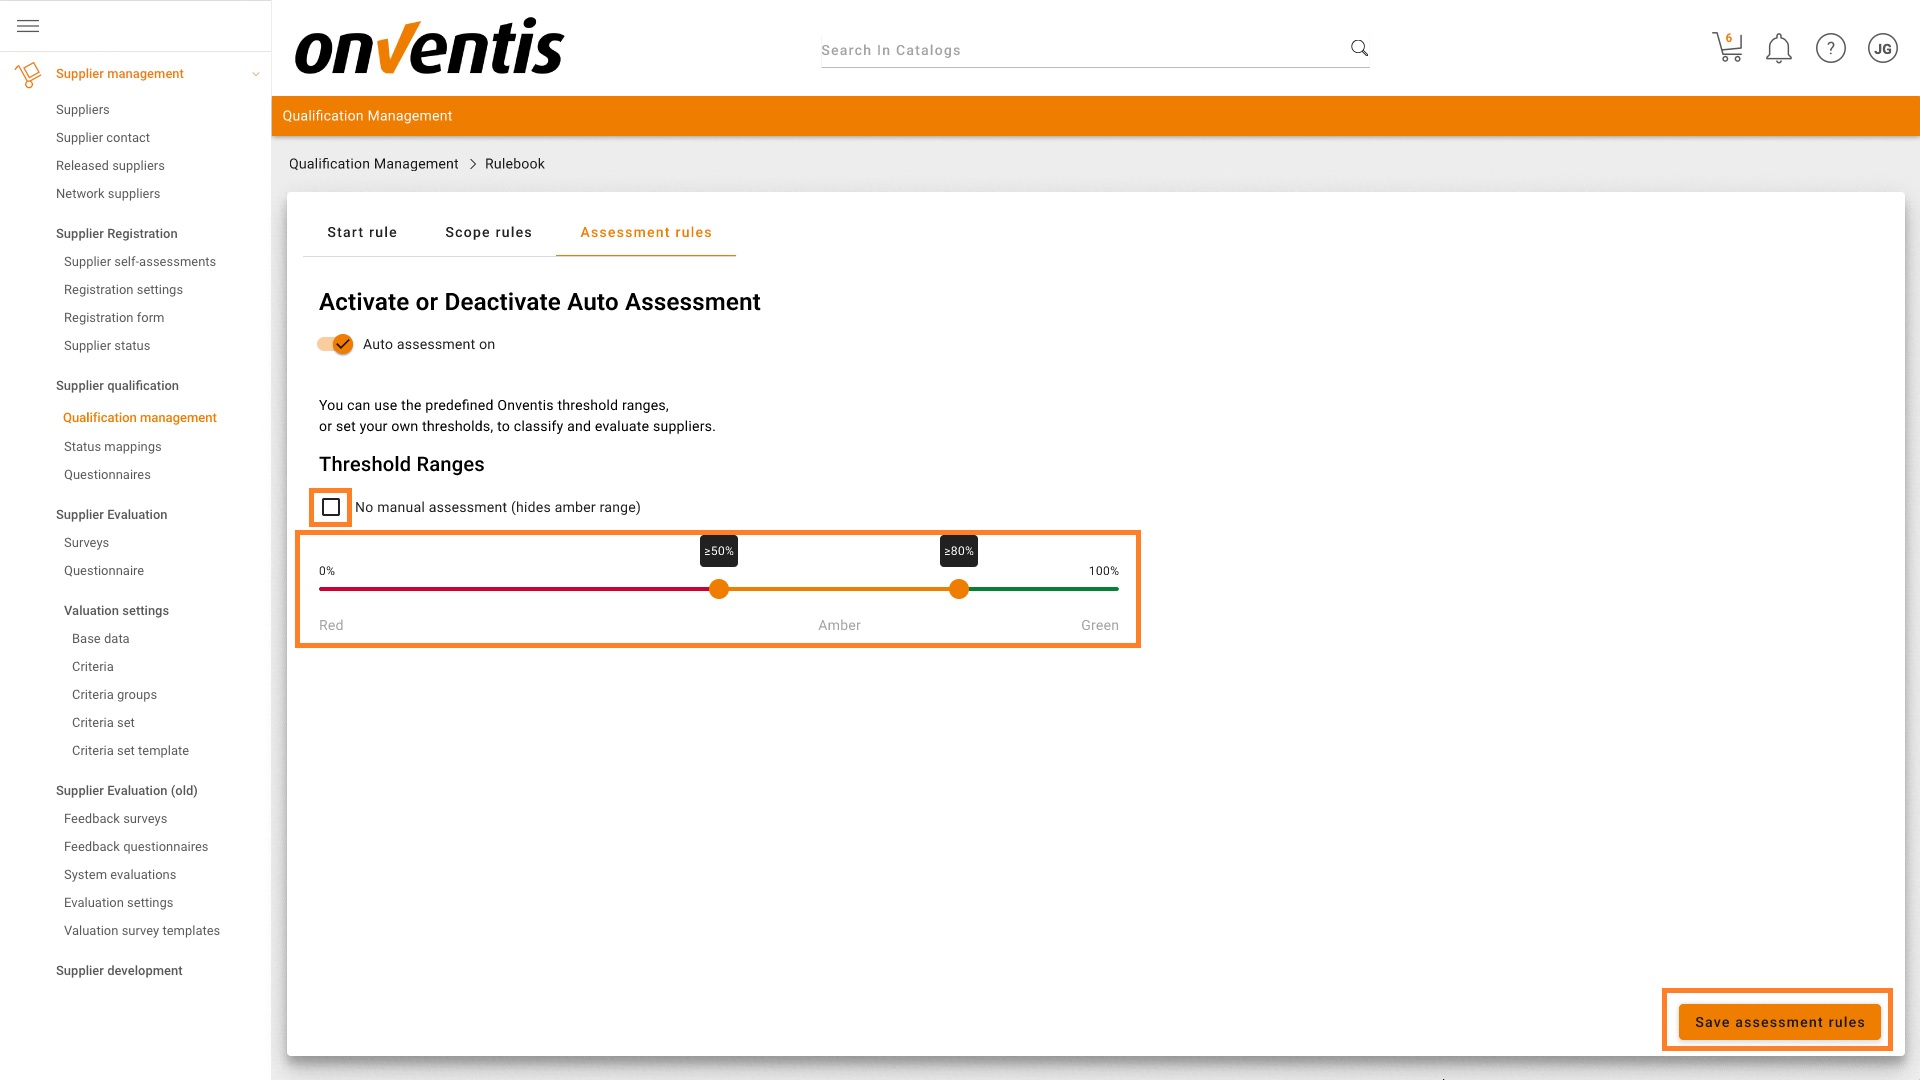
To use the auto assessment functionality, you must first turn this feature on. You can do this by using the toggle that appears after you press the Assessment rules tab.
After you turn on the functionality, you can define the auto assessment threshold ranges.
The different thresholds are:
Red: Automatically reject (default value: between 0 % and < 50%)
Amber: Manual assessment (default value: between ≥ 50% and < 90%)
Green: Automatically approve (default value: between ≥ 90% and 100%)
If you only wish to either reject or approve a questionnaire automatically but not do a manual assessment, you can disable the manual assessment by checking the box.
The threshold reflects the scores in percentages achieved by a supplier when completing a scored questionnaire. You can adjust all threshold ranges to your own preference. You do this by moving the orange dots on the percentage bar to the desired threshold per range.
After you finish configuring, press the “Save assessment rules” button.
Templates
This menu option allows you to configure a template that is used for each new qualification request that will be sent according to the rulebook automation rules. A fully configured template is necessary if you want to use the new automated way of qualifying suppliers. When you want to start configuring the template you can press the Template button.
A basic set of data is requested which is used by default for each automatically generated qualification request. All customers already familiar with the existing qualification processes will be familiar with these sets of data.
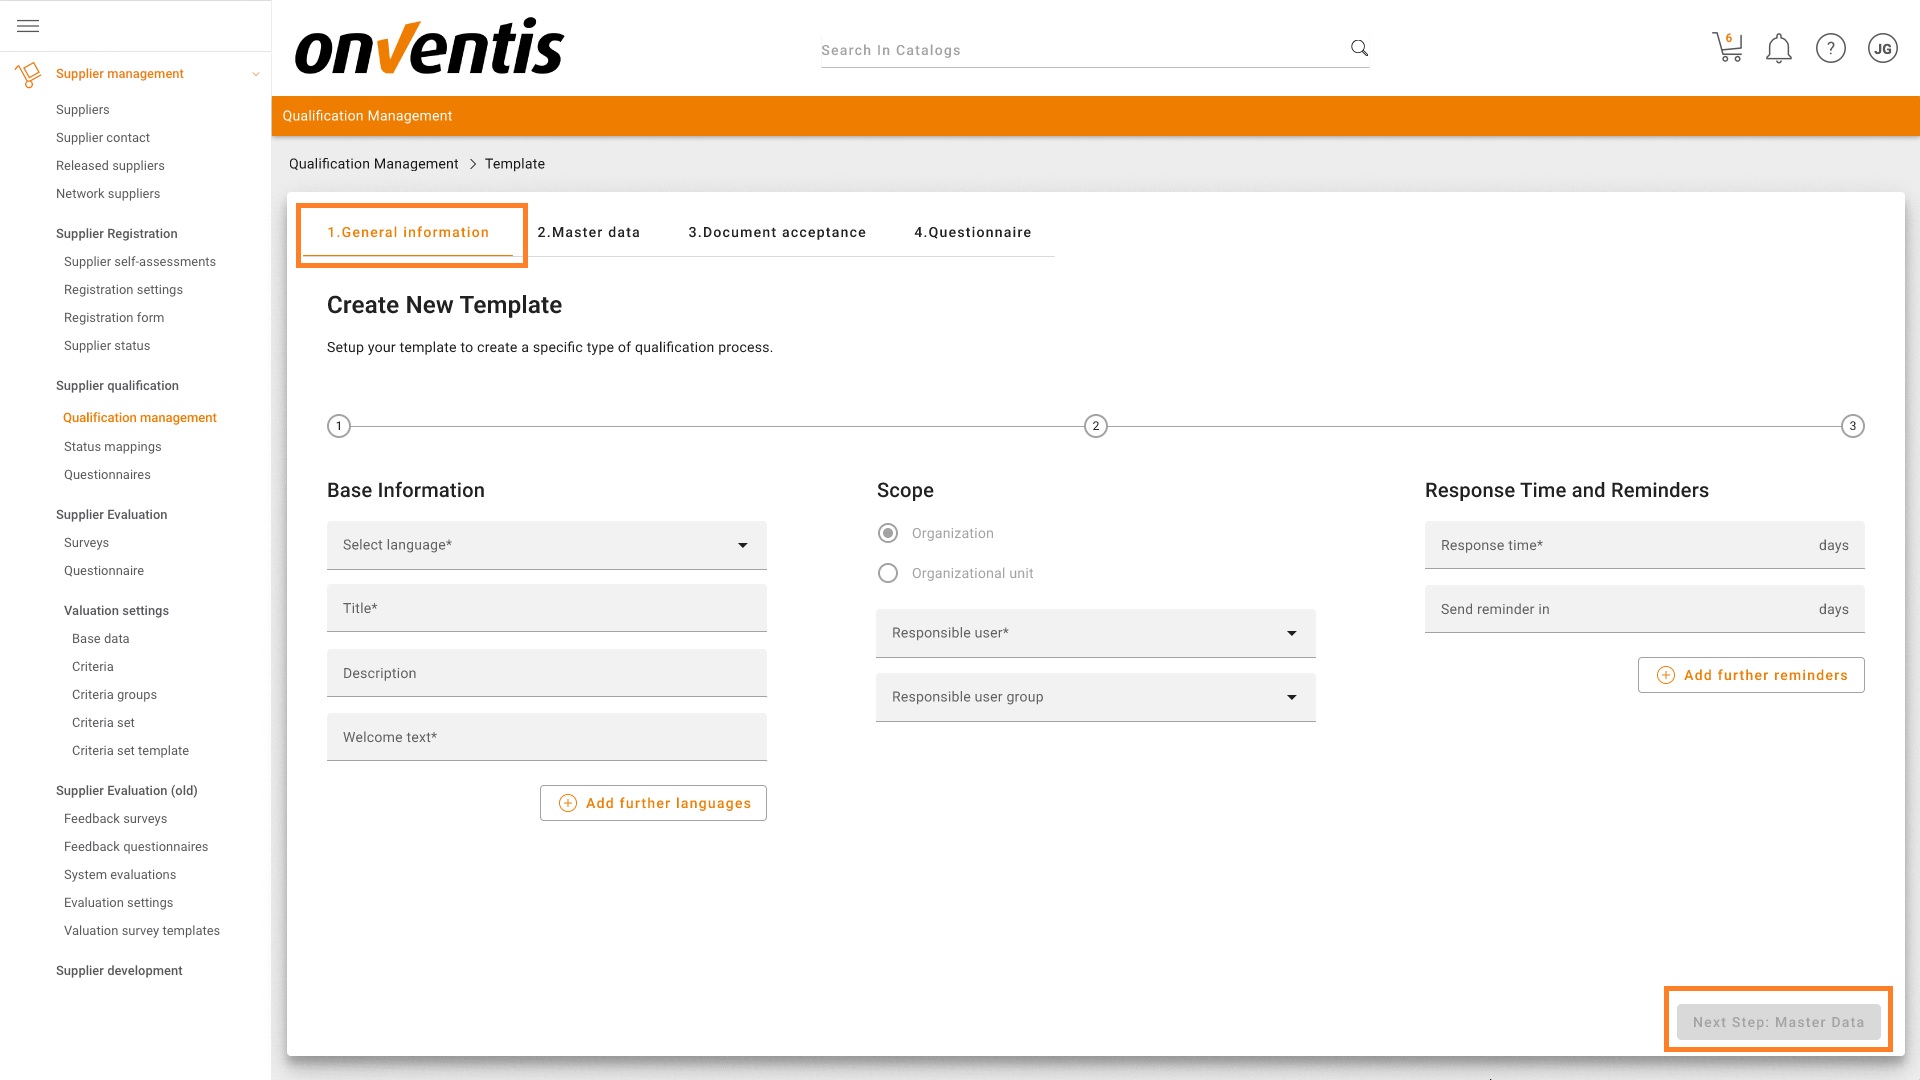
General information
General information currently contains 3 elements:
Base Information à Language selection, Title, Description and Welcome text for the supplier. You can create this information for multiple languages by using the button “Add further languages”.
Scope à For now it’s only possible to create a template for Organization level. We will extent the scope of using Organizational unit within future releases
Response Time and Reminders à Configure the response time in days and within how many days a reminder will be send. You can also add up to 5 reminders via the button “Add further reminders”.
When you are finished you can press the button “Next step: Master Data” to continue the template configuration.
Master Data
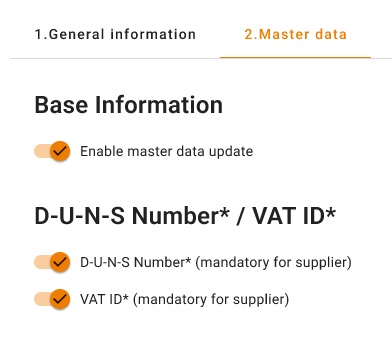
It is possible for each qualification request to allow the supplier to verify and update its master data. If this is desired, you can turn it on by using the toggle.
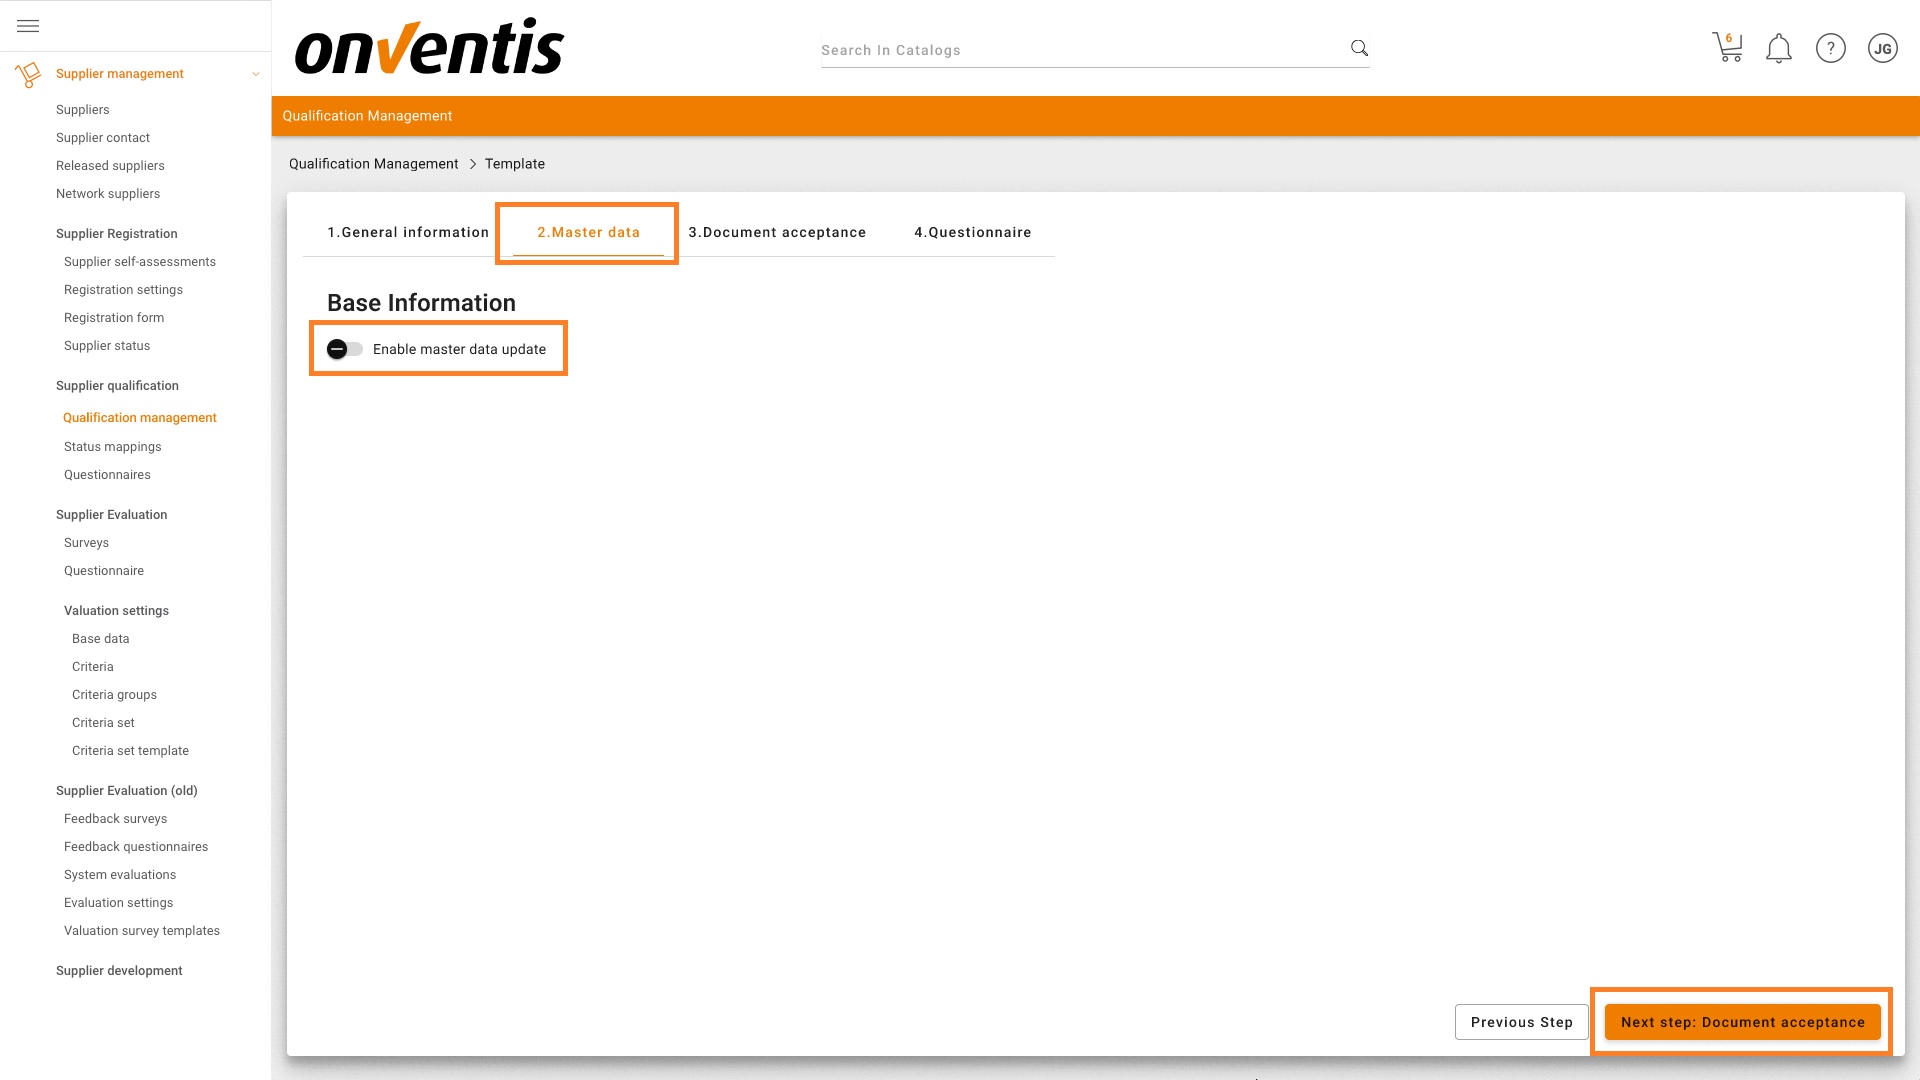
When enabled it looks like this. You can additionally set if certain identifying attributes (DUNS Number, VAT-ID) are mandatory for the supplier to provide in the response.
When you are finished you can press the button “Next step: Document acceptance” to continue the template configuration.
Document acceptance
It is possible for each qualification request to ask the supplier to accept important document(s). If this is desired, you can turn it on by using the toggle.
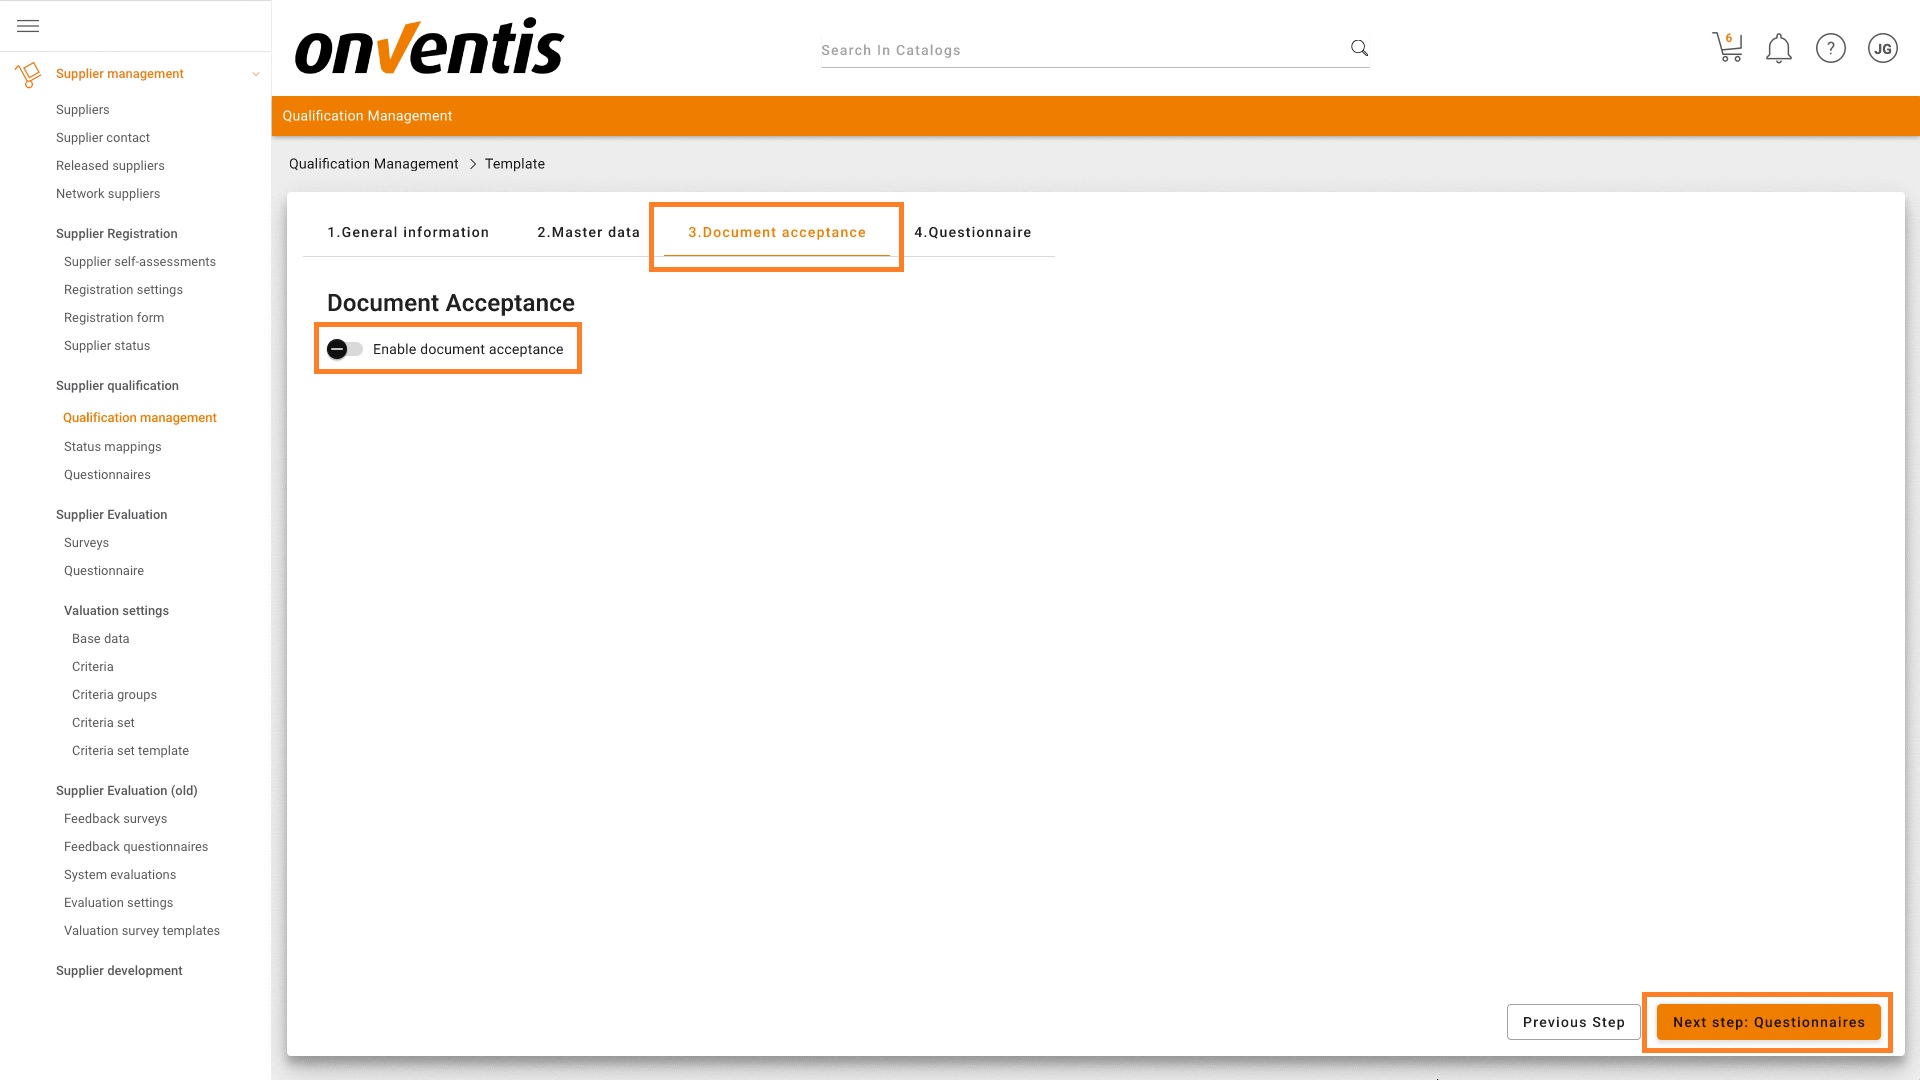
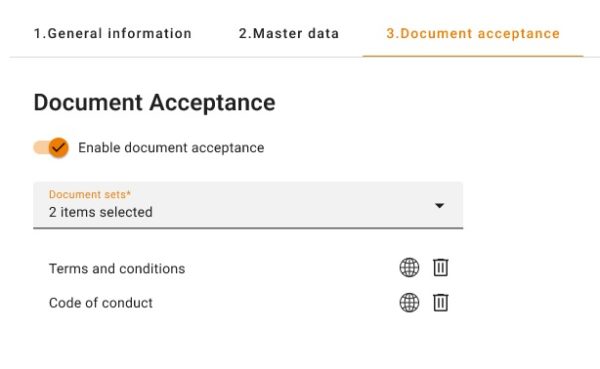
When enabled it looks like this. You can select, which document the supplier should accept or reject, from your already available documents sets in the Onventis software.
When you are finished you can press the button “Next step: Questionnaires” to continue the template configuration.
Questionnaire
In order for the auto-assessment to work, it is required to select one generic questionnaire that is not specified to serve the qualification of a specific material group. This questionnaire will be sent to all suppliers where the supplier status is assigned that is defined for the Auto-start rule.
Important note is that the selected questionnaire cannot be used in any scope rule in the rulebook.
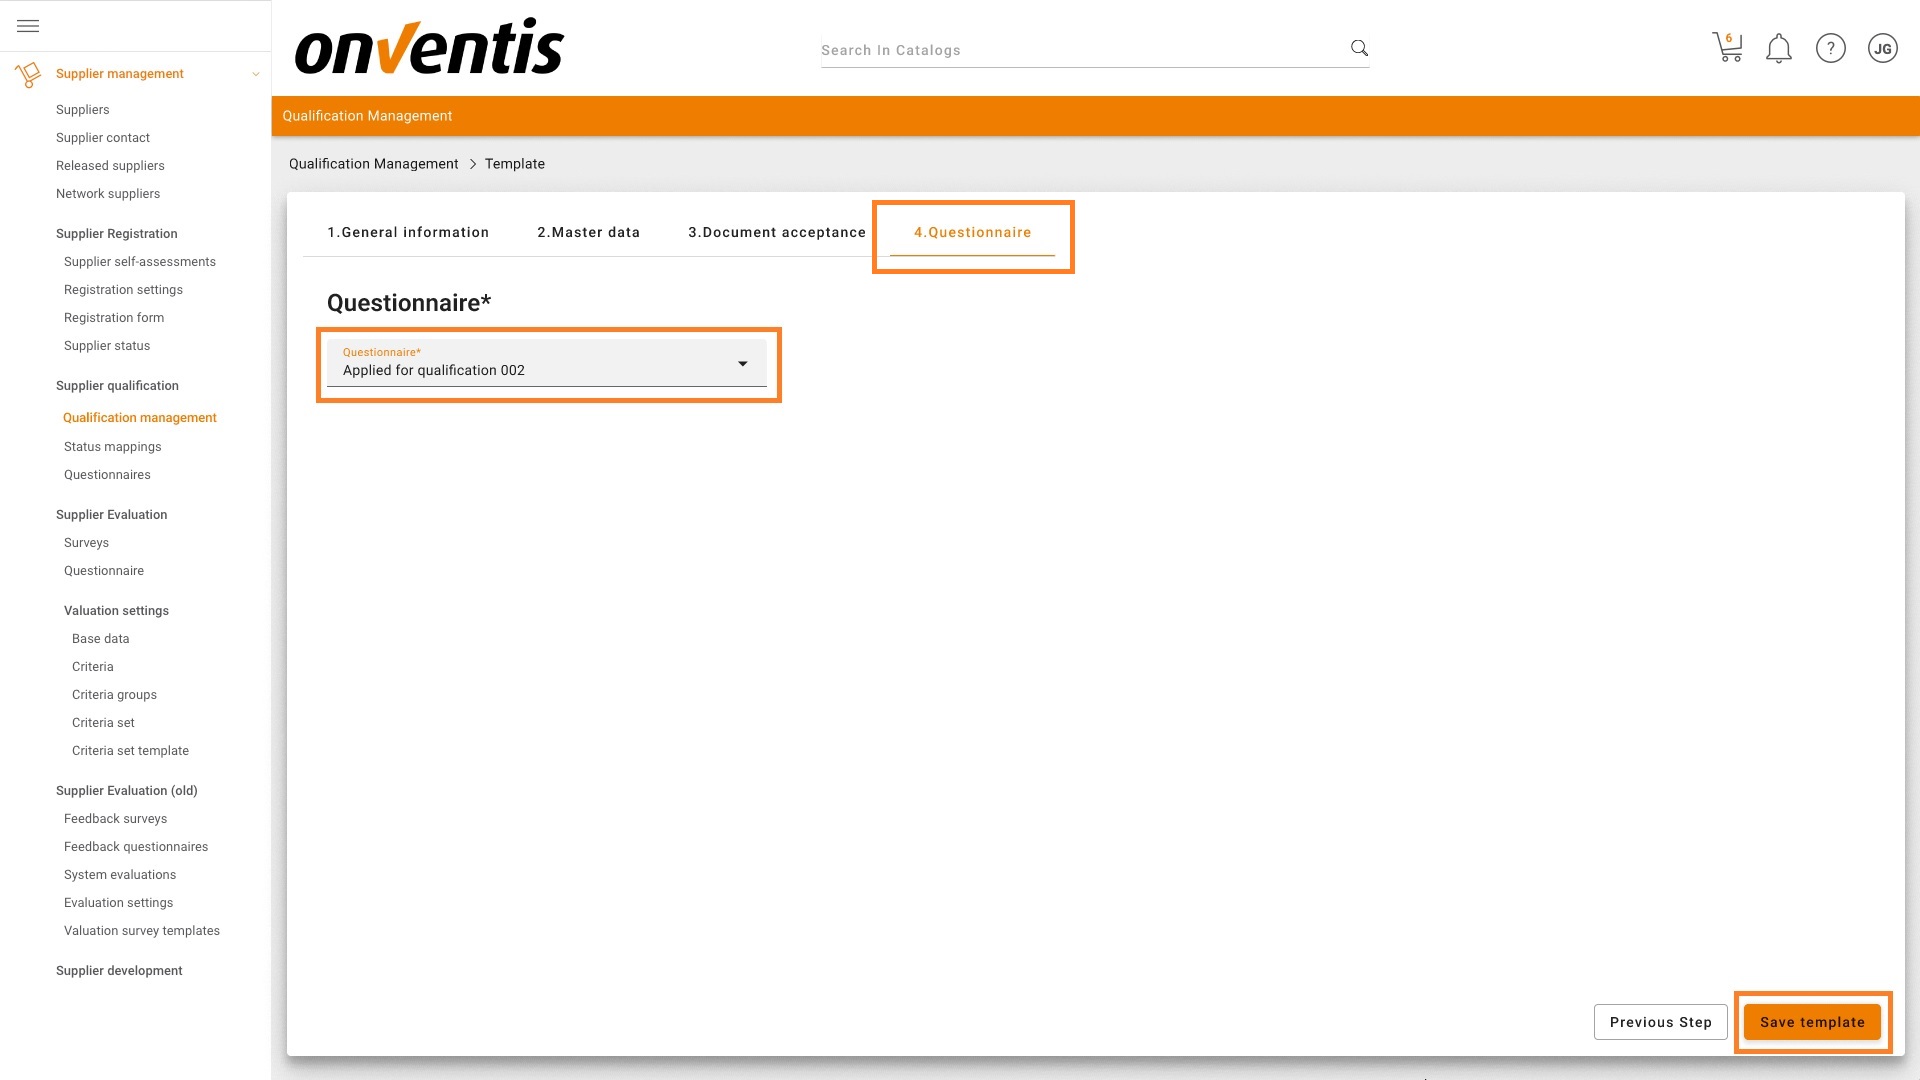
When you are finished you can press the button “Save template”.
Now the template if fully configured and can be used. You can make changes in the template whenever you want and will be applied for all newly created and sent qualification requests after saving the new template configuration.
Activation functionality
In order to use this new functionality, you must have the appropriate license. If this is not the case or if you have any questions, please reach out to your Onventis contact person.
If you already have the appropriate license, the functionality will be activated automatically after you have fully configured and saved both the rulebook and template.
Platform & Core
With the last release, we introduced an extension of the Email queue delivery statuses. Based on this information, we now provide the ability to automatically inform your users about email delivery issues.
With the new configuration setting under Configuration -> Organization settings -> General -> E-mail Settings you will find a new configuration checkbox with the label “Inform process initiator if email delivery or creation failed”:

When it is activated, the system will check once every 24 hours all items of the Email queue for items in the state “Delivery failed” or “Failed” and will sent an email to the user that triggered the email-related process, to inform them about the issue.
This will allow your users, to understand, that their triggered process was not able to reach a related participant via email. It will give them the ability to trace the related email and to take action to overcome the communication channel problems by getting in contact with the receiver of the email.
With the introduction of this feature, we retire an old configuration to inform a specific person about email delivery issues:
![]()
In case you have configured this feature in the past, we will automatically activate the new
“Inform process initiator if email delivery or creation failed” feature for you.
Procure-to-pay
Download of attachments in the new shopping cart
We have enhanced the functionality of the new shopping cart to allow the downloading of attached files once they are imported into a shopping cart position.
Tax rate default value for external catalog items
In case a catalog item from Amazon Business was included in the shopping cart, the tax rate default calculation was not executed when the organization unit was changed. That logic was extended, so that also articles from external sources are covered.
Extensions of the inherit function
We extended the inherit function so that it is possible to also inherit the object information “Subject to inventory management” from one position to other positions in the shopping cart and in the purchase order.
In addition, an error was fixed, which lead to the situation, that the cost allocation object type “psp element” was not part of the inherit function in the new shopping cart.
Bug Fixes
We have addressed a bug that resulted in the omission of cost allocation objects in the selection of objects during multi-accounting.
We have fixed the bug when displaying error messages that were previously displayed as SQL queries and, as a result, we now display human-understandable text messages to customers.
A bug was fixed, where in specific cases the published pinned fieldsorganization template was not updated automatically for users using the organization template.
In specific cases, the shopping cart showed an error message after send though there was no error. That bug was fixed.
We fixed a bug in the shopping cart, that caused a not properly shown country information in case the ad hoc delivery address was used.
Condition Update for order changes and sales order changes
We adjusted the behavior of condition update in order changes and sales order changes, so that the conditions of catalog items are not automatically updated, if the setting “condition can be changed in the shopping cart” in the current valid condition is active.
Approval Process Bug
Resolved a bug in the approval process causing a system error when the combined length of the first and last name exceeded 50 characters. This occurred with the user-representative setting “Send a copy of all emails to the representative” activated.
Object Customer in Opentrans order XML
Previously, if the cost allocation object type “customer” was flagged as mandatory, the export of the purchase order line did not include customer information in the OpenTrans XML. This issue has been rectified, ensuring that even in instances where the cost allocation object of type “customer” is designated as mandatory, it will be correctly exported.
CompCode handling in Supplier Import from SAP
All CompCodes and all PurchasingOrg-assignments which are sent from SAP with SPERR or/and LOEV-flag should be deleted on ONV-side
Statistical surcharges in ORDERS05 from SAP
The error with the correct transfer of statistical additional conditions when importing orders from SAP has been fixed, so that the statistical conditions are not taken into account when calculating prices on the Onventis side.
Import the SAP Address number in Supplier import
The SAP address number is saved on the Onventis side when importing suppliers from SAP and transferred back to SAP via a bidirectional interface so that the existing address entries are updated correctly and no new entries are created.
Contact person handling in Supplier Import from SAP
If contact persons are deleted in SAP and are no longer transferred to Onventis during the supplier import from SAP, they are also deleted in Onventis. Only contact persons who have not been manually created in Onventis and contain an SAP contact number are deleted.
The SAP contact number is saved on the Onventis side when importing suppliers from SAP and transferred back to SAP via a bidirectional interface so that the existing contact persons/contacts are updated correctly and no new entries are created.
Import of additional fields with Excel article import
We have extended the capability of the excel article import. Now it’s also possible to import articles with additional fields via the excel article import. To do so, the following Excel template can be used: ArticleAdditionFields Template
Search selection added to material group in service note (buyer view)
We extended the service note edit page with the capability to use the search buttons to fill in the material group into the service note position. It’s activated, as soon as the organization setting “ “Use search function for selections” is activated.
Account assignment object bug fix on supplier side
In the Service Procurement process, there is a feature that enables suppliers to view account assignment information in service notes. In this context, we addressed a bug that resulted in the improper display of the title for cost allocation fields.
“Service-Note-Received-Date” as column information in Service Note List
We extended the service note list with a new column that is called “Service note received on“ on supplier and on customer side. The column includes the date when the service note was sent (from supplier or buyer side). By default the Service note list is sorted by service note number descending, by clicking the column title, its also possible to sort the column by “Service note received on“ .
New input fields available in service notes
The service note page was extended, so that also the new input controlls can be used for service notes aswell. Given the organisation uses new dropdowns (org settings → tab “general”): “Use the text input with automatic search feature in orders” then all dropdowns in the new position are using the new dropdowns with search feature.