
Onventis 2024.4
The new Onventis 2024.4 release contains various enhancements, improvements, and bug fixes. Check out the complete list below!
Beta release date: Monday, April 22, 2024
Release date: Wednesday, May 8, 2024
This release contains huge value for many Onventis customers and it’s users.
Learn all about it in our release notes!
Supplier Management
In 2023, Onventis introduced the “API Connector for IntegrityNext” that enables a direct connection of the Onventis purchasing system to the global IntegrityNext platform via an API interface. All information regarding IntegrityNext’s sustainability assessment and monitoring can be accessed through the ‘Supplier risk’ tab available at supplier level.
The key features of the connector include:
- Inviting suppliers, which are considered for sustainability assessment directly through the Onventis system. The users can request assessment for a set of standard ESG topics defined by IntegrityNext or a manual selection of relevant topics.
- Displaying the overall ESG assessment rating as well as assessment rating of the individual topics selected for the particular supplier.
- Displaying the critical messages received under ‘Sustainability monitoring’ section collected by IntegrityNext.
With the new release, we are further adding new use cases around the ‘IntegrityNext API Connector’ to provide added value to our customers and help them manage sustainability risks of their suppliers.
1. IntegrityNext: User notification for ‘Sustainability monitoring’
The ‘Sustainability monitoring’ section in the ‘Supplier risk’ tab at master data level displays the count of all the critical news received for the particular supplier. Critical news across several topics such as ‘Environmental Protection’, ‘Human Rights & Labor’, ‘Health & Safety’, ‘Anti-Bribery & Anti-Corruption’, ‘Supply Chain Responsibility’ and many others are collected by IntegrityNext by scanning around one billion media message a day.
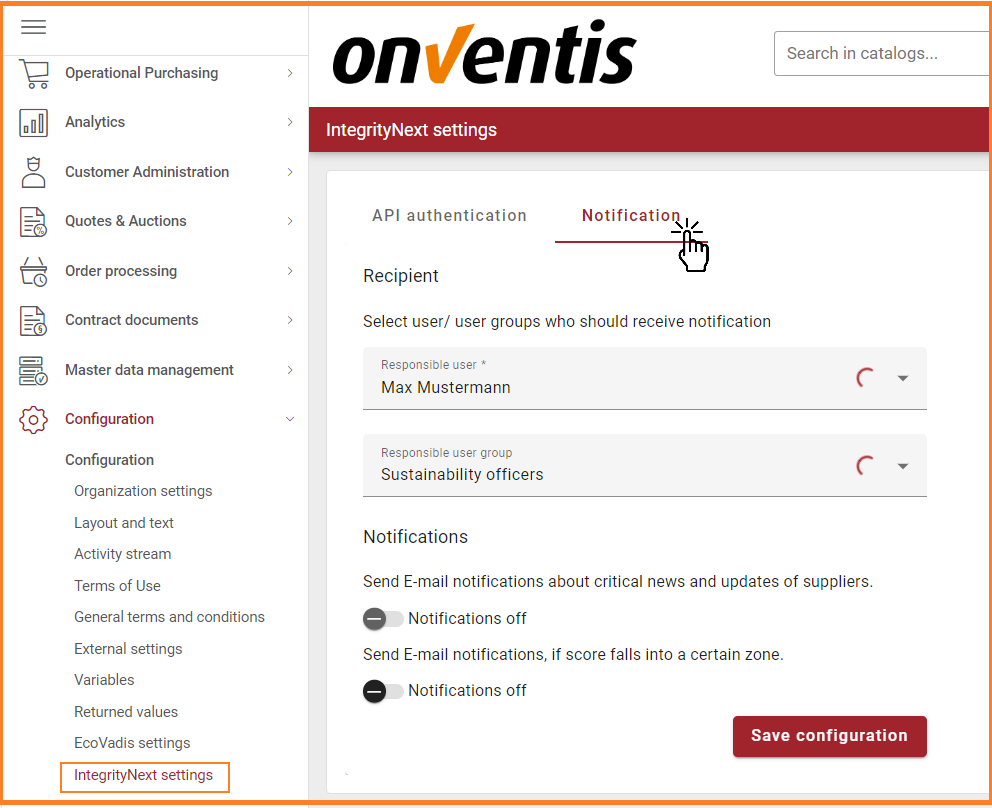
With the new release, our customers using ‘API Connector for IntegrityNext’ will be able to receive E-mail notification for critical messages received. The settings to enable notification can be accessed through the ‘Notification’ tab available in the ‘IntegrityNext settings’ under ‘Configuration’. Users can configure the ‘Responsible User/User group’ who are responsible for sustainability assessment of suppliers to receive these notifications.
Once critical news regarding sustainability topics is received, an e-mail is sent to the ‘Responsible user/user group’ configured in the system. A link to IntegrityNext’s ‘Social media profile’ of the supplier is provided in E-mail so that the user can view the news.
To avail this function, follow the below steps:
- Under ‘Configuration’ click on ‘IntegrityNext settings’
- Click on the ‘Notification’ tab available under these settings
- Select the ‘Responsible user/ Responsible user group’ maintained in the system
- Toggle the ‘Notification’ on

E-mail template:
Subject: Alert regarding IntegrityNext sustainability monitoring for Supplier {Supplier Name}
Dear Sir or Madam,
For your supplier {Supplier Name}, critical message has been received under IntegrityNext sustainability monitoring.
Follow the link to view the update: {Link to the social media profile of the supplier}
Yours sincerely
Your Onventis Team
2. IntegrityNext: User notification for ‘Assessment rating’ in a certain zone
The ‘Sustainability assessment’ section in the ‘Supplier risk’ tab at master data level displays the ESG rating for the particular supplier. Suppliers are assessed across several topics such as ‘Environmental Protection’, ‘Human Rights & Labor’, ‘Health & Safety’, ‘Anti-Bribery & Anti-Corruption’, ‘Supply Chain Responsibility’ and many others by IntegrityNext through pre-built questionnaires.
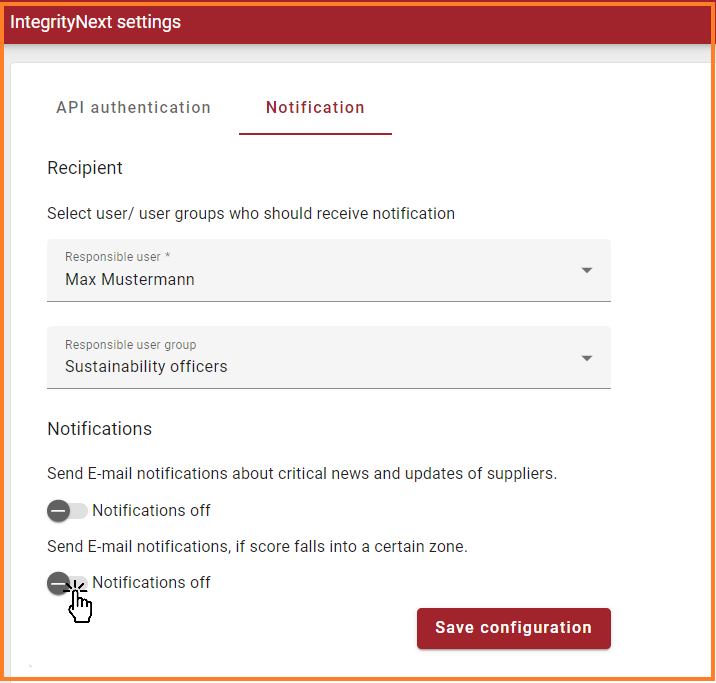
With the new release, our customers using ‘API Connector for IntegrityNext’ will be able to receive E-mail notification when the ‘Overall assessment rating’ falls into a certain risk zone. The settings to enable notification can be accessed through the ‘Notification’ tab available in the ‘IntegrityNext settings’ under ‘Configuration’. Users can configure the ‘Responsible User/User group’ who are responsible for sustainability assessment of suppliers to receive these notifications.
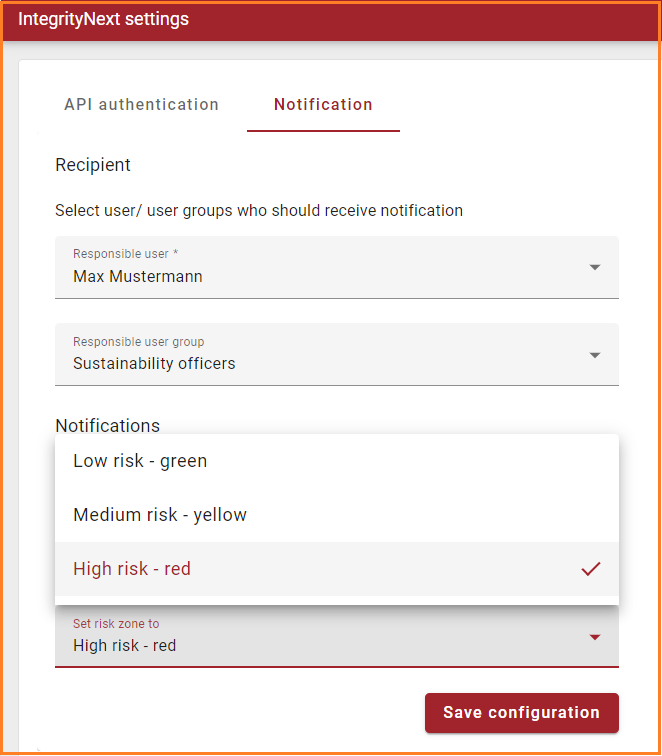
The users can also configure the ‘Risk zone’ which acts as a risk threshold. ‘High risk – red’ is the default selection if the notification is toggled on. Once the supplier rating falls into or below that risk zone, an e-mail is sent to the ‘Responsible user/user group’ configured in the system. A link to IntegrityNext’s ‘Supplier profile’ is provided in E-mail to view detailed ESG assessment.
To avail this function, follow the below steps:
- Under ‘Configuration’ click on ‘IntegrityNext settings’
- Click on the ‘Notification’ tab available under these settings
- Select the ‘Responsible user/ Responsible user group’ maintained in the system
- Toggle the ‘Notification on’
- Select from ‘Low risk – green’, ‘Medium risk -yellow’, ‘High risk -red’ as the risk threshold zone
The logic for notification trigger works as shown in the below table:

E-mail template:
Subject: Alert regarding IntegrityNext assessment for Supplier {Supplier Name}
Dear Sir or Madam,
For your supplier {Supplier Name}, the latest IntegrityNext overall assessment rating is {rating} which is in or below the set threshold: {Set zone}.
Follow the link to view the update: {Link to the Public Profile of the Supplier}
Yours sincerely
Your Onventis Team.
1. ‘Request number’ in qualification management
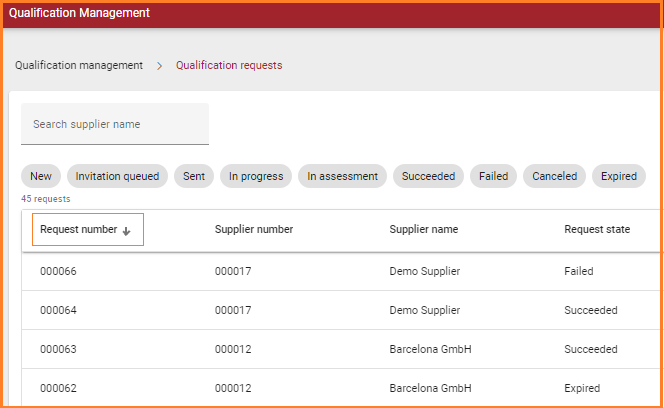
With the new release, a new field called ‘Request number’ is added, which serves as a unique identification number for the qualification requests. The ‘Request number’ is displayed in the ‘Qualification requests’ table and in the response page after opening the request. The ‘Request number’ is also mentioned in all the e-mail notifications related to qualification management.
Users can sort the ‘Qualification requests’ table according to the ‘Request number’. The table by default is sorted in descending order of ‘Request number’ so that the recent requests are displayed at the top.
2. Add ‘File title’ to ‘Extended File Upload’ question in the questionnaire:
With this feature, the questionnaire designer is able to add ‘File Title’ to ‘Extended File Upload’ question.
To avail this function, follow the below steps within the questionnaire tab:
- Create a new questionnaire.
- Fill the general information and proceed to ‘Editor’ tab.
- Add a new question and select the question type as ‘Extended File Upload’.
- A side panel automatically opens after selecting this question type.
- Enter the ‘File Title’.
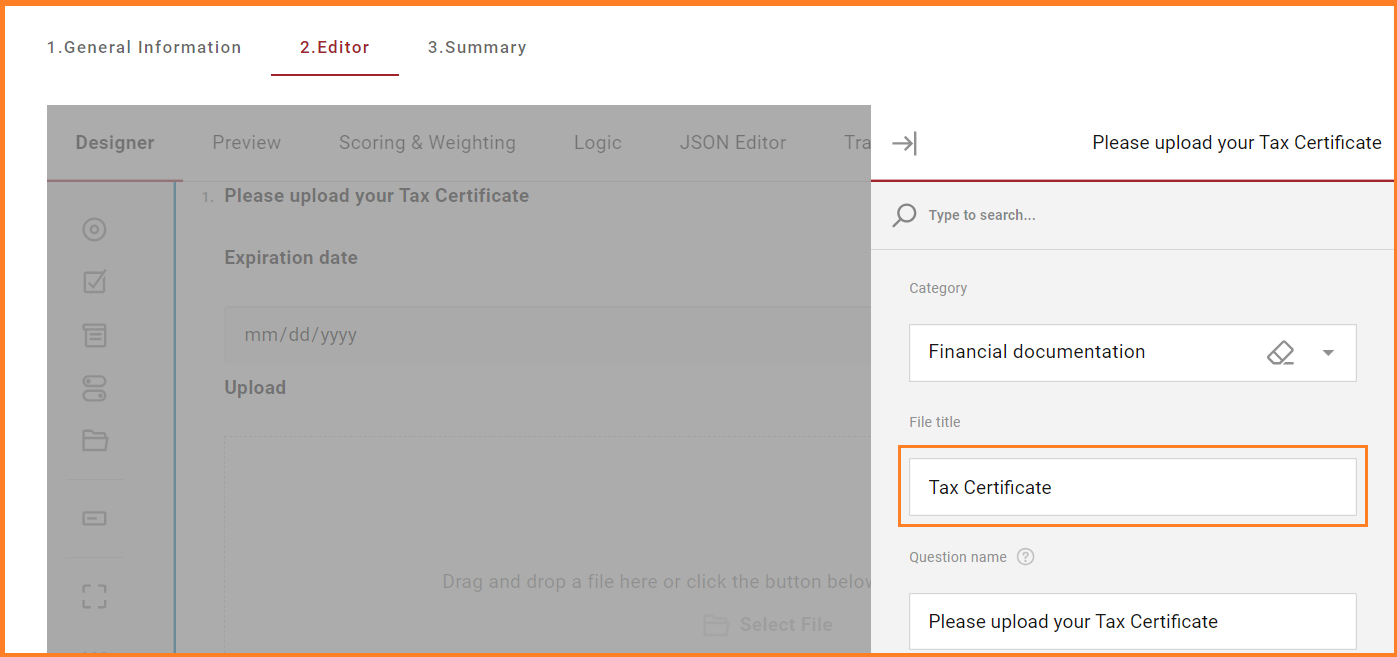
Once the supplier responds to the questionnaire, the same file title is visible in the ‘Uploaded files’ tab. This tab is available in the supplier list and in qualification request response page. If no ‘File Title’ is added by the questionnaire designer, the title of the file uploaded by the supplier is displayed.
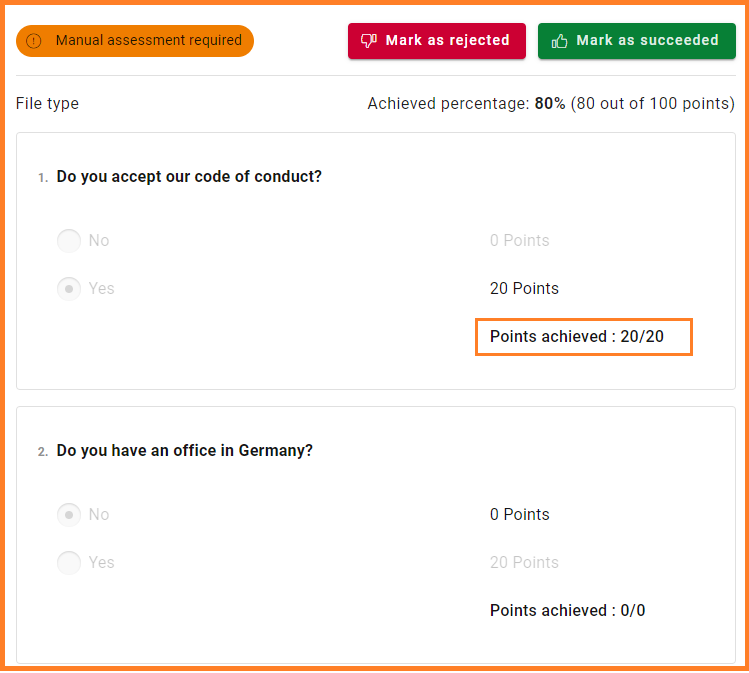
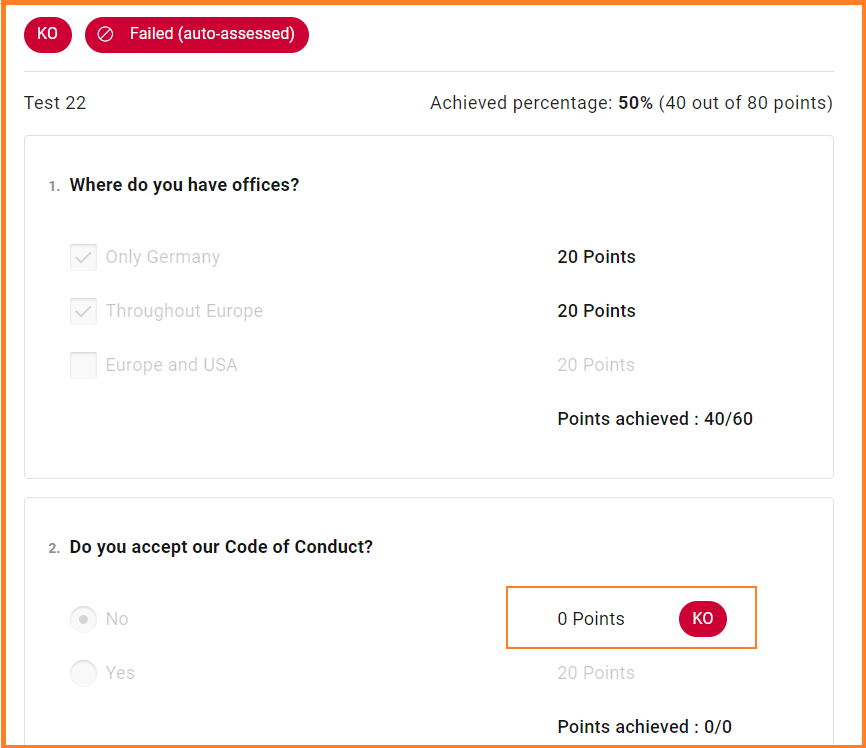
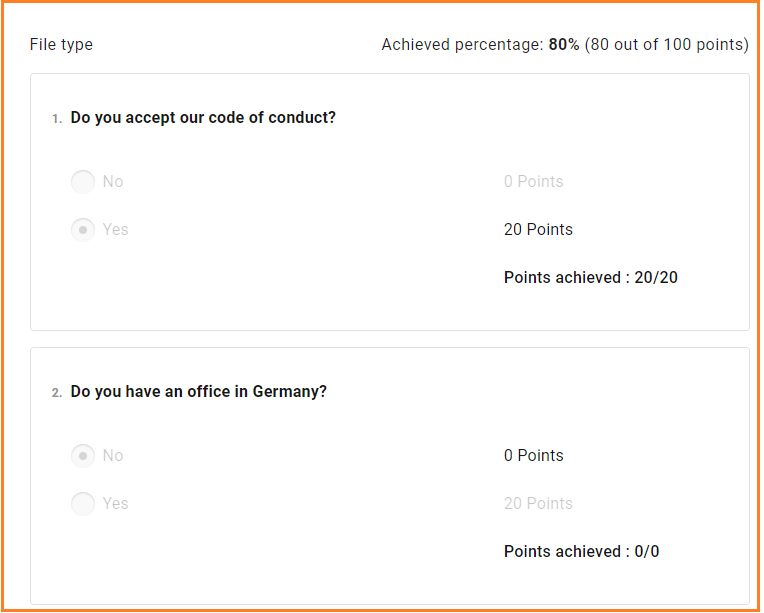
3. Detailed summary of questionnaire response
With the latest update, the user can see a detailed response to a questionnaire under qualification management. The detailed scoring is shown for questionnaires in both standalone qualification requests and requests under qualification processes. This feature enables user to make an informed decision when a manual assessment is required.
Against each question, the achieved points out of the maximum possible points, and weight is shown if enabled. If the ‘KO’ is activated against a response, it is displayed.
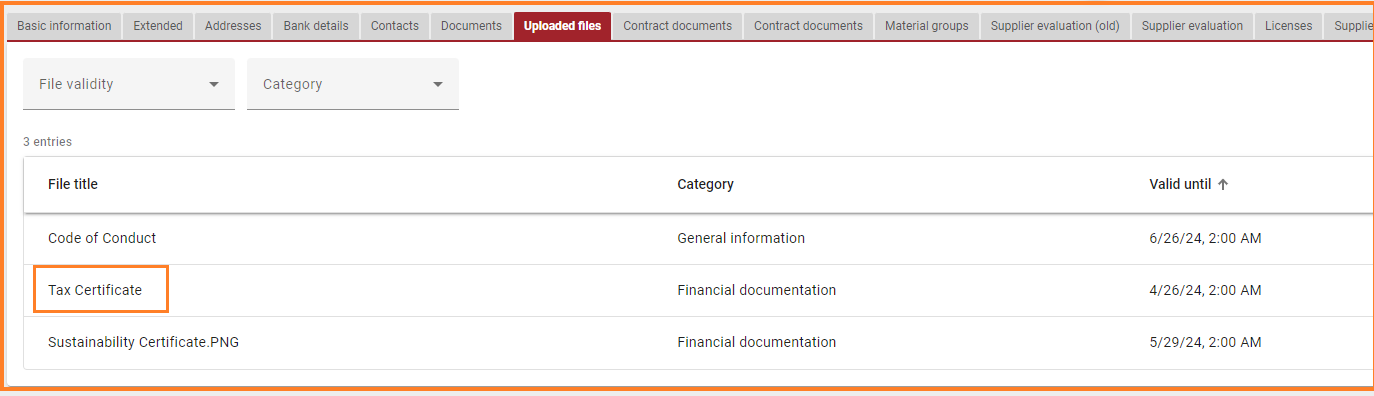
4. Link to questionnaire response from ‘Uploaded files’ view:
The ‘Uploaded files’ tab in the supplier list facilitates the users to access all the files received under qualification processes and requests for the particular supplier under a single tab.
With the new release, we have added a column called ‘Questionnaire’ in this view to display the name of the questionnaire through which this file was requested.

If the user clicks on the questionnaire, the detailed response to the questionnaire as shown below is displayed. This functionality allows the user to access the questionnaire response through the ‘Uploaded files’ tab.
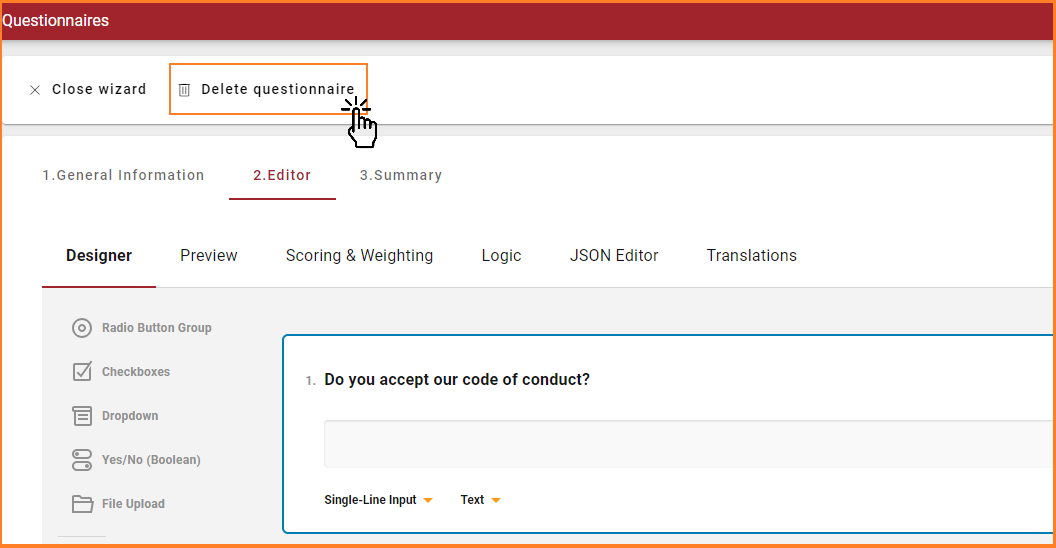
5. Delete questionnaire in ‘Being Created’ state:
This feature enables the user to delete unwanted questionnaires which are in ‘Being Created’ state and not yet published. The ‘Delete questionnaire’ option is visible at the top besides ‘Close wizard’.
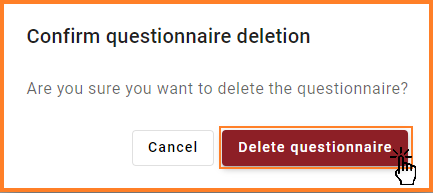
Once the user clicks on the ‘Delete questionnaire’ button, a pop-up message called ‘Confirm delete questionnaire’ is displayed. If the user selects the ‘Delete questionnaire’ option, the questionnaire is deleted and is no longer visible in the list view. Once the questionnaire is published, the user can no longer avail this functionality.
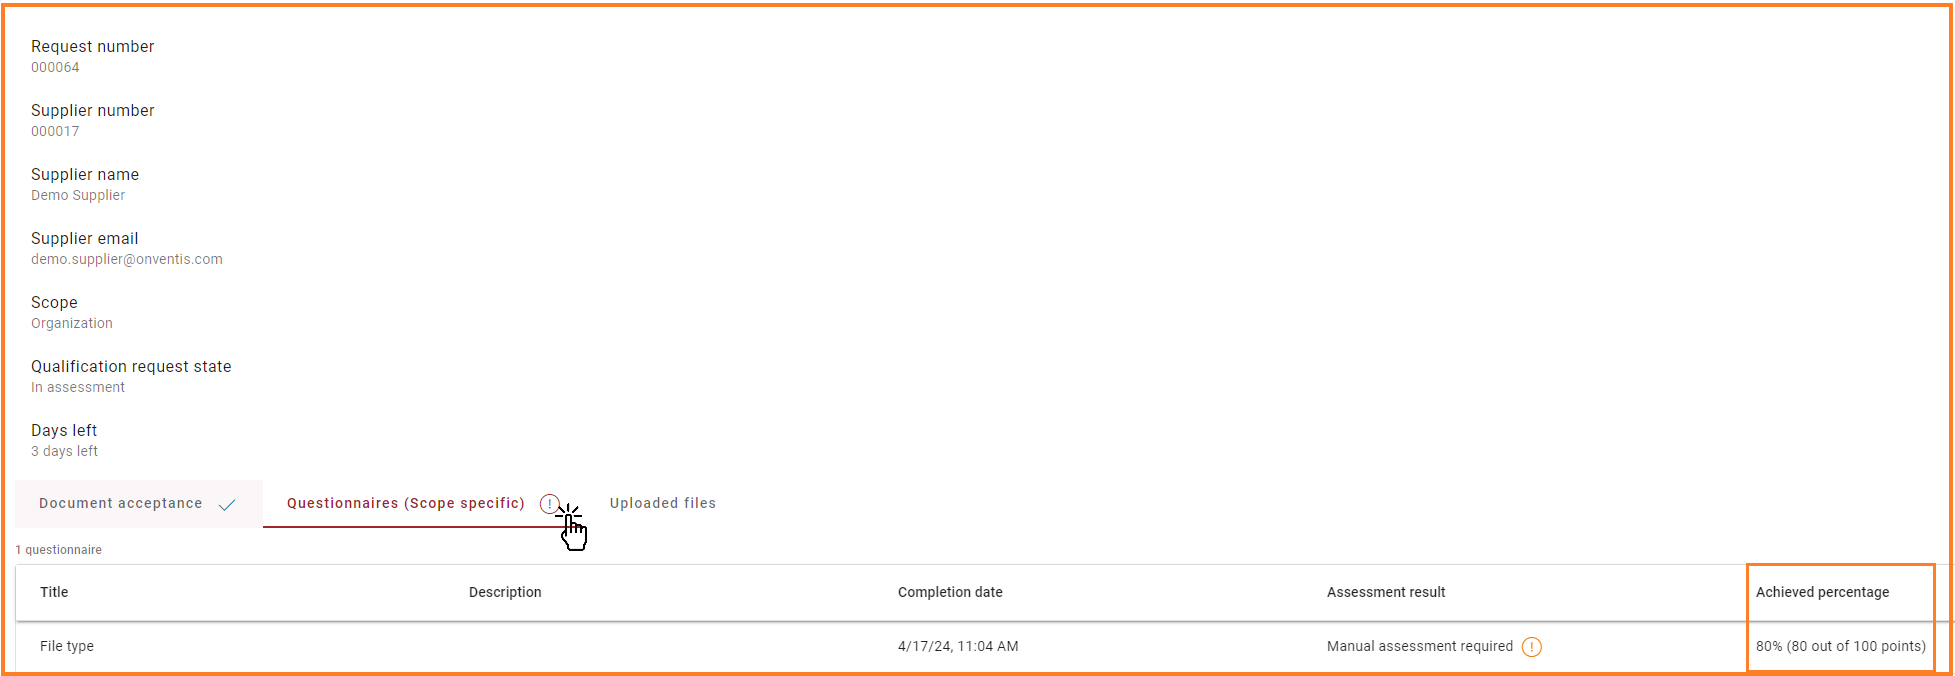
6. Display ‘Achieved percentage’ at qualification request response view:
The ‘Achieved percentage’ is added as a column in the table displayed after clicking on the qualification request and selecting a particular questionnaire. The ‘Achieved percentage’ and (‘Points’ out of ‘Total points’) is shown in this column. Previously, this information was only available after opening the questionnaire response.
With this release, we are making some changes to Supplier registration. These include minor changes to the E-mail templates and the welcome message displayed to supplier after clicking on the Onventis Buyer registration link. These changes were made to ensure that the registration process is highly transparent and in accordance with the regulatory requirements. Apart from this, we have also done other changes which are as follows:
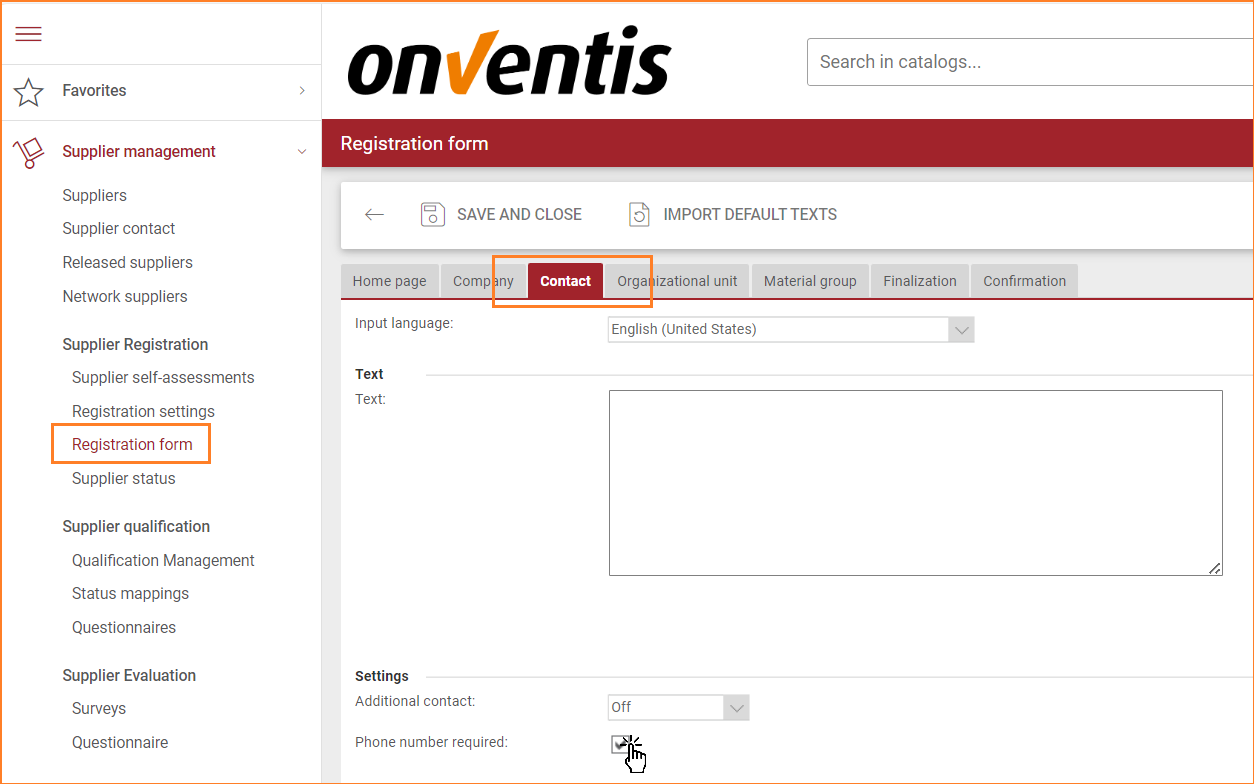
1. Making the ‘Phone’ field in the ‘Contact’ tab of the registration form configurable:
Previously, the phone field was mandatory to be filled by the suppliers while registering themselves against the buyer’s Tradecore organization. However, with the current release the users would be able to configure the ‘Phone’ field as optional. Phone numbers are classified as ‘Personal’ data, and this feature allows our customers to collect minimum ‘Personal’ data, which is encouraged by the GDPR law.
By default, the checkbox is ticked, so that the existing system behavior is not changed. However, if the users unchecks it, the ‘Phone’ field would be optional for the suppliers to fill while registering.
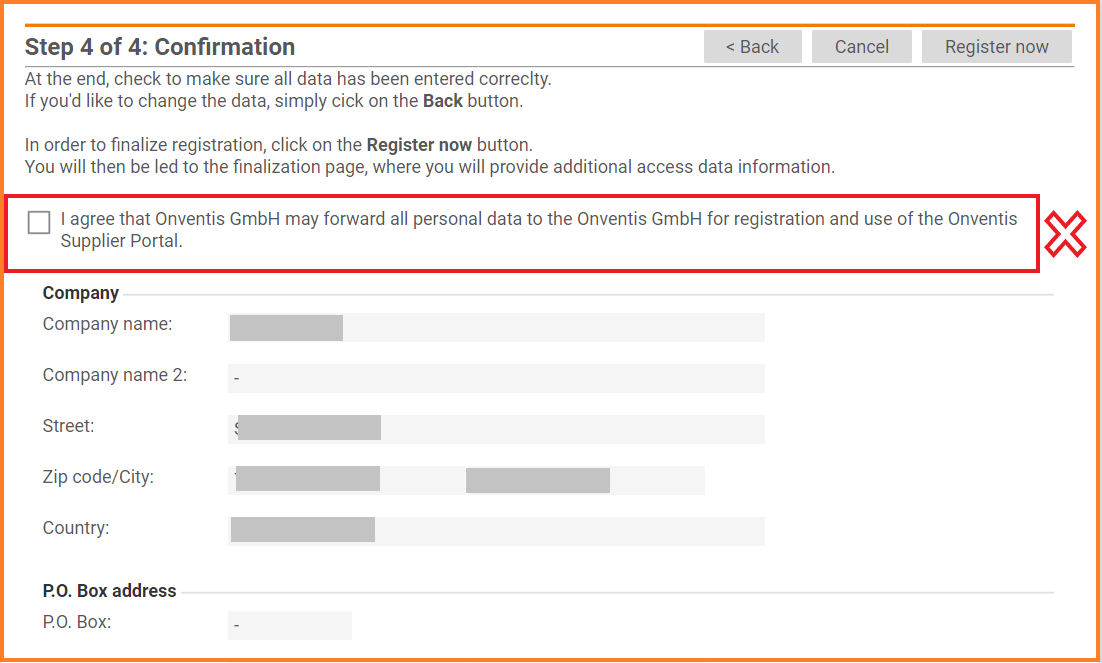
2. Not prefilling ‘Personal’ data while registering on Onventis Supplier Portal:
With this change, we have removed the option for suppliers to provide consent to forward personal data to Onventis for registration and use of Onventis Supplier Portal by removing the check box and associated text in the ‘Confirmation’ step. The ‘Confirmation’ step is displayed to supplier when the suppliers register themselves against the buyer’s Tradecore organization after clicking on the Onventis Buyer registration link.
Onventis does not store any personal data of the supplier at this step. Subsequently, when the supplier registers on the Onventis Supplier Portal after buyers sends access details, no personal data is prefilled.
For our Onventis Spend Analytics customers, we have introduced preconfigured Spend Analytics charts exactly where they are most impactful. Starting with the supplier management, you are now able to see all relevant spend for a particular supplier, by selecting a supplier and navigating to the tab “Spend Analytics”. Please note, this is only visible if a user has at least the Onventis Spend Analytics “Viewer” right.

Procure-to-pay
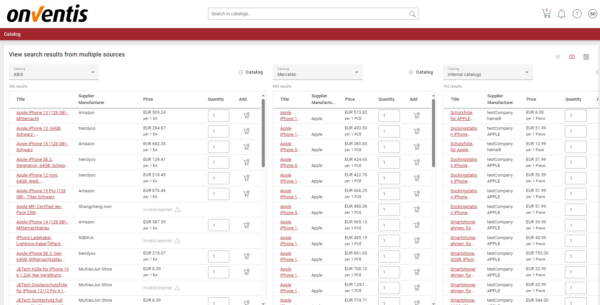
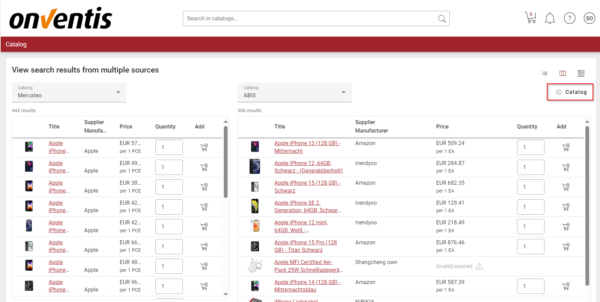
Brand new catalog search result view
In this release, we are introducing a brand new view to display search results. The split view allows to compare catalog search results of different sources in one overview.
When searching for an item, our customers can now use the split view, by clicking on the split view icon:
![]()
The search results will then be divided into up to three different catalogs between marketplaces and internal catalogs:
By clicking on the – catalog button, the customer can remove one of the catalogs:
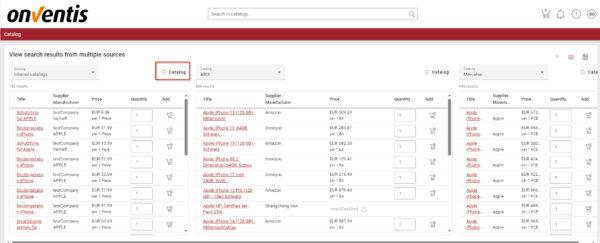
By clicking on the + catalog button, the customer can add one catalogs:
By clicking on the drop-down menu, the customer is free to select the catalog they want to compare:

Price displaying
We have addressed a bug where the article was not displaying the updated price correctly on the results page.
Catalog Display
We have addresses a bug where an unexpected screen is displayed when selecting integrated marketplace in catalog navigation.
Service note settings
We have addressed a bug related to service notes, where in very specific cases the customer was able to edit serviec note in status “being processed” even if the option “service note can be entered by customer” was not activated in the order processing settings.
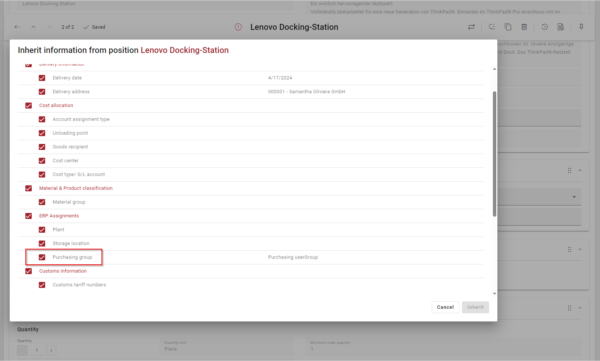
Inherit feature
We have extended the inherit feature in the shopping cart with the option to inherit the purchasing group.
In case of non-SAP organization it is assigned to “Material & Product classification” section
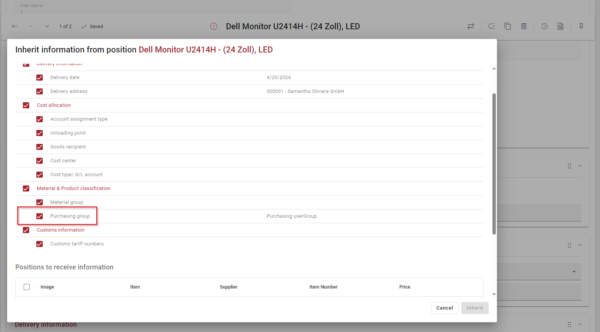
In case of SAP organization, it is assigned to “ERP assignments” section
Mandatory fields
We have addressed a bug that was showing certain fields in the account allocation and ERP assignments in the new shopping cart as mandatory, even though they were optional. In addition, some of the mandatory fields in the account allocation assignments were not being validated and now they are.
Multi-Accounting
We have addressed a bug where the quantity was reset after choosing/changing the “Cost center” in the “Edit multi-accounting” window for the “Quantity-based account assignment” type.
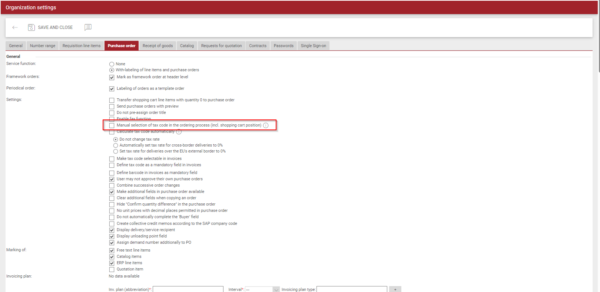
Manual selection of tax codes
In this release, we have introduced a feature that allows the manual selection of tax codes in the shopping cart, on the requisition line item and on purchase orders.
Note: This feature is only supported, if the autoamtic tax determination feature is deactivated. In case you are currently using and will use the automatic tax determination feature, in your case the manual selection of tax codes feature is not an option.
To configure this new behavior, you need to navigate to configuration > organizational settings > purchase order tab and search for “Manual selection of tax code in the ordering process (incl. shopping cart position)”
After selecting the setting mentioned, you will notice that a new field in the shopping cart in the conditions block will appear so that you can fill in the desired tax code manually.
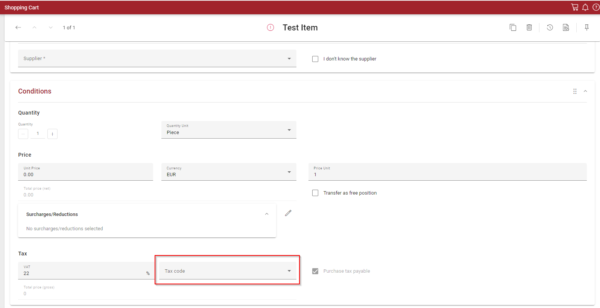
The manual selection of tax codes will be possible in all documents where the tax code is part of, like the shopping cart, the purchase order position or the requisition line item. If a tax code is manually selected, it will be transferred to the follow up documents.
Cost allocation fields
We addressed a bug where the value in the “Cost type/Accounting” field was not cleared when a “Cost center” without any assignment was selected in the drop-down field of the new shopping cart
Sending orders to suppliers
We have addressed a bug related to an interface configuration in which some purchase orders were not being sent to the suppliers.
Display of the delivery date
We have improved the display of the delivery date (item level) in the order list, which will now show the first delivery that does not have a canceled status of all the position items, so that our customers know the first date an order will be delivered when there is a delivery schedule.
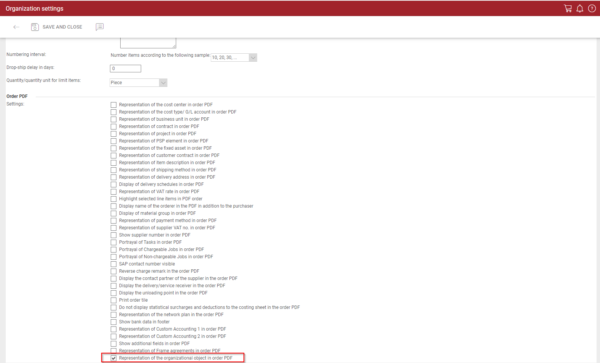
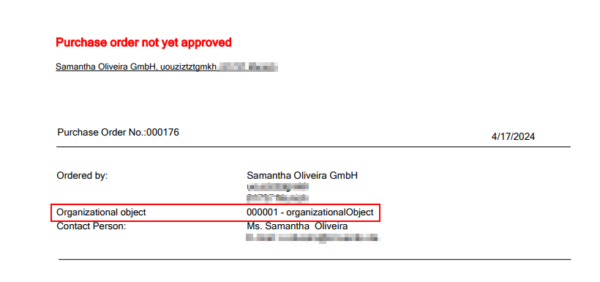
Displaying organizational objects in the PDF
In this release, we have added the option of displaying organizational objects (number and title) in the purchase order and sales order PDFs.
Example:
Order list filter
In this release, we have added the organizational object as a filter option in the filter configuration.

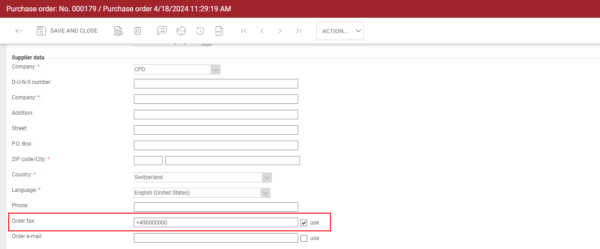
CPD supplier
In this release, we have improved the CPD supplier functionality. When creating a purchase order, the checkbox use the fax number entered for CPD will automatically be checked.
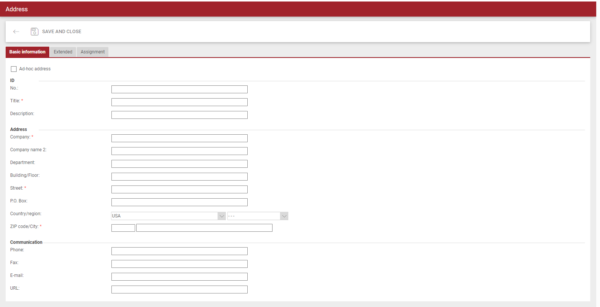
New delivery addresses
In this release, we have added the function of creating a new delivery address for the new shopping cart. To do this, the user must have permission in the access rights settings
(User roles > Rights > Administration > Internal organization > Address > Create address)
In the new shopping cart, in the delivery information area, users who have the right to add a new address will see an add button:

By clicking on this add button, the address page will open and the user will be able to add all the necessary information.
Framework order
We have address a bug where some framework orders could not be send to the supplier.
Adjust the BC-log of Order Import from SAP with SAPMixed adapter
When importing order confirmations from SAP, the order number is also displayed in the import log in addition to the order number.
Supplier import
When importing suppliers from several external systems, you can prevent the current supplier number from one system from being overwritten by the number from the second system.
Surcharges import
When transferring orders from Onventis to SAP, you can optionally activate the check and transfer of the additional conditions that come for an article in the response from SAP. This means that the additional conditions created in Onventis are compared with the additional conditions from SAP and supplemented.
Order change
We addressed a bug where two users were simultaneously editing a sales order change and given this behavior they received a generic message “There is no row at position 0” in which it was not possible to identify the error and fix it. After handling the bug, we changed the generic error message to a more appropriate one “Order is in a status which does not allow adding new positions”.
In addition, we also addressed a bug where when changing the material group in the sales order the change was not possible.
Delivery date confirmation
We have addressed a bug where suppliers couldn’t confirm delivery dates not only from the “Important messages” screen while logging into the application, but directly from the Sales order page when the Supplier user opens it from the list after navigating from the Dashboard or the side menu.
Translation
We have fixed the translation manufacturer in the requisition line item position.
We have removed the filters options of the account assignment determination list, as we are currently not supporting any way of filtering of the account assignment determination rules list.
Ad-hoc address
In this release, we are introducing the ad-hoc address functionality in the mobile version.
User assignments
In this release, we have introduced the option of selecting all organizational objects for user assignments.
To select all organizational objects for a user, we must navigate to master data management > user (select the user) > assignments (tab) > organizational object
Import of address
We have addressed a bug where it was not possible to delete information via import because blank fields were not overwritten.
Platform & Core
With the Ob 2024.4 release, our Onventis Buyer and Onventis Supplier applications receive translations for Bulgarian, Croatian and Romanian. You can now also maintain content in these languages.
This enables us to improve the usability, of the system, for your Bulgarian, Croatian and Romanian native speakers.
In this release we introduce the aggregation of BcJob notifications into one email per hour. Instead of sending a notification email directly after finishing each BcJob execution, we check each hour, how often a BcJob was executed and send you one email containing the information on success, error and failed executions.
We do so, to reduce the amount of notification emails we send as we often send big numbers of emails for the same BcJob within a very short time frame that are not read.