
In the master data area, you can maintain and configure all the master data required for your organization.
Create and manage order units
You can maintain order units for your organization under Master Data Management → Master Data → Order Units.
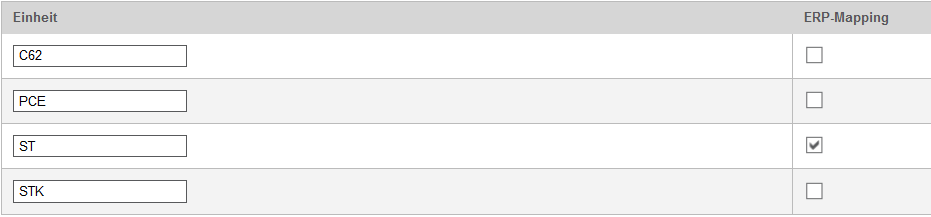
With the help of the order unit table, you can use the import mapping to standardize the different units that are imported by the vendor in catalogs.
In the following example, all imported order units of the columns Import Mapping (C62, PCE, STK) and ERP mapping (ST) converted to “piece“.

In addition, you can define which units are to be transferred with a purchase order in the case of possible integration into the ERP system.
The transfer of the order units is controlled by the ERP mapping. If the purchase order is transferred to SAP, for example, the displayed order unit “piece” is converted to “ST” when it is transferred to an ERP system.
Functions in the overview list
The following functions are available in the order unit overview:
- You can create a new order unit by clicking the New button.
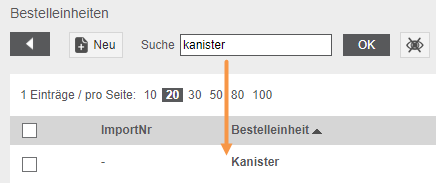
- You can search for an order unit in the search field. To do this, enter the order unit you are looking for and confirm your entries with the OK button. As a result, all matching entries are found. The StopSearch.svg cancels the search and all existing entries are displayed again.
- The Favorites icon adds the order units to your Create and Manage Favorites.
- If you want to delete existing order units from the overview list, you must select the desired order unit(s) by activating the selection box.
- You can delete the selected order units using the Delete Selected Order Units button.
- You can transfer all the base units from Onventis using the Transfer base units.
- Via the Export… button, you can export the bear units as an Excel file.
- You can import order units via the corresponding BC job.
Configuration and creation of order units
You can create a new order unit by clicking the New button.
To configure existing order units you have to select the order unit by clicking on it.
You can make the following settings when configuring order units:
Basic data tab
- Input language: Selection of the language in which the order unit is to be displayed in the system.
- ImportNr: Assignment of an import number in the form of a string (in the example “piece”)
- Unit: Enter the respective order unit
- Description: in this field you can enter detailed information about the order unit.
- Default for goods: here you can set the most used order unit, e.g. “piece”, as default for all items.
- Standard for services: here you can define the most commonly used order unit, e.g. “h”, as the standard for all newly created service orders.
- Standard for blanket orders: here you can define the most used order unit as standard for all newly created blanket orders.
- Automatically created unit: with the help of this checkbox, order units that have not yet been defined, e.g. when importing catalogues or orders in OpenTRANS format, are automatically saved in TradeCore.
- Visibility: with the visibility you can control in which modules of TradeCore the order unit is visible.
Mapping tab
The mapping controls the conversion of the order units during import and export.
You can create a new entry by entering the new order unit in the text field column.
The order unit is added via the New entry button. By activating the checkbox ERP-Mapping the mapping between TradeCore and other ERP systems is activated.
The system can then convert the order unit.

Onventis basic units
You can adopt the basic units from Onventis. The basic units offered are based on experience and are the most frequently used order units by customers and suppliers.
If you have already created your own order units in your system, the following rules apply when you transfer the Onventis base units:
- If one of the base units already exists in your own unit list, it will not be taken over again, but the “Title” incl. the “Unit” will be taken over. of all translations. If a translation has been adjusted, the unit is transferred again, as a second data record.
- If you have defined a default unit, this default remains. The standard flag is not copied again from the basic data.
You can import the base units using the Import base units button.
| Import number | Order unit German |
Order unit en-US | Import Mapping | ERP mapping |
| Can | Can | Can | DO|TN|DOS|CAN | DOS |
| Square meter | Square meter | Square meters | MTK|M2 | M2 |
| Kilometres | Kilometres | Kilometers | KM|KMT | KM |
| Cubic millimeter | Cubic millimeter | Cubic millimeters | MMQ|MM3 | MM3 |
| Flat rate | Flat rate | flat rate | LS|PAU | PAU |
| Milliliter | Milliliter | Milliliters | MLT|ML | ML |
| Bottle | Bottle | Bottle | BO|FL | FL |
| Barrel | Barrel | Drum | Z3 | |
| Centimeter | Centimeter | Centimeters | CMT|CM | CM |
| Kiloton | Kiloton | Kiloton’s | KTN|KT | KT |
| Cubic meters | Cubic meters | Cubic meters | MTQ|M3 | M3 |
| Cubic centimeter | Cubic centimeter | Cubic centimeters | CMQ|CM3 | CM3 |
| Cardboard | Cardboard | Carton | CT|KAR | KAR |
| Dozen | Dozen | Dozen | DPC|DZ | DZ |
| number of persons | number of persons | Number of people | HEA|PRS | PRS |
| Cubic Decimetre | Cubic Decimetre | Cubic decimeters | DMQ|CD3 | CD3 |
| Pack | Pack | Pack | PK|PCK|PA|PAK | PAH |
| Roll | Roll | Roll | CL|RO|ROL | ROL |
| Blackboard | Blackboard | Panel | OA|TAF | TAF |
| Box | Box | Box | BX|KS | KS |
| Box | Box | Crate | CS|KI | AI |
| Power unit | Power unit | Activity unit | LE | LE |
| Hectolitre | Hectolitre | Hectoliters | HLT|HL | HL |
| Square millimeter | Square millimeter | Square millimeters | MMK|MM2 | MM2 |
| Palette | Palette | Pallet | PAL | PAL |
| Sheet | Sheet | Sheet | BLT|BL|LEF | BLT |
| Minutes | Minutes | Minutes | 5K|MIN | MIN |
| Tonne | Tonne | Tons | 26|CTN|DT|E28|GT|TO | TO |
| Decimeter | Decimeter | Decimeters | DCM|DMT|DM | DM |
| Meter | Meter | Meters | MTR|M | M |
| Year | Year | Year | A|ANN|JHR | JHR |
| Piece | Piece | Piece | C62|PCE|EA|STK|UNIT|STCK|ST | ST |
| Milligram | Milligram | Milligrams | MGM|MG | MG |
| Sentence | Sentence | Set | LOS | SET |
| Days | Days | Days | DAY|T | T |
| Confederation | Confederation | Bundle | PAT|BE | |
| Millimeter | Millimeter | Millimeters | MMT|MM | MM |
| Pair | Pair | Pair | PAA|PR | PAA |
| Tube | Tube | Tube | TU | TU |
| Bag | Bag | Bag | BG|SA|TTE | TTE |
| Square centimetre | Square centimetre | Square centimeters | CMK|CM2 | CM2 |
| Gram | Gram | Gram | GRM|G | G |
| Seconds | Seconds | Seconds | S|SEK | |
| Block | Block | Block | PD | |
| Kilogram | Kilogram | Kilograms | KGM|KG | KG |
| Months | Months | Months | MON | MON |
| Square decimetre | Square decimetre | Square decimeters | DMK|DM2 | DM2 |
| Litres | Litres | Liters | L|LTR | L |
| Hours | Hours | Hours | H|STD | STD |
| Weeks | Weeks | Weeks | WEE|WCH | WCH |
Create and manage material groups
You can create and maintain material groups in Onventis underMaster Data Management → Master Data → Material Groups.
You can create new material groups by clicking the New button.
The following field is available for entering and maintaining material groups:
- Input language: Selection of the input language in which the material group is to be entered and displayed.
Area Material group
- No.: the number of the material group. If you are entering the data manually, you should leave this field blank. When saving, a unique number is generated by Onventis. If you use the material groups incl. of the material group number in Onventis via the Business Connector, the material group number is imported into this field.
- Title: Material group name, e.g. office supplies
- Description: detailed description of the material group
- Keywords: Definition of keywords by which users can search for the material group, e.g. office equipment, stationery, etc.
Settings area
- Visibility: the associated checkboxes allow you to control the visibility of the material group in the individual modules within Onventis:
- Visible in Purchase Order/Catalog Management
- Visible in inquiry system/supplier management
- Visible to supplier upon registration
- General: under General you can activate the material group and define separate rules:
- Active: by activating this checkbox, the material group is activated and can be used in Onventis.
- Set delivery/service recipient as required field: if the material group is selected in a purchase order, activating this checkbox makes the delivery and service recipient fields required fields.
- Do not allow orders with this material group to be sent: by activating this checkbox, users cannot send orders with this material group to the supplier.
- No budget calculation: by activating this checkbox, material groups are marked as “not budget relevant”. As a result, purchase orders with these material groups do not debit the assigned budget of the organizational unit.
Codes/Mapping area
In this area, you can select the corresponding
eClass
– and/or
UNSPSC
– numbers for each material group.
When an item is transferred from an OCI shop to the Onventis shopping cart, the material group is assigned based on the eClass number provided. The prerequisite for this is the activation of the option “Carry out eClass mapping to material group during OCI transfer”. This option is disabled in the default settings.
The OCI mapping for eClass comes from the OCI interface and is converted to the customer specific material group. When ordering articles from OCI catalogs that have an eClass number stored, the corresponding material group is automatically selected for the corresponding order item.
Via the New... button it is possible to create eClass numbers and assign them to the respective material group. An eClass number can only be assigned to one material group at a time. Multiple eClass numbers can be assigned to a material group.
You can define fallback material groups for groups of eClass numbers.
Examples:
- If the eClass number 19-05-00-00 is stored for a material group, this material group is used for all articles that are subordinate to the eClass number 19-05-00-00 (e.g. 19-05-04-03 or 19-05-08-90).
Onventis always checks first whether there is an exact mapping between an eClass number and a material group. If no exact match is found, Onventis falls back to the fallback material group. - If the eClass number 00-00-00-00 is defined for a material group, this material group can be used as a fallback for all undefined eClass numbers. Here, too, Onventis first checks whether there is an exact mapping between an eClass number and a material group before resorting to the fallback material group.
Assignments area
Assignments
- You can make the following assignments for each material group:
- a user group (usually the associated purchaser)
- n – Types of costs
- n – account assignment categories
- n – Tasks
- n – Delivery addresses
- Activate delivery address assignment (only for delivery address at item level): if you select this option, the delivery address assigned for this material group is determined in the purchase orders. This setting is only valid in connection with the activation of the option Delivery addresses on item level.
| Hinweis
Prerequisite for the assignment of cost elements to material groups is the activation of the checkbox Material groups in the organizational settings. |
This assignment is carried out in order to provide users – depending on the material group – with the (possibly restricted according to the settings) predefined data as a preselection.
The Save and Close button saves the material group and displays it in the material group overview.
You can either create further material groups of the same level or their subhierarchies.
To use the menu available for the material groups and select the corresponding action, click on the arrow symbol ![]() .
.
New: Creation of a substructure of the material group 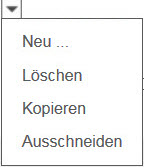
Delete: Delete the material group
Copy: Copying the material group for pasting at another place
Cut: Cut the material group for insertion at another location.
A possible hierarchy tree of the material groups could look as follows:
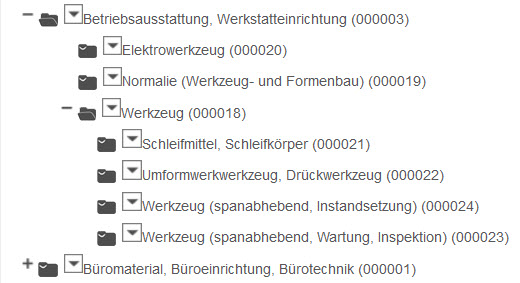
![]()
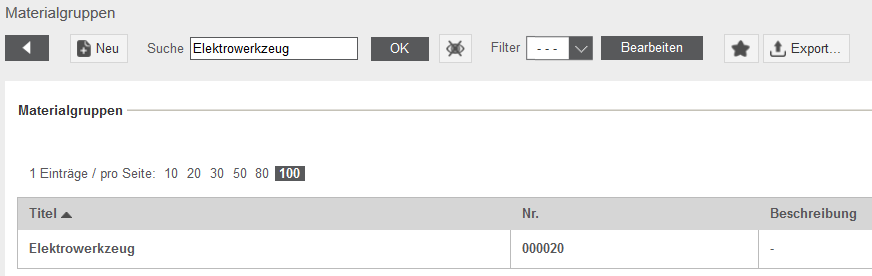
Via the“Search field” you have the possibility to search for a material group. To do this, enter the desired term in the search field, e.g. “power tool” and confirm with the OK button.
The matching material groups are displayed in a list.
Customs tariff numbers
Under Master Data Management → Master Data → Customs Tariff Numbers, you can view and maintain the customs tariff numbers that apply to your organizational units.
| Customs tariff numbers are eight-digit commodity codes. Customs tariff numbers are used to code goods in order to notify the authorities of the quantity of goods of a particular type that have been imported or exported.
The statistical goods number corresponds to the Combined Nomenclature, which is relevant as a customs tariff number for exports. This number must be reported to customs for every export and import transaction; the goods are tariffed with it, i.e. grouped into the customs rates. For export the customs tariff number is 8-digit and for import 11-digit (the 8-digit number is supplemented by another 3 digits). For example, if a company purchases goods of the type “clothing”, there is a certain range of tariff numbers assigned to that type. This can be obtained from customs. |
You have the option of importing the customs tariff numbers into Onventis or maintaining them manually. You can control a mass upload using the BC Job.
You can request the customs tariff numbers from German customs.
In order to guarantee the import, the supplier is usually responsible for indicating the correct customs tariff number.
Packing instructions
For some goods, special, stress-resistant packaging may be necessary for the transport of certain goods in order to protect them from stress. For this purpose you have the possibility to define packaging instructions in Onventis.
In the area Master Data Management → Master Data → Packaging Instructions you can administer packaging instructions, which can be selected in the purchase orders by the users and suppliers.
You can open an existing packing instruction by clicking on the number or title.
You can create a new packing instruction by choosing New.
The following fields are available for maintaining packing instructions:
- Number: under Number you must assign a number. The number entered must not yet be assigned. If you enter an existing number, a field message is displayed. This field is mandatory and must be maintained.
- Title: under Title you must enter a title for the packing instruction. This field is mandatory and must be maintained.
- Description: under Description you can enter further, detailed information about this packing instruction.
In the organizational settings, you can activate the packing instruction for the selection in the purchase orders.
Create and manage shipping types
You can maintain the shipping types under Master Data Management → Master Data → Shipping Types.
Shipping methods or shipping costs can be defined for customer, country and order value. The set shipping methods are automatically available for selection in an order.
This gives you the option of making the shipping conditions specially agreed with a customer available only to that customer.
A shipping type includes general information, regional allocations, and order value dependent costs.
You can create a new shipping type by clicking the New button.
The following fields and settings are available for maintaining shipping types:
Basic data tab
- Input language: Selection of the language in which the shipping types are entered and displayed.
Shipping type area
- No.: Number for the shipping method. If you do not enter a number for the shipping type, it will be assigned automatically after saving.
- Title: in the title you can enter the valid title for the dispatch type.
- Description: here you can enter further, detailed information for the shipping method
Customer texts area
- Selection text customer: here you determine the selection text which should be displayed in an order at the customer.
- Customer description: here you can enter further, detailed information for the shipping method, which will then be visible to the customer.
- Customer info text: in this field you can maintain the information text for the shipping type. This is then displayed in the customer’s order.
Other area
- Settings: if you activate the checkbox Default, this shipping method will be defined as default when ordering.
- Currency: here you can select the currency for the shipping costs
- VAT: in the VAT field, enter the valid VAT rate in percent. This will be added to the shipping costs.
- Country/Region: Selection of the country and region for which the shipping method is to apply.
- Postcode: Enter the postcode for which the shipping type is to apply.
| Hinweis
If you define regional settings under Other, no costs are charged for customers who do not have their delivery address in these regions. |
Rider costs
Here you determine the shipping costs that are incurred by the customer. These always refer to the order value.
To create new costs, click on the New Cost button.
Depending on the order value, the shipping costs are added to the net order value for the customer. The customer has the option in the order to view the details of the shipping method via the Details button.
- Rank: with the rank you can define the order in which the shipping costs should be displayed
- Type: the shipping costs always refer to the order value and are added to the net price.
- Value: with the value you determine for which value range in the order (from-to) the shipping costs are to apply.
- Costs: in this line you can maintain the costs for the shipping type.
Terms of payment
Under Master Data Management → Master Data → Terms of Payment, you can maintain the terms of payment valid for your organization.
With the New button you can create a new payment term.
The following fields are available for maintenance:
- No.: the number for the payment term. This field is mandatory and must be filled in.
- Input language: you can select the input language via the selection field. In the case of terms of payment which must be available in several languages, you must maintain the terms of payment separately for each input language.
- Title: the title of the payment term. The title is displayed in the selection field, e.g. when an order is placed. This field is mandatory and must be filled in.
- Description: in this field you enter the description for the payment term. This field is mandatory and must be filled in.
| Hinweis
In the case of an SAP connection, the number must match the terms of payment key in your SAP system. If the data does not match, the user receives an error message, e.g. when transferring an order to SAP. Therefore, the order cannot be shipped. |
Payment methods
The payment methods determine the payment procedure for an automatic payment transaction, e.g. bank transfer, salary. When creating new suppliers, for example, these can be selected and assigned to the supplier.
Under Master Data Management → Master Data → Payment Methods, you can maintain the payment methods valid for your organization.
- No.: the payment method number. This field is a mandatory field and must be filled in.
- Title: the number path Title. This field is a mandatory field and must be filled in.
- Description: in this field you can enter the payment method description, which explains the payment method in more detail.
- Settings /default status (will be preset on new creation): if you activate this option, the default payment method will be preset for each newly created supplier.
| Hinweis
In SAP integration, the payment method title is transferred when a vendor is created or changed. |