
Customer catalogues
Under Customer Catalogs you can see all the catalogs that the supplier has assigned to you.
Catalogue statistics
Under Master Data Management → Catalog Management → Catalog Statistics you can call up catalog statistics for your catalogs.
Customer catalogues area
After calling up the statistics, you will see all the catalogs uploaded by your organization in the Customer Catalogs section.
In the column Number of Categories you can see the number of categories created for this catalog.
In the column Number of items you can see the number of items created for this catalog.
Supplier catalogs area
After calling up the statistics, you will see an overview of all supplier catalogs that have been assigned to your organization by the suppliers in the Supplier Catalogs area.
In the column Number of Categories you can see the number of categories created for this catalog.
In the column Number of items you can see the number of items created for this catalog.
Via the Export… button you can export the catalog statistics to an Excel file.
Creating Synonyms in the Catalog Search
For the optimization of the article search you have the possibility to define synonyms. By maintaining synonyms, you can define individual terms and descriptions for articles and thus optimize the article search.
Defined synonyms are displayed in the search result. If this search does not return the desired results, Onventis links to the main term so that the search term does not have to be entered again.
You can create and maintain synonyms under Master Data Management → Catalog Management → Catalog Search.
Create synonyms
To create a new synonym, enter the term relevant to the search in the Search term field, e.g. “ballpoint pen”, and the associated synonym where the article is to be searched for, e.g. “pen” for “ballpoint pen”.
With the + you can add your entry to your individual synonym list.
The entry is then displayed in the table.

Import and export of synonyms
With the Import button you can upload a previously created CSV file with the search words = Searchword (in CSV) and synonyms = Synonym (in CSV).
Example of a CSV file:
| Search Keyword | Synonym |
| Ballpoint pen | Ballpoint pen |
| Highlighter | Highlighter |
| Laptop | Notebook |
The Export button allows you to export the list of synonyms to an Excel file.
Create and manage article groups
With article groups, you can assign special conditions valid for your customers or for certain articles to several articles at the same time.
An example of the use of article groups is metals, where surcharges and discounts are often applied to the base price of the metal type.
By combining these articles into an article group, you can maintain the surcharges and discounts for the respective metal type and thus manage the calculation of the product price centrally.
You can assign each article to a specific article group. You can then define special conditions for the defined article groups per catalog and assign them to the customer.
In Create and Manage Article Group Conditions, you also have the option of defining surcharges and discounts.
Create new article group
You can create a new article group under Master Data Management → Catalog Management → Article Groups via the New button.
- No.: the article group number. This field is mandatory and must be entered. If you do not enter a number, Onventis will automatically generate one.
- Title: the title of the article group. This field is mandatory and must be entered.
- Description: the description and other information for the article group.
With Save and Close the article group is saved and you return to the article group overview.
Create and manage article group conditions
In an article group condition under Master Data Management → Catalog Management → Article Group Conditions, you can define surcharges and discounts for article groups and manage all catalogs. These can then be assigned to a customer in customer management.
You can create a new article group condition using the New Create button.
Article group conditions – Basic data tab
- No.: the number of the article group condition. This field is mandatory and must be entered. If you do not enter a number, Onventis will automatically generate one.
- Title: the title of the article group condition. This field is mandatory and must be entered.
- Description: the description and other information for the article group condition.
Article Group Conditions – Surcharges and Discounts Tab
On the Surcharges and discounts tab, you can define surcharges and discounts for all catalogs that contain article groups. To do this, select the desired catalog from the drop-down menu.

The associated article groups are displayed in the first column.
You can maintain the surcharges as a percentage using the columns Price Increase Surcharge, Alloy Surcharge and Shortage S urcharge: The surcharges are added to the base price and result in the total surcharge.
If an additional discount has been deposited, this will be deducted from the surcharge.
In customer management, you can assign an article group condition to a customer.
Article groups can be created in catalog management and assigned to articles there.
Create article supplementary conditions
Absolute and percentage amounts as well as surcharges calculated using a formula can be defined in an article supplement condition.
You can create a new additional condition using the New button.
Create additional article condition
- No.: Rank, which determines the order for the calculation
- Title: Title of additional condition
- Calculation basis: Price to which the calculations are to relate
- Article unit price: the surcharges are calculated on the basis of the article price
- Cumulated values according to the rank: the calculation of the surcharge is based on the added values, which are summed according to the rank
- Type: the type determines whether the amount is an absolute amount, a percentage, or a formula for calculating the surcharge.
- Value: Amount, percentage or formula for the calculation of the surcharge
- The following characters are allowed as operators: *,+,-,/
- With the method Round(Formula... ,2) the result can be rounded (2=two decimal places).
Clicking on Save and Close saves the additional article condition and takes you back to the overview.
To assign the additional article condition to an article, open the desired article under Administration → Catalog Management → Catalogs by clicking on it.
In the tab Additional conditions of the corresponding article you can assign the additional condition via the Use button.
Formula definition for supplementary conditions
A formula can be composed of the “building blocks” organization variables, article variables, article conditions and return values.
| Module | Use/Example | Path | Description |
| Organization variables | OrgVar:CU(“OrgVar”=table name, “CU”=variable name) | Administration/ Internal Organization / Variables | Organization-wide variables that you can use to calculate supplementary conditions. |
| Article variables | ArtVar:CU (“ArtVar”=table name, “CU”=variable name) | In the Variables tab of the article | Similar to the organization variables, but the article variables can only be used for the article in which they were maintained. |
| Article conditions | ArtCond:PriceQuantity ArtCond:PricePerPQ1 ArtCond:TaxRate |
Are maintained in the article conditions in the tab Basic data | Conditions that you have defined in the basic data for the article condition. You can also use this via the table name “ArtCond”. |
| Return values | OrgVarRes:[OrgVar:CU] (“OrgVarRes”=table name, “[OrgVar:CU]”=variable name) | Administration / Internal Organization / Return Values | In a return value, you can specify at which value of an organization or article variable a specified return value is generated. |
Example
Entered values:
- Price unit (ArtCond:PriceQuantity) = 1
- Price (ArtCond:PricePerPQ1) = 0,50
- VAT. (ArtCond:TaxRate) = 19
- Value of the organization variable (OrgVar:CU) = 75
- Value of the article variable (ArtVar:CU) = 500
- Return value (OrgVarRes:[OrgVar:CU]) = 1.5 (for comparison value (OrgVar:CU) >= 50)
Formula:
Round((([ArtCond:PriceQuantity]*[ArtCond:PricePerPQ1])*(1+([ArtCond:TaxRate]/100))*([OrgVar:CU]/100)*([ArtVar:CU]/1000)+([OrgVarRes:[OrgVar:CU]]),2)
Results:
Round(((1*0,50)*(1+(19/100))*(75/100)*(500/1000)+(1,5),2) = 1,72
Conditions – Release list
You can find the condition release list under Master Data Management → Catalog Management → Condition Release List. The drop-down menu above the Catalog selection lists all catalogs for which a condition release is required.
The conditions are not visible in the catalogs until they have been released.
| Hinweis
The actual release of the conditions is always possible via a batch run on the following day after creation or import. When the condition release e-mail is received, the conditions can be viewed and released the following day in the condition release list. |
The release of the conditions is carried out in the background. In the Condition Release List area, you can see a list of the current release jobs, including the status and the creation date.
You can use a filter to narrow down the conditions you want to see.
You can get a more detailed overview of the release status by selecting the catalog in the Ongoing Release Jobs. The corresponding BC Job (Business Connector Job) opens automatically, showing the existing conditions and the conditions that have already been released or rejected.
To facilitate the processing of conditions that have not yet been released, you have the option of exporting the conditions as an Excel file, processing them and importing the changes via a BC job.
Please note that you can only release conditions if no responsible user group is assigned to the catalog, or if you belong to the assigned group.
You can export the conditions to an Excel file under Master Data Management → Catalog Management → Condition Release List using the Actions drop-down menu and the Export Conditions selection.
The conditions are exported to an Excel file and stored on the server.
An email will then be sent to the address below with a link to download the file.
Following this dialog, a release job is created in which you can import the Excel file again after editing.
The following data is displayed in the export file:
- Article
- Part number
- Creation date
- New price
- Price unit
- Old price
- Difference absolute
- Difference %
- Enable (default = 1)
In the Release column, you can release the conditions by entering “1” and not release the conditions by entering “0”.
You can then attach the file to the created import job and import it.
In the case of a condition update, the mail address that has been defined for this purpose in the organizational settings on the Catalog tab receives a notification. In principle, any user – with the appropriate user rights – is also permitted to release the conditions of the catalogs.
Within a catalog cover, however, it is also possible to store a responsible user group in the assignment area, which is then informed instead and receives the release authorization for this catalog. Users with sharing rights, but who do not belong to the authorized user group, can then no longer share the catalog.
Create and configure catalog views
Under Master Data Management → Catalog Management → Catalog Views you can define new catalog views or edit existing catalog views.
Catalog views let you control which catalogs and catalog categories are visible to individual users.
Create new catalog view
You can create a new catalog view with the
New
button to create a new catalog view.
Basic data tab
Catalog View Area
- No.: Number of the catalog view. If you do not maintain this number, Onventis will automatically assign a number.
- Title: here you can enter the desired title for the catalogue view, e.g. “Office supplies”, “Tools”, etc.
- Description: here you can describe the catalog view in more detail.
Catalogs area
In the Catalogs section, you will see a listing of all the catalogs available for your organization.
By activating the checkbox of the desired catalog, it will be assigned to the respective catalog view.
If the option “Hide prices in catalog navigation and order processing” is activated for a user in the user administration, you can show the prices of individual catalogs of a catalog view again for these users:
- To do this, activate the checkbox in the “Always show prices” column of the corresponding catalog.
The prices of articles in these catalogs are then displayed again in the catalog navigation.

Assigning categories to a catalog view
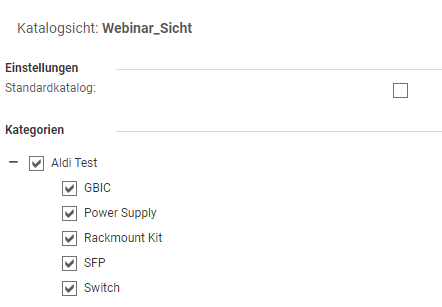
Settings area
In the Settings section, you can define the catalog or the selected categories as the default catalog by activating the “Default catalog” checkbox.
When you assign this catalog view to a user, the catalog defined as the default catalog is always loaded in the Catalogs area.
Area Category
To assign individual categories of a catalog to a catalog view, you must click on the respective catalog.
An overview of all categories of the catalogue is then available.
By activating the checkbox for the respective category, you can activate individual categories and/or the subcategories for the catalog view.
Assigning catalog views to users and customers
In order for users or customers to have access to the catalogs, the catalog views must be assigned to the user or customer.
You can assign the catalog views to the user under Master Data Management → User Management → Users → Advanced tab.
You can assign the catalog views to the customer under Customer Management → Customers → Customer Selection → Advanced tab.
Access to catalogs depending on the organizational unit or organizational object
When this setting is activated, the user is deprived of the set catalog view and the entry point is changed to the shopping cart. The user is only shown those catalogs that are assigned to the relevant organizational unit or organizational object. The decisive factor here is which organizational unit and which organizational object is selected in the shopping basket.
Configuration
Activate user settings
- Please activate the setting “Access to catalogs depending on organizational unit or organizational object”.
- The setting can be found under User Management → Users → Advanced tab.
- When you enable the setting, the user’s current catalog view is removed and the selection field is disabled.
- The same applies to “User-selectable views”.
- The entry point changes with the activation to “shopping cart” and can also no longer be edited.
Note: If you deactivate the setting again, the mentioned fields become editable again. The old values are not re-entered by the system. - Please make sure that the following items are also enabled on the user:
a. Select/change the organizational unit in orders and shopping cart.
b. Select/change the organizational object in orders and shopping cart.
Assigning Catalog Views
- Make sure that catalog views are assigned to your organizational units.
- Alternatively, you can also assign catalog views to organizational objects.
- If no catalog view is assigned to an organizational object, the catalog view of the organizational unit is used.
- If no catalog view is assigned to the organizational unit and organizational object, the user will not see any articles.
Note: You can also import the setting using UserImport via Excel. Currently we are starting the testing for this. If you would like to test this as well, please proceed as follows:
- To do this, add the “OrgBasedCatalogView” column to your Excel template. Value “1” of this column means “activate setting”, value “0” or empty column means “do not activate setting”.
- Please also note: If you want to activate the catalog view depending on the organizational unit / organizational object (“OrgBasedCatalogView”), remove the catalog view (CatalogViewNr) and the assignable catalog views (column SelectableCatalogViews)” for the affected user and set the value of the “StartUpObject” to “120” (the user with activated setting can only start in the shopping cart).
Behavior
Starting point: Configuration has been made.
- The user always starts the session in the shopping cart.
- Every time you click on an empty shopping cart, the following note is displayed in the shopping cart (exception: you are in the shopping cart with items and delete the shopping cart).

- The organizational unit/object selected in the shopping cart is decisive for the display of the catalog view:
The system first checks whether the organizational object selected in the shopping basket is assigned to a catalog view.- If this is the case, this catalog view should be displayed.
- If this is not the case, the system checks whether the organizational unit selected in the shopping cart is assigned to a catalog view.
- If this is the case, this catalog view should be displayed.
- If this is not the case, no catalogs or catalog items are displayed to the user.
- If there are articles in the shopping cart and the organizational unit or organizational object is changed, the following warning is displayed to the user in the first step:
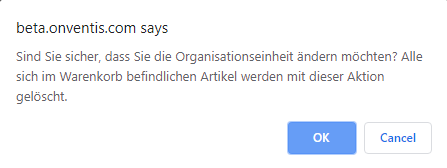
- If this message is confirmed by the user, all items (whether catalog items, free text items, etc.) are removed from the shopping cart and the organizational unit/object is adjusted accordingly.
- The catalog view for the user then adapts accordingly.
Please note the following restrictions, among others:
- Orders placed via the order list are not taken into account in the function.
- The feature is not taken into account for purchase orders with the status “In capture”.
- The order must be shipped DIRECTLY from the shopping cart.
- Changes to purchase order documents in all approval workflows are not reflected in the feature.
- Order changes & purchase order changes are not reflected in the feature.
- The user must start in the shopping cart.
- The complete shopping cart is always deleted (regardless of whether catalog items, free text, etc.).
- The shopping cart is deleted with every change (no matter if only object or unit).
- The function is only considered to a limited extent in Onventis Mobile.*
- Article favorites & AutoLearn list are not included in the function.
- The organizational unit/object set in the shopping cart is decisive for influencing the catalogs displayed and the search results.
- The organizational unit in the shopping cart will always be filled with the user’s organizational unit in the default value. The Organizational unit field in the shopping cart must not be empty.
- The user is only shown the note “Please first select the organizational unit/object for which you want to order” in the empty shopping cart.
Exception: You are in the shopping cart with articles and delete the shopping cart.
The feature can be used on mobile devices with the following restrictions*.
Thefollowing is considered in the app:
- (✔) When the organizational unit is changed, the shopping cart is emptied.
- (✔) When the organizational object is changed, the shopping cart is emptied.
- (✔) The catalog view depends on the organizational unit (or organizational object) set in the shopping cart.
The following is not included in the app:
- (✘) The user starts in the shopping cart – App: The user always starts on the dashboard, not in the shopping cart.
- (✘) A note is displayed to the user in the shopping cart that the shopping cart will be deleted if the organizational unit or organizational object is changed. – App: The user is not informed in the shopping cart that the shopping cart will be deleted if there is a change of organization.
- (✘) The user is shown a message in the shopping cart: “Please first select the organizational unit/object for which you want to order.” – App: The user is not informed at any point, not even in the shopping cart, that the catalogs displayed depend on the organizational information set in the shopping cart.
Please also note:
- Users need to know how the app reacts to the activation of the feature, it is not apparent in the app and cannot be seen without this knowledge.
- There are no warning messages and there is no secondary confirmation that the user really wants to change the organizational unit or organizational object: If the organizational unit/object is changed, the shopping cart is empty and cannot be reset.
Create and configure catalog views
Under Master Data Management → Catalog Management → Catalog Views you can define new catalog views or edit existing catalog views.
Catalog views let you control which catalogs and catalog categories are visible to individual users.
Create new catalog view
You can create a new catalog view with the
New
button to create a new catalog view.
Basic data tab
Catalog View Area
- No.: Number of the catalog view. If you do not maintain this number, Onventis will automatically assign a number.
- Title: here you can enter the desired title for the catalogue view, e.g. “Office supplies”, “Tools”, etc.
- Description: here you can describe the catalog view in more detail.
Catalogs area
In the Catalogs section, you will see a listing of all the catalogs available for your organization.
By activating the checkbox of the desired catalog, it will be assigned to the respective catalog view.
If the option “Hide prices in catalog navigation and order processing” is activated for a user in the user administration, you can show the prices of individual catalogs of a catalog view again for these users:
- To do this, activate the checkbox in the “Always show prices” column of the corresponding catalog.
The prices of articles in these catalogs are then displayed again in the catalog navigation.

Assigning categories to a catalog view

Settings area
In the Settings section, you can define the catalog or the selected categories as the default catalog by activating the “Default catalog” checkbox.
When you assign this catalog view to a user, the catalog defined as the default catalog is always loaded in the Catalogs area.
Area Category
To assign individual categories of a catalog to a catalog view, you must click on the respective catalog.
An overview of all categories of the catalogue is then available.
By activating the checkbox for the respective category, you can activate individual categories and/or the subcategories for the catalog view.
Assigning catalog views to users and customers
In order for users or customers to have access to the catalogs, the catalog views must be assigned to the user or customer.
You can assign the catalog views to the user under Master Data Management → User Management → Users → Advanced tab.
You can assign the catalog views to the customer under Customer Management → Customers → Customer Selection → Advanced tab.