Requirements
Before you can start importing catalogs and conditions, some basic requirements must first be met. You basically need the following for uploading catalog data:
- Supplier account: The supplier account is your own area in Onventis, which allows you to maintain your company data, create users, process orders and upload catalogs, among other things.
If you do not yet have your own account, please contact your customer so that they can register it for you. - Access data: To log in to your account, you will need the appropriate login credentials. If you do not have them, you can have your customer send them to you (again) at any time.
When you log in to the system for the first time, you will be prompted to change the password that was sent to you. Please change this according to the given password rules.
FTP account: Up to a maximum size of 10MB per catalog file, it is also possible to upload catalogs in Excel or CSV format without a separate FTP account. If you want to upload larger catalogs or catalogs in general in BMEcat 1.2 format, you need a separate FTP account. In this case, please contact the department Catalog & Integration Services of the Onventis GmbH. We will create an FTP access for you after receipt of your order and send you the access data. FTP accounts can be created in the size classes 0.25 GB, 0.5 GB and 1 GB. be commissioned.
Preparation
Catalog data is imported into Onventis using the Business Connector. You can use this interface to import catalogs, conditions, customer data, orders or master data, for example.
There are two ways to make files available for import:
- Upload and save data using FTP access for BMEcat or files such as Onventis Excel templates or CSV templates > 10 MB.
- Upload of data via web interface. With this variant, only Onventis Excel templates and CSV templates up to max. 10 MB can be uploaded.
The catalog data must comply with the BMEcat version 1.2 standard or the Onventis Excel templates. If you want to upload catalogs in the BMEcat 1.2 format, please note that Onventis has implemented certain extensions for this format that supplement the standard and offer you additional options for the optimal presentation of your catalogs. If necessary, please contact the Customer Service of Onventis GmbH to obtain the appropriate documentation.
| Hinweis
The data can be imported as a new catalog or into an existing catalog. By importing into an existing catalog, both versions (the productive version in Onventis and the import version) update existing items, add new ones and keep old ones. If you do not want to keep old articles, you have to activate the option “Delete old articles” in the import interface. |
Creating a catalog cover
Before you can upload a catalog, you must first create a catalog cover. The catalog cover is a kind of container that contains the data of the catalog and allows you to make other basic settings for this catalog, such as “Only items with valid conditions can be ordered”, eClass no., material group, cost type, etc.
You can create new catalog covers under Administration → Catalog Management → Catalogs . To do this, please select in the dropdown menu the function ![]()
You can find a description of the catalog system under: Catalog Management.
Within the catalog cover, you can also define a responsible user group, which is then informed about new conditions and is allowed to release them. If no responsible user group has been maintained, the information e-mail address from the organizational settings is used and any authorized user may release the conditions.
Creating a new BcJob
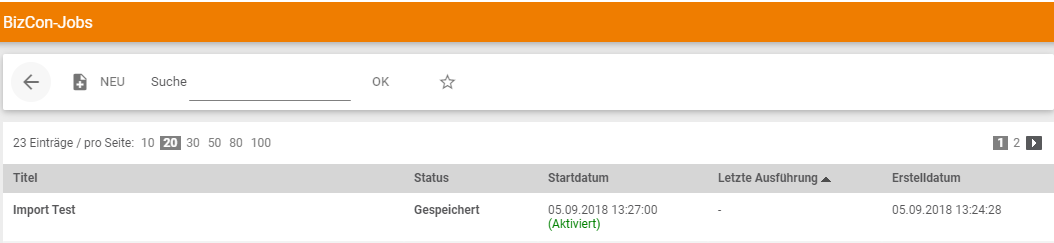
In the area Administration → Business-Connector → BcJobs you can always see all running and already executed BcJobs.
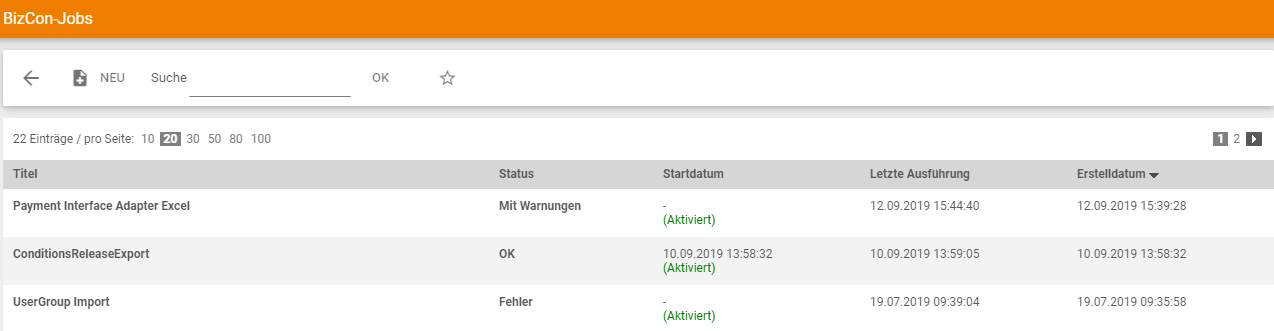
A new BcJob can be created via the ![]() button.
button.
An import job is made up of various functions that offer a variety of possible combinations. By compiling:
- Controller
- Adapter
- Converter and
- Port
defines whether data is to be imported or exported, which data is to be imported, in which format this data is to come and where Onventis can find this data.
Settings for the catalog import according to BMEcat standard
In a “BcJob” there are several possibilities to import data. For example, to import a catalog according to the BMEcat standard, the following settings must be selected:
- BcJob Controller
- BcJob adapter
- BcJob Converter & BcJob Port
These are described in more detail in the following paragraphs.
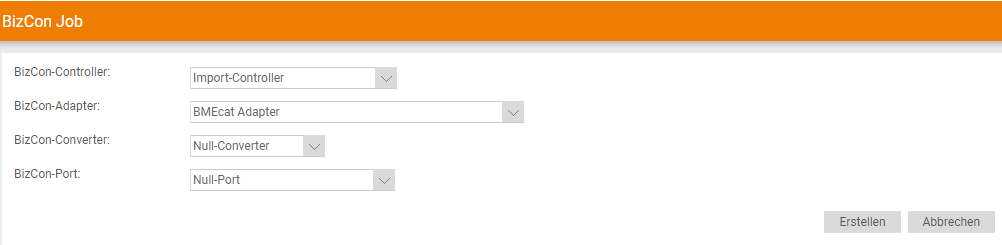
BcJob Controller
This is where you determine whether it is an import or export. Import Controller” must be selected here.
BcJob adapter
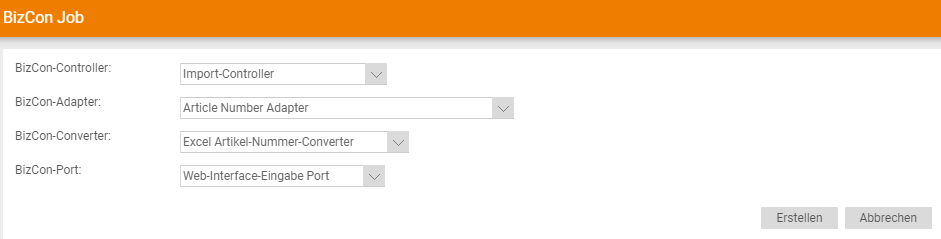
Here you define what is to be imported. To import a catalog in BMEcat format, “BMECat Adapter” must be selected.
BcJob Converter & BcJob Port
Here the user determines which data type is involved and where the data comes from. Since these are imported directly from the FTP server during the BMEcat import and the data may only have a certain format, the selection cannot be changed here. Therefore, “zero converter” and “zero port” are stored here.
Afterwards, the settings for the BcJob job must look like this:
Use the ![]() button to create a “BcJob Job”.
button to create a “BcJob Job”.
Settings for the catalog import via MS Excel file
To import a catalog using an Excel file, the file must match a predefined pattern. This is explained in more detail in the following points:
- Structure of the Excel file
- Import images to the articles
For this purpose, the available Onventis Excel templates can be obtained. Please contact Customer Service in this regard.
Structure of the Excel file
The Excel file contains all the data associated with the article, such as article numbers, descriptions, as well as categories and subcategories in which the article is to be stored in the catalog.
![]()
To assign an article to a catalogue category, the categories must be entered in the column “ArticleCategories_en-DE”. These must be separated by the pipe character “|” (“ALT Gr” and “<“) without spaces.
Example:
Articles that are to be assigned to the subcategory “self-aligning ball bearings” in the category “Rolling bearings, plain bearings and accessories” must be saved in the Excel file as follows (Rolling bearings, plain bearings and accessories|Self-aligning ball bearings):
In the catalog, the items are displayed as follows after import:

Import images to the articles
In order to import additional pictures for the articles, the file names of the pictures must first be stored in the column “ArticlePictureName” of the Excel file. Before the import is started, the Excel file as well as all images of the articles must be saved in a ZIP archive. This archive must then be selected in the BcJob (see Excel Settings à Import Data).
When importing, you have the option of importing a CSV or XLS file. The following settings must be selected for the import:
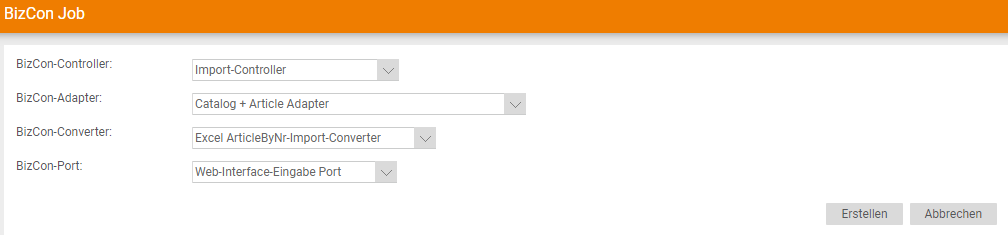
BcJob Controller
This is where you determine whether it is an import or export. Select “Import Controller” here.
BcJob adapter
Here you define what is to be imported. To import a catalog in Excel format, please select “Catalog + Article Adapter”.
BcJob Converter & BcJob Port
Here the user determines which data type is involved and where the data comes from. When importing a catalog using an Excel file, “Excel ArticleByNr-Import-Converter” must be selected.
With BcJob-Port you can choose between “Web Interface Input Port” (i.e. direct upload of files via the web interface) or “Local Port Files” (upload of files from FTP server, relevant for Excel files > 10 MB).
Subsequently, the settings for the BcJob job must be as follows, depending on the file type:
Use the ![]() button to create a “BcJob Job”.
button to create a “BcJob Job”.
Settings before import
Since the input masks differ depending on the import type (BMEcat, Excel, …), the individual areas of the BcJobs are explained and shown below:
- BcJob
- Settings
- Notifications
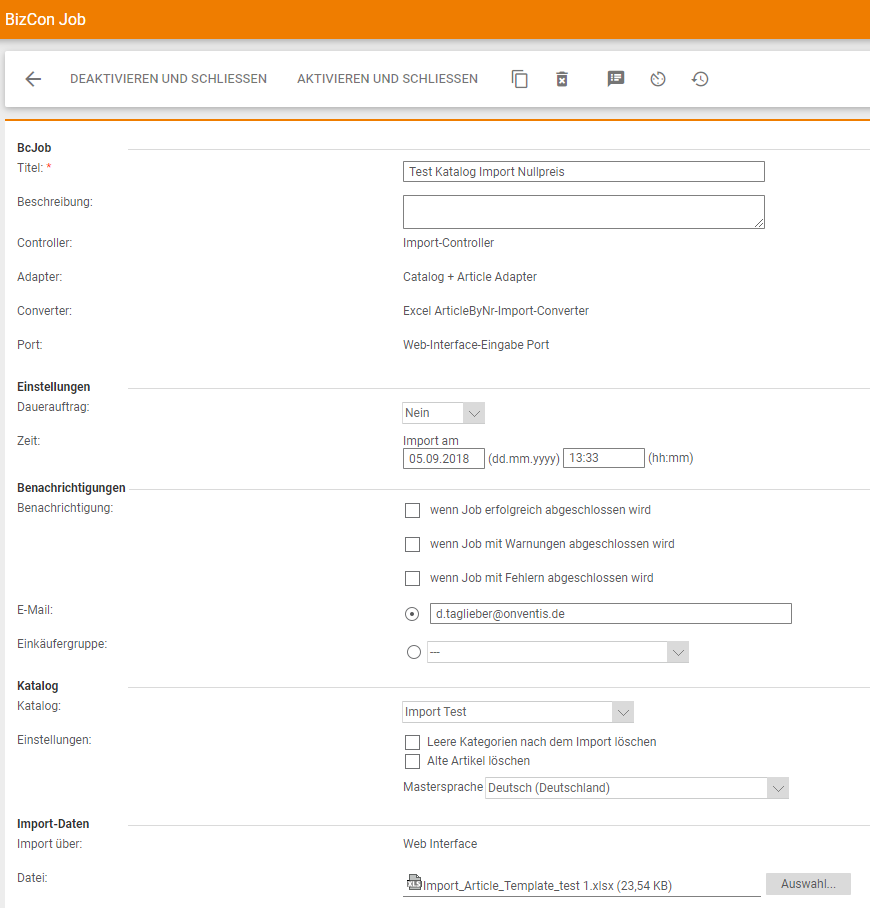
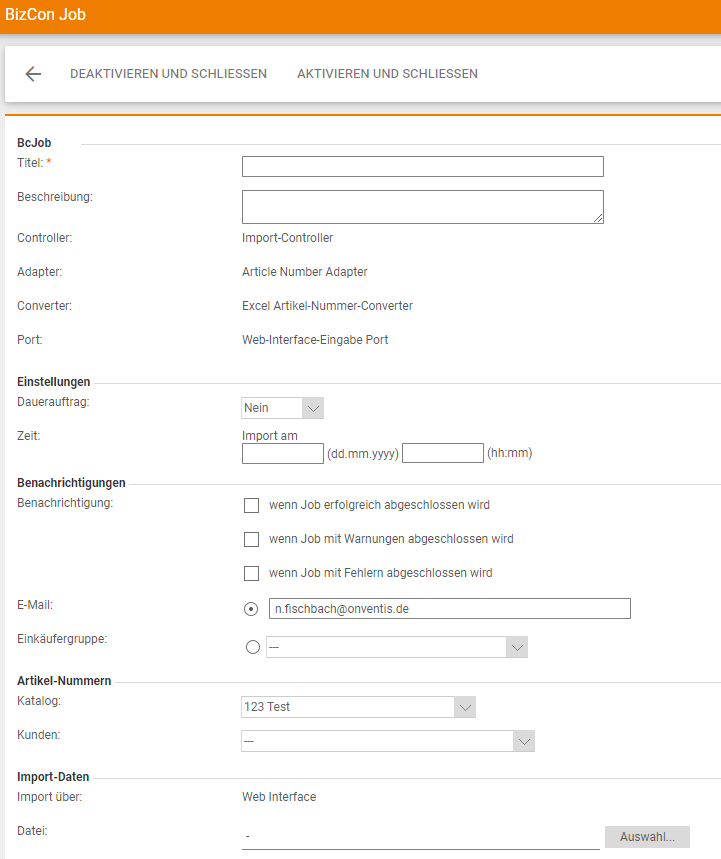
BcJob
A title must be assigned for the BcJob job that is created. In the Description field, you have the option of entering additional text. This is displayed next to the title on the overview of BcJob jobs.
A BcJob can be stored deactivated ![]() and activated
and activated ![]() .
.
If you want to prepare an import job, but do not want to start it yet, you can do so by clicking ![]() . If the job is to be executed, it must be activated by clicking on the
. If the job is to be executed, it must be activated by clicking on the ![]() button.
button.
Settings
When you create the BcJob, you can specify whether this import is a one-time import or a standing order.
As a rule, catalog imports are carried out once, i.e. without a standing order, since these usually have a longer validity and since it must be noted that the catalog files must always be made available on the selected port (FTP or web interface).

If you would like to set up a standing order, select Standing order _ <Yes>. Then the interval for the import can be set.
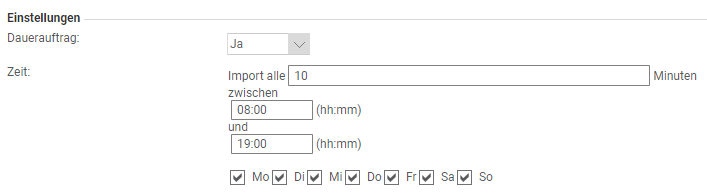
| Hinweis
Since a catalog import involves large data that places a heavy load on the server, catalog imports are not possible between 08:00 and 17:00. Imports start daily from 17:00. You can predefine a date and time in the import job to start the import at the earliest from this point in time. If you leave the fields empty and save the import job via |
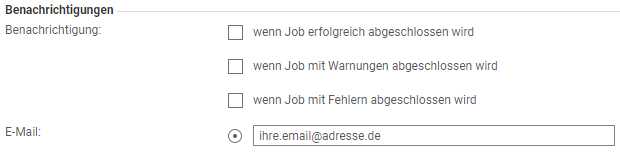
Notifications
In this area you can enter which contact person(s) should be informed when the
- Job is completed successfully
- Job is completed with warnings
- Job is completed with errors
Several e-mail addresses can be stored in the e-mail field. These must be separated with a semicolon (“;”) without spaces between the addresses.
Catalog template and BMEcat documentation
Adapter-specific settings – BMEcat
BMEcat-specific settings
For the import of BMEcat catalogs, there are various setting options that strongly influence the import behavior and thus the use of these catalogs.

Catalog/Files area
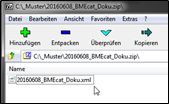
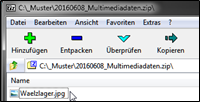
Here you specify the name of the BMEcat file to be imported and the media file to be uploaded via FTP and the catalog into which they are to be imported. The name of the ZIP file on FTP must be entered here. If no image archive is to be imported for the catalog, the corresponding field can be left blank.
Afterwards, the catalog cover into which the catalog is to be imported must be selected in the dropdown catalog.
| Both the catalog and the multimedia data must be packed in a ZIP file. The ZIP files for the catalog and the multimedia files must not contain a subdirectory. The name of the XML file of the catalog must have exactly the same name as the ZIP file. |
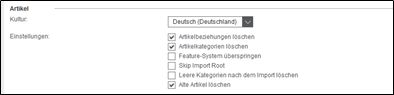
Article area
Under Culture you can define for which language the articles should be imported.
The following is defined under Settings :
- Delete article relations: All relations are deleted (article favorites, assignments to categories, referencing).
- Delete item categories: The tree structure of the catalog is removed.
- Skip feature system: The feature “group system”, i.e. the characteristics for the articles are not imported.
- Skip Import Root: During import, the first category node is not imported because it has already been manually created in Onventis as a catalog name in the catalog shell.
- Delete empty categories after import: Categories to which no article is assigned are deleted.
- Delete old articles: All items in the catalog currently loaded in Onventis, including their relationships, are deleted.
| If the old articles are not deleted, new articles not yet contained in the catalog will be created during a catalog update, existing articles will be updated and articles contained in the current catalog but not included in the catalog update will also remain included without being updated. This can result in articles that are no longer produced or articles with invalid prices remaining in the catalogue for ordering. |
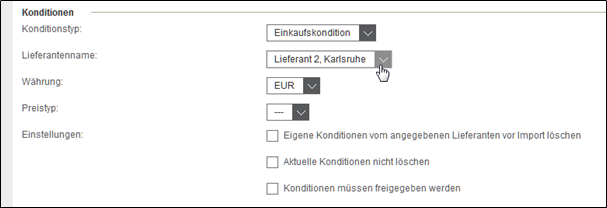
Conditions area
If conditions are to be imported, you must specify which type of conditions are to be imported. If a catalog is imported by a vendor, the sales conditions must be imported for it.

sales conditions: Sales conditions must be assigned to either a specific customer or a customer group under Assignment . In addition, the currency of the conditions can be selected.
The default currency is the same as the base currency in the company master ( Other tab).
In general, the first price per article is always read from the BMECat, e.g. <ARTICLE_PRICE price_type=”net_customer”>. However, if a catalog contains more than one price type, you can select between the types below to determine which price is imported:
- net_list: (purchase) list price without sales tax
- gros_list: (Purchase) list price including sales tax
- nrp: non-binding (sales) price recommendation
- net_customer_exp: Customer-specific final price without sales tax for express delivery
Other settings for the conditions are:
–Delete own conditions of selected customer/customer group before import: If the previous conditions in the catalog are to be replaced, the checkbox must be activated.
–Do not delete current conditions: If this option is activated, it is still possible for the customer to order items under the old conditions during the update process until the new conditions have been set via the release list.
–Conditions must be released: If this checkbox is activated, the importer (vendor) must release the conditions via the condition release list after the import – only then are the conditions passed on to the customer for release in the customer condition release list. This allows the conditions to be checked again before they are handed over to the customer. It should be noted that this takes another day, as the release can only run overnight.
Purchasing conditions: Purchase conditions only apply when a customer imports a catalog through their account itself, not when a vendor imports a catalog for a customer.
In the case of purchasing conditions, you can specify and enter the vendor to which the conditions belong, and you can choose whether your own conditions are to be deleted from the specified vendor before the import.
By choosing Do not delete current conditions , you can specify whether the current conditions are to be retained until the new conditions are released. This means that existing articles can still be ordered until the new conditions have been implemented.
If the Conditions must be released checkbox is activated, the conditions must be released after the import via the condition release list.
Area numbers and material groups for customers
If the customer material numbers (field BUYER_AID) and/or material groups (ERP_GROUP_BUYER) for certain articles are to be included with the BMEcat and displayed in the customer catalog, the corresponding customer can be selected in this area.

| Please note that customer material numbers can also be imported later using a separate template. |
Adapter-specific settings – Excel/CSV
There are also specific settings for the Excel import. For example, the conditions are not included in the catalog as in BMEcat, but are imported separately.
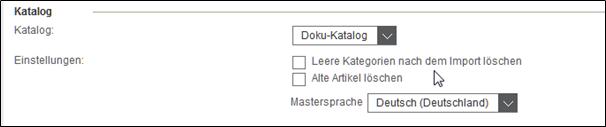
Catalogarea:
Under Catalog , you can first select the catalog cover into which the Excel catalog is to be imported.
Under Settings you can define the following:
- Delete empty categories after import: Categoriesto which no article is assigned will be deleted.
- Delete old articles: All items in the catalog currently loaded in Onventis, including their relationships, are deleted.
Import data area (via web interface input port):
- For Excel files up to max. 10 MB, the web interface can be used for imports.
Use the button Selection to select the Excel file to be imported. The file attachment must then be attached in the web interface using the Attach button .
Via ![]() the created BcJob is saved.
the created BcJob is saved.

- Excel files larger than 10 MB are imported via FTP (null port for BMECat or local files port for Excel):
If you import an Excel catalog with a size of more than 10 MB, it must be uploaded via FTP. The Excel file must first be stored on the FTP. Then the name of the Excel file must be entered under File path and Pattern .

You also have the option of creating an archive directory on the FTP server if one does not already exist. The import files can be automatically stored in this directory on the FTP after the import. For this purpose, the name of the archive directory can be specified under Archive path.
Import catalog conditions (Excel/CSV)
When importing a catalog via Excel, the conditions must be uploaded separately. There is a separate import template for this purpose.
![]()
In addition to the option of uploading conditions initially for a new catalog, this separate import also allows you to conveniently import price updates for a catalog without always having to upload the entire catalog, including the master data.
The settings in the BcJob correspond to the settings already described above in the areas of
- BcJob
- Settings
- Notifications
- Conditions
- Import data
Settings
If it is necessary to include customer material numbers for a catalog and if these are not already included via a BMEcat, it is possible to import these customer-specific article numbers separately. To import these customer-specific article numbers, you must create a new BCJob as described below:
Within the BcJob, the specifications for the BcJob itself and the settings for the time control, the notifications and the import data must be made again. How these work is described in Importing Catalogs and Conditions. The information in the article numbers section is important here. Here you have to define in which catalog and for which customer these customer material numbers should be imported.
Importing article groups
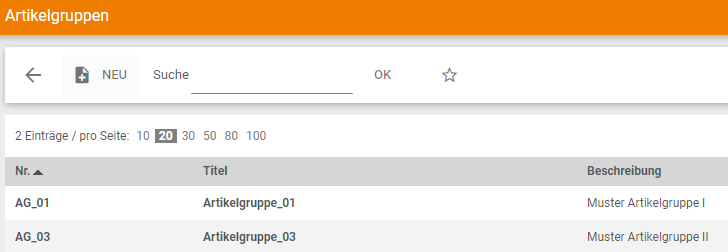
Create article groups
In the area Catalog Management → Article Groups you can create new article groups or have them created automatically via a BcJob. You can use article groups to assign special conditions to several articles at the same time. Each article can be assigned to a specific article group. You then have the option of defining special conditions for the article groups in each catalog and then assigning these conditions to customers. You can define surcharges and discounts in the article group conditions.
After assigning a number and a title, the new article group can be saved.
Article group assignment or creation via a BcJob
When using the Excel template for the BcJob “Catalog adapter”, one or more group assignments must be entered in the column
ArticleGroupNumbers
column, one or more group assignments must be entered for each desired article. If there is more than one group per article, the article group numbers are separated by the pipe character “|” (AltGr key + <).

After that, an Import-BcJob must be created with the “Catalog Adapter” as described above. You can select the previously saved Excel file as import data via the user interface and attach it to the BcJob.
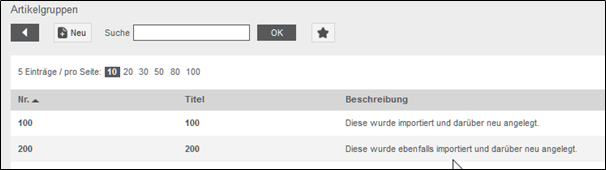
After successful processing, you will receive the following status message by clicking on the status of the BcJob, provided that these article groups were newly created via the import:
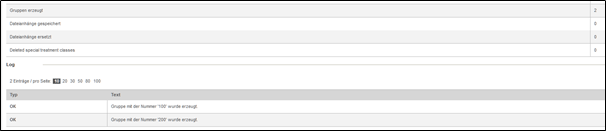
Existing article groups are assigned to the articles during import.
The group number is automatically taken as the name of the article group. This title can be changed at any time under Catalog Management → Article Groups.
Import status
In the overview of the BcJobs you can see the status of the imports. The import has the status “Saved” until it is executed.
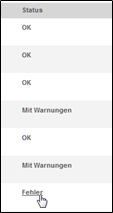
As soon as the import starts, the status changes to “In process”. If the import was completed without problems, the status changes to “OK” and the catalog is now available.
If the import was completed with errors, it receives the status “Warning” or “Error”.
An import is completed with a warning if, for example, columns in your import file that are not mandatory fields are missing. However, this data does not affect working with the imported data. If “Error” occurs, the import could not be performed and the import is terminated.
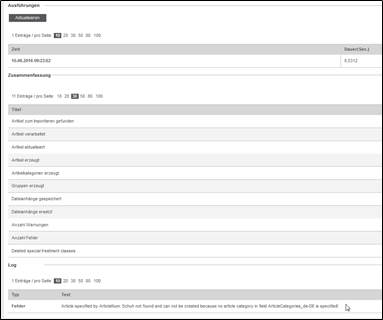
You can view the log files by clicking on the respective status. Here you also have the possibility to check how much data was imported or why imports were cancelled.