In the user administration you can create, maintain and configure new and existing users, user groups and users.
In addition, you can control access to modules and individual functions via rights management in the user roles.
For users, you can control their assignments and access to your master data, define substitutions for users, and make individual user-related settings.
In the user applications, you can create new users via a user registration.
Create and manage users
In the Master Data Management → User Management → Users area, all users created in the organization are displayed.
You can add new users, delete or lock existing users, and configure user settings.
The following options are available:
- Creating a new user
- Search of an existing user
- Create an individual search filter
- Export of existing users (including settings) to an Excel file
- Sending the access data
You can configure user settings by opening a user. To do this, click on the name or number of the user.
A new user is created via the New button.
User – Basic data tab
User area
No.: Enter the user number.
For the user number you can choose a combination of letters, characters and/or numbers, e.g. company Onventis user Mustermann, possible user number: ONV-MUS1 . If you do not enter a number, Onventis will automatically generate a 6-digit number, e.g. 000001 for the 1st user.
| Hinweis
Please note that a user number must be unique and may not be assigned more than once. |
- Salutation: you can select the salutation via the drop-down menu.
- First name: First name of the user. This field is mandatory.
- Last name: Last name of the user. This field is mandatory.
- Position: in this field you can store the function of the user within your organization, e.g. buyer, purchasing manager etc..
- Address addition: In this field you can maintain address addition data, e.g. room number, floor etc.. This data is printed on various PDF files, e.g. orders.
Communication
- Phone: the phone number of the user
- Fax: the fax number of the user
- Mobile: the mobile phone number of the user
- E-mail: the e-mail address of the user. This field is mandatory.
All system notifications, e.g. regarding the order or approval process, etc., in which the user is involved, are sent to this e-mail address.
Login data area
- User name (e-mail address): Maintenance of the user name for logging into the Onventis Mobile smartphone application. Please note that the username must be in the form of an e-mail address, e.g. muster@onventis.de.
- Loginname: in this field you can enter the login name of the user with which he will log in to Onventis.
The Change Password button allows you to set an initial password.
If a user locks himself due to wrong password entry or forgets his password, you can change the password again using the Change Password button.
As soon as you click the Change Password button, the following additional fields are displayed:
- Password: Enter a new password
- Password rules (behind the Password field): by clicking on the term, the password rules are displayed. You can maintain password rules in the organizational settings.
- Confirmation: re-enter password to verify and confirm password assignment.
- New password at next login: if you activate this option, the user must set a new user password the next time he logs in to Onventis.
User – Advanced tab
Settings area
- User group: Assignment of the user to a user group. Within Onventis you have the possibility to create user groups. The user group is used to group together several users from the same task areas, teams, or purchasing groups in order to reuse them in workflows or views, for example. When a purchasing group is selected, the assigned purchasing group is automatically drawn for purchase orders that are triggered by the user.
- Organizational unit: Assignment of the user to an organizational unit. For purchase orders triggered by the user, the addresses of the assigned organizational unit are automatically drawn.
- Catalog view: Assignment of a catalog view for the user. You can use catalog views to define which catalogs the user is allowed to access.
- User-selectable views: the Select… button allows you to assign multiple catalog views to the user. button you can assign several catalog views to the user. Afterwards, the user can select the relevant catalog view in the Display tab according to his or her needs. Please note that all views that the user is allowed to access must be selected in this field.
- In the Catalog View field, you must select the view that the user is to use initially. If you do not want the user to use any other views, you do not have to select anything in the User-selectable views field. The user then gets a selection field to be able to change the view.
- If the user is to be able to choose between several views, all views must be entered in the field Views selectable by user, including the initial view defined under Catalog view. This gives the user the selection field and allows him or her to switch between the views. The Catalog View field is overwritten by the currently active view each time it is changed.
- User language: Selection of the user’s language for his Onventis access.
- Number/date format: Selection of the number and date format in which the date and numbers are to be displayed to the user. This setting can only be configured per user.
- Entry point: by selecting the entry point, you can define the user’s start window. For example, if you select Dashboard, the user will always see the Dashboard first after entering their credentials.
- Valid: this field allows you to limit the validity of the Onventis access to a specific date. Once the validity has expired, the user can no longer log in to Onventis.
Settings:
- Locked: by activating this checkbox, the user is locked in Onventis and can no longer log in to Onventis.
- Guest account: To allow potential new customers to test your Onventis, you can create a guest account. In order to avoid possible misuse, you should also define a suitable user role with restricted editing rights.
- Receive a copy of the order: the orderer receives a copy of the order e-mail that was sent to the supplier.
- User is only allowed to see reports of his own organizational unit: in the Analytics module you have access to some standard reports, e.g. Top Cost Drivers. If you activate this option, the user is only allowed to evaluate the orders, suppliers etc. that are assigned to his own organizational unit.
- User can change purchase orders as an approver: if you activate this option, the user who is defined as an approver in an approval workflow can change purchase orders that he or she has to approve; for example, he or she can correct cost centers.
- User can change self created invoices as approver: if you activate this option, the user who is defined as approver in an approval workflow can change invoices that he has to approve.
- User is allowed to edit user requests in approval: if you activate this option, the user can edit received user requests that have not yet been approved. The user application, regardless of the adjustment, remains in approval.
- Inform users only once a day by email about all approvals: if you activate this option, users will only be informed once a day by email about documents that need to be approved.
- Select/Change Organizational Unit in Purchase Orders and Shopping Cart: If you activate this option, the Organizational Unit field will not be preset in a purchase order. The user must select the organizational unit manually. In the shopping cart, the user has access to all organizational units and must specify for which organizational unit the shopping cart will be filled before filling the shopping cart.
- User is allowed to access all assessment surveys of own organization: within Onventis you can send internal assessment surveys to users. By activating this option, you limit the survey to the user’s organization, i.e. the user only gets the surveys that concern his organizational unit.
- Select organizational unit before creating order: by activating this option, the user must first select the organizational unit for which he wants to order before creating the order. The organizational unit is then write-protected in the purchase order and can no longer be changed.
- Hide conditions: by activating this checkbox, the conditions and the Add to cart button in the catalog items are hidden for this user, i.e. the user can see the catalogs and the corresponding items, but cannot order them. In addition, activating this option hides the prices in the catalogs.
- Define user as super admin: by activating this option, the user becomes super admin the next time he logs into Onventis and has all rights.
- Technical user: You need a technical user if you use external applications within your organization, e.g. for invoice verification, and you want them to access your Onventis account via API(Application Programming Interface). The technical user will never be banned, not even due to expired account or password.
- Template user: if you activate this option, the settings of the template user, e.g. catalog views, assignments, etc., are taken over when creating new users from user requests.
- Hide prices in catalog navigation and order processing: by activating this option, all prices of catalog items in the catalog navigation, in the shopping cart as well as in the order processing process are generally hidden for the user. This allows the user to order catalog items at fixed prices, but not see the item prices. For individual catalogs, the prices can then be displayed again in the catalog view using the “Display conditions” option.
- User may delete orders in approval: if you activate this option, the user may irrevocably delete orders that have not yet been approved.
- User is not allowed to change the email address of the supplier in the order: if you enable this option, the user is not allowed to change the email address of the supplier in the orders.
- User may change automatically determined account assignment in purchase orders and shopping cart as orderer: if you use automatic account assignment determination, the user may change the account assignment data found in the shopping cart. This setting only applies if the user is also the orderer for this order.
| Hinweis
Only an active super admin has the ability to assign super admin rights to another user.
|
Permit area
- Workflow for requirement items: here you can assign a self-configured requirement – approval workflow to the user. Please note that a change to the approval workflow always affects the newly executed requirement items.
- Workflow for purchase orders: here you can assign a self-configured purchase order approval workflow to the user. Please note that a change to the approval workflow always affects the newly executed purchase orders.
- Single limit: under Single limit you can set a single limit per order for the user by entering a value. This setting is only checked if the individual limit is activated in the approval workflow.
- Budget: in the Budget field, you can enter a value and select a period from the selection field to define a budget that is valid for the user. In interaction with approval workflows, the approval workflow is activated in the event of a budget overrun set here.
- Valid from – to: Defines the validity of a user from date – to date. Once the validity has expired, the user can no longer log in to Onventis.
- Supervisor: the drop-down menu allows you to select the user’s supervisor. This supervisor receives the user’s documents for approval. If you use the dynamic workflow within Onventis, you must maintain the superior.
- Supervisor group: the option is only visible if the option Assign multiple supervisors to one user has been activated in the organization settings. Via the Selection… button, you can assign several superiors to the user. When using approval workflows
- Hierarchy level: using the drop-down menu, you can select the hierarchy level in which the user works, e.g. “Department management”. If you use dynamic workflow within Onventis, you must maintain the hierarchy level and assign it to the user. Hierarchy levels can be maintained under Master Data Management → User Management → Organizational Hierarchy.
Other area
- Confirmation Status Terms of Use: this shows whether the user has read and confirmed the Create and Manage Terms of Use. As long as the terms of use are not confirmed, the user cannot log in to Onventis.
- Modified on: under modified on you can see the date on which the terms of use were modified.
- Changed by: under changed by you can see the username of the user who changed the terms of use.
- Purchase Card No.: here you can store a credit card number to which the vendor is to be billed, e.g. for a field service employee.
- Remarks: in this field you can enter your remarks about the user.
User who is the orderer …
- has access to catalogues depending on the delivery area.
With this setting, only those catalogs are displayed to the selected user that are permitted for the respective postal code area. The postal codes can be set in the catalog master data. - Has access to catalogs depending on the organizational unit or organizational object.
When this setting is activated, the user is deprived of the set catalog view and the entry point is changed to the shopping cart. The user is only shown those catalogs that are assigned to the relevant organizational unit or organizational object. The decisive factor here is which organizational unit and which organizational object is selected in the shopping basket.
For more information about this feature, see Creating and Configuring Catalog Views
Users – Assignments tab
General preferences area
In the Assignments area, you can control whether the user should have access to all or only selected cost centers, business areas, account assignment categories, key figures, or addresses.
For example, if the user is to be able to select from all available cost centers, you must select the All cost centers checkbox.
If you want to restrict access to certain cost centers, you must assign the corresponding cost centers to the user via the
Selection
button to assign the corresponding cost centers to the user.
You can set a cost center as the default for the user. This is automatically selected when the user creates a shopping cart item or order. To do this, select the desired cost center and define it as the default cost center for this user by clicking the Standard button.
In addition, you can enter a standard delivery and billing address. If you do not assign an address to the user, the address of the organizational unit to which the user is assigned is used.
Assignment options to the user:
- Cost center
- PSP elements
- Job (non-chargeable):
- Business divisions
- Account assignment category
- Delivery address
- Invoice address
- Key Indicator
- Material group
- Organizational units
- Organizational objects
You can make one or more assignments using the selection button. By activating the option All e.g. cost centers, all cost centers are assigned to the user. To set an assignment as default, select the desired assignment and click the Default button. For documents created by this user, the documents are preset with the standard assignments. This can be changed by the user in case of multiple assignments.
External documents area
In the External Documents area, you can set views on documents. You can use the views to control whether the user is allowed to see and edit data of other users. You can distinguish between “read access” and “write access”.
In addition, you can define that the user only sees the purchase orders for which he or she is defined as the requisitioner. If you do not make a selection, the user sees only the records he or she created.
Views can be configured for the following documents:
- Orders
- Requirement items
- Inquiries
- Auctions
- Purchased parts lists
- Bills
- Other
Users – SAP Assignments Tab
In the case of SAP integration, you can assign the predefined SAP structures to the user in the SAP Assignments tab page, in the same way as the general settings, and, if necessary, select them as the standard default setting.
The following SAP data can be assigned to the user:
Preferences area
In the Preferences area, you can configure the user’s access to SAP structures (SAP organizational units).
To allow access to all organizational units, e.g. all controlling areas, you have to activate the checkbox all controlling areas . If you want to restrict access to certain organizational units, you must make the assignment using the
Selection
button.
You can configure access to the following SAP structures:
- Controlling area
- Company code
- Plant (Purchasing)
- Storage location
- Purchasing organization
Standard settings for purchasing organizations area
In the Default Settings for Purchasing Organizations area, you can configure the default organization for the user.
These settings are automatically determined by Onventis for all new documents created by this user, e.g. purchase order attachments, and can be adjusted if necessary. The selection is made via a drop-down menu.
| Hinweis
The organizational units can only be selected if you have created the SAP structure in Onventis. |
You can make the following standard settings for purchasing organizations:
- Controlling area
- Company code
- Factory
- Storage location
- Purchasing organization
- Recipient of delivery/service
- Unloading point: manual maintenance of an unloading point, e.g. floor EG, room 1
- Purchasing group
User – Display tab
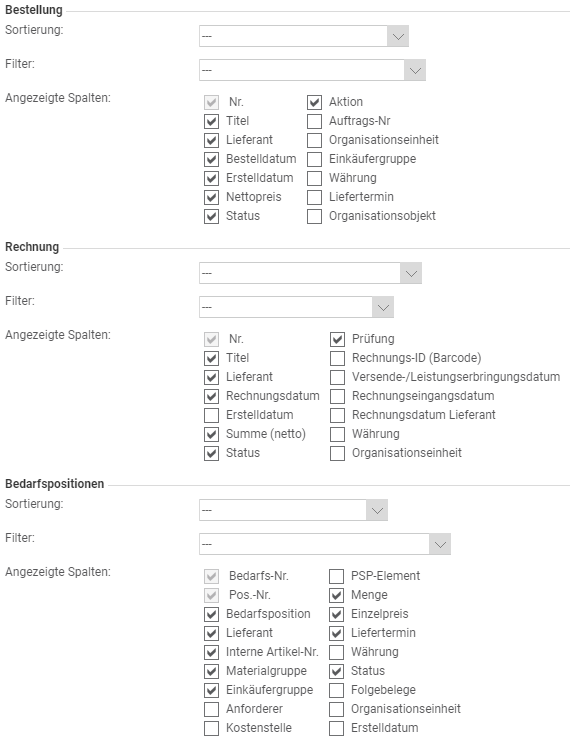
In the Display tab, you can define the display of catalogs and documents for the user.
If several catalog views have been assigned to you as a user, you can specify the view that is relevant for you in the Active Catalog View field in the Catalogs area. The active catalog view is displayed below the shopping cart.
You can preconfigure the display for documents by preselecting the sort order and preselecting from existing filters.
In addition, you can preset the general search. You can select the settings for the individual documents using the dropdown menu.
In the Purchase order, Invoice, Requirement and Contract items areas, you have the option of activating or deactivating the table columns that are to be displayed in the overview lists.
By activating or deactivating the corresponding checkboxes, you can select or deselect the columns displayed in the overview lists.
Users – Substitutions tab
In the Substitutions tab, you can specify one or more substitutes for a user. The substitute regulation enables the substitute to log on as a substitute in the defined substitution period via user self-administration and to process the relevant documents.
In theMaster Data Management → User Management → Users → Substitutions tab, you can set up a substitution rule for an absent user.
A substitution can be created as a substitute for a predefined substitution period via the New Sub stitution button. In addition, you can activate e-mail forwarding to the substitute.
| Hinweis
In order for the user to be able to create and edit the substitution rule himself, or for the substitute to be displayed to the user, the rights for substitution must be activated in the user roles assigned to the user. |
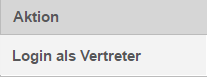
The user can access his own user master in the user administration.
In the Substitutions tab, he or she can log in as a substitute to the account of the user to be substituted via the Login as substitute link.
| Hinweis
The e-mails sent by the system are not automatically sent to the deputy. If a substitute rule is set up in a user, the e-mails can be forwarded to the substitute for the period entered. This setting must be made in the Master Data Management → User Management → Users → Substitutions tab. |
After creating a new substitute, the Send access data button is displayed in the toolbar.
This button sends an e-mail to the user’s e-mail address stored in Onventis with their access data.
User – Material groups tab
In the Material Groups tab, you can restrict a user’s access to only those material groups that are relevant to him.
In the case of documents for which the material group must be specified, for example, purchase orders, the user can select from the material groups relevant to him.
The advantage lies in the better clarity for the user.
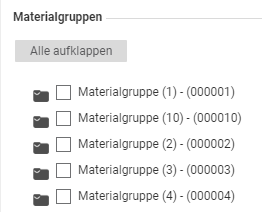
The Expand All button expands subgroups.
By activating the checkbox next to the desired material group, the selected material groups are assigned to the user.
The user then sees, for example in the purchase order, only the material groups assigned to him.
Mailings and notifications tab
In the Mailings and Notifications tab, you can set which newsletters and notifications you would like to receive from and about Onventis.
You can adjust the settings at any time.
| Hinweis
Please note that it may take some time to process the settings you have made. It is possible that you will temporarily still receive emails that you have already deactivated. |
The following mailings and notifications can be selected by activating the checkbox:
- Product information: the product information contains all information about Onventis, e.g. release information, new functions and changes
- Newsletter: the newsletter contains all relevant information of the company. Onventis
- Events: the events contain all information about upcoming events, e.g. invitations to webinars, training courses and events such as the Exchange Days.
Create and manage user groups
Under User Groups, you can group multiple users into a predefined group. This group can be assigned to approval workflows or create and manage material groups, for example.
You can create a new user group under Master data management → User management → User group via the New button.
Basic data tab
In the Basic Data tab, you can restrict access to Onventis modules for user groups, assign them to organizational units, and store a central e-mail address and the corresponding contact person.
User group area
- No.: Enter the user group number. If you leave this field blank, Onventis will automatically generate a number.
- Grouping:
- Title: the title of the user group, for example, purchasing group ONV4711. This field is mandatory and must be maintained.
- Description: exact description of the user group
- Visibility: with this you control the visibility, i.e. the access to the user group within the Onventis modules. You can restrict the visibility to the following modules; multiple selection is possible:
- Ordering
- Inquiries
- Order processing
- Order approval
- Document management
- Framework contracts
- Contracts
- Award approval
- Notes
- Auction
- Supplier evaluation
- Org. units: the assignment of the user group to all organizational units is done by activating the checkbox All organizational units; the assignment to only selected organizational units is done by selecting and assigning them via the Select button.
- Only display users from the selected organizational units in the user selection: Enabling this option restricts the ability to assign users to a user group to the selected organizational units. In the Users tab, only those users are displayed who are assigned to the selected organizational unit. This checkbox is only useful in connection with restricted organizational units.
Settings area
- Type: basically you can create two types of user groups:
- General: These user groups can be used in all areas in Onventis, e.g. as an approval user group.
- Purchasing: These user groups are especially for the purchasing specific area. A purchaser user group can, for example, be selected as the contact person for the vendor in a purchase order or assigned to a material group.
- Central e-mail address: Enter a central e-mail address to which users assigned to a specific user group have access.
- Contact person for the central e-mail address: Enter a contact person for the central e-mail address.
User tab
In the Users tab, you can select the users who should belong to this user group and define a rank for the user.
By specifying a rank number, the system always enters the purchaser with rank 1 in a purchase order for which the purchasing group must be maintained.
In the case of approval workflows, all users, regardless of rank assignment, receive the relevant document for approval. Only one user of the user group has to approve the document.
Create and manage user roles
Under Master Data Management → User Management → User Roles, you have the option of centrally restricting access to only certain functions within Onventis by assigning rights.
By assigning a user to a user role, the user only has the rights assigned to the user role.
Classic user roles are, for example
- Orderer
- Buyer
- Administrator
- Approver
You can create a new user role in Master Data Management → User Management → User Role via the New button.
Basic data tab
- Number: Number of the user role. If you do not enter a number, Onventis will automatically generate one.
- Title: Title of the user role. The Title field is mandatory and must be entered.
- Description: Description of the user role.
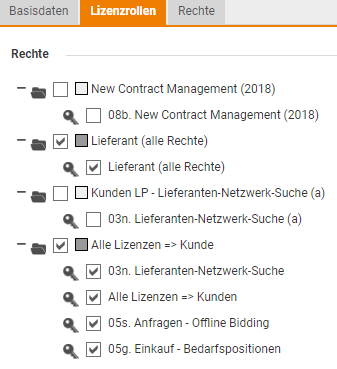
Rider License Roles
The License Roles tab displays the license roles assigned by the provider, usually Onventis. By activating the corresponding checkboxes, the license roles are assigned to the user role.
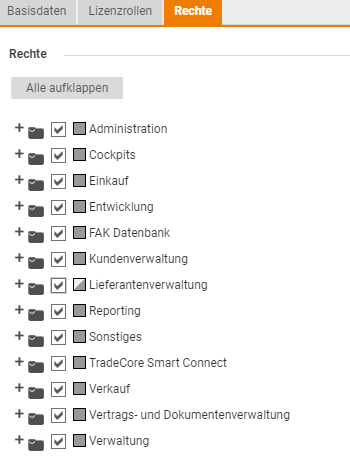
Rights tab
The rights assigned to the license role are displayed in the Rights tab. By enabling or disabling the individual functions, you can configure access to individual functions within Onventis.
Example
The example shows a user role with all available rights.
Create and manage organizational hierarchy
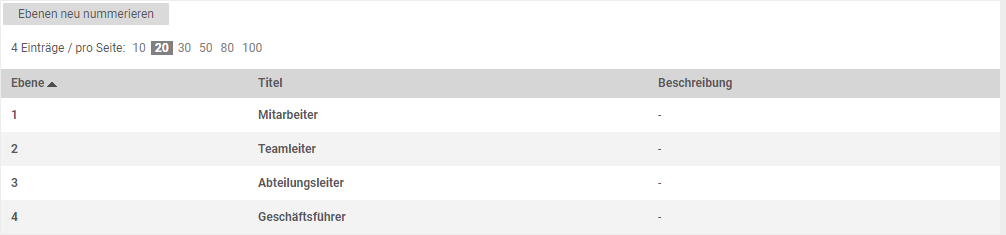
You can use organizational hierarchies to map your organizational structures. These can be used to dynamically determine approvers within dynamic approval workflows. You can create organizational hierarchies under Master Data Management → User Management → Organizational Hierarchy via the NEW button.
The following fields are available for this purpose:
- Level: via the drop-down menu you can select a hierarchy level, e.g. 6 = Managing Director. Here, the higher the number, the higher the hierarchy level.
- Title: in this text field you enter the name for the hierarchy level. This field is mandatory and must be filled in.
- Description: in this text field you can describe the hierarchy level in more detail.
| Hinweis
A hierarchy level can only exist once, that is, a level can only occur once. n users can be assigned to a hierarchy level. |