
Worklist view
The worklist can be opened both from the menu at the left-hand side and via the process tile on the Home screen. This will bring you to the following screen:

In the worklist you can always see on the right-hand side the main document which is linked to the transaction and at the left-hand side a division of the worklist and the currently selected transaction. By means of the button below, which is marked blue, you can fill the left-hand side of the screen with only the details of the selected transaction:

This way you can hide the other transactions in your worklist to focus on the selected transaction and edit it if so desired. The same happens when you press the button Edit above, which is marked orange. However, this will bring you straight to the edit mode, allowing you to immediately modify the transaction.
To the right of the button Edit you will find the buttons Generate and Reset. (Please note that ‘reset’ is optional and set during implementation.)
- Generate: This generates the process related report. For a purchase this will be, for instance, the order PDF and for a budget the budget overview.
- Reset: This allows you to manually re-determine the role players of a transaction. This can be necessary following an adjustment of the authorisation matrix or the booking itself. However, this is already automatically taken care of in the first step, unless it has been set up otherwise.
The button circled in green in the print screen above is an option to view the role players and the authorisation history of the selected transaction:
Column preferences

When you click the settings icon above the Edit button, you can view and alter your user preferences:

Simply dragging the columns from left to right will make them visible in your transaction worklist. The same applies the other way around. The buttons Hide all and Show all will make the columns invisible and visible via one click. You can also determine the order of views by dragging the columns up or down. These settings will be saved per user for each future session of the user concerned.
At the top of the worklist is a Filter icon which allows you to search for transactions within the worklist:

Clicking on it will take you to the following search screen:

Here you can search both by header- and line details based on different criteria. Multiple tabs can be unfolded to see more details you can search by. You can switch between two tabs to search by certain criteria. Above you can see the tab Transaction. On the right of it you can click on Process to initiate a search by more/other criteria. The button Hide takes you back to the screen where the entire worklist including the selected transaction is visible.
Grouping your work list by a certain column works slightly different:

To the right of the Filter button you will see a button with a three dot colon. This will show all other options regarding the functionalities in the worklist. If “Show grouping” is checked, you will see a light grey bar above the columns, as shown above, to which you can drag columns to group them. Remove the grouping can be activated by clicking the X within the column you dragged up.
Additional options in Column preferences on line level
Two additional options are added in the column preferences screen on line level. This maintenance screen can be reached by using the gear icon on line level (e.g. via invoice lines).


The options which are added are:
Show grouping: This enables the user to add a ‘group by’ on line level

An example using cost centers in the ‘group by’:

Filtering mode: The method of filtering within the lines themselves.
Three options are possible:
No filtering is done on line level.
On header level of the columns, a filter option is added which enables you to filter within the lines.

Per columns, it is possible to use 2 filter options using the ‘and/or’ option.

The column filter used is indicated with a green color, so it is clear at a glance which filters are in use.

A line-level filter option is added for quick filtering

The chosen grouping and filtering mode are stored for each user. This additional behaviour is available for line level filtering in workflow and archive of transactions.
By means of the button “Refresh”, you simply renew the worklist to show possible changed data. By means of the button “Email”, which can also be found via the three dot colon button, you can send an email from the application to another user or any other desired email address:

Navigating your mouse to the ‘To’ field automatically shows a list of all users and their linked email addresses to choose from. When you start typing in this field also the e-mail addresses of linked organisation contacts will be shown. It is also possible to send the e-mail to an address that is not known inside the application yet: just continue typing. The list with email addresses also contains email addresses of contact persons, linked to the supplier used in the linked transaction. They are displayed as ‘external contacts’.
Fields ‘CC’ and ‘ BCC’ are by default visible and can be hidden by clicking on the ‘CC & BCC’ link.
At the bottom you also have the option to upload a file from the hard disk to attach to the mail. Besides that, it is possible to attach and send one or more files that are linked to the selected transaction. You can select the attachments by clicking them. They will be flagged when selected.
A sent mail will always be saved as a remark with the selected transaction.
By means of the button ‘mark as read’ worklist items can be marked as read when currently unread.
By means of the button ‘mark as unread’ worklist items can be marked as unread when currently read.
Unread items are marked with bold characters.
If activated, a button ‘review role players assignment’ can be present. When available, this button will give you a preview of the role players that would be assigned to each step, which mandate is used, and which steps were done to find this role player. This is done based on the current selected master data on the transaction.
The other buttons above the worklist have the following function:
| Button | Meaning |
| Approve | Button is only available once the process is ready to be forwarded. If the process cannot be forwarded the reasons for this can usually be shown by hovering the mouse over this button:
|
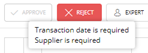
| Reject | Rejects the process. Depending on the settings of the workflow, you can choose to reroute the process one step back, send to the submitter or completely de-activate. It’s always required to enter a remark when rejecting! |
| Expert | The process can be directed to a colleague with this button. It’s also called the “question button”. You need to enter a remark why you send it to a colleague. The colleague will need to enter a remark as well when approving/rejecting.
After approval or rejection, the process will return in your own worklist. |
| Delegate | Send the process to a colleague. This person can then approve or reject in your name. Then the process will go to the next step; it will not be returned to your worklist. So with this button you delegate the approval to a colleague. |
 Depending on the process step, a PIN code may be required for approval.
After clicking Edit, you will be in the editing mode. Depending on the process step the transaction is in, you can or cannot edit any fields.
Coding
To code (enter) an invoice, you will need to click the “Edit” button first. The fields that you will see are dependent on various settings in your environment. Your screen may look different from the screenshots below.
When you first edit an invoice, data may be filled that comes from:
- OCR results
- Processing by the BOT user
- Received XML data via InvoiceSharing
- Possibly in combination with transaction defaults.
General rules apply to the screen:
- The entry can be saved when there are no errors/messages that prevent this
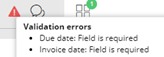
- If a field has an invalid value, a message in a red may be displayed. This is also shown in the top right of the coding screen with a red exclamation mark. If you hover the mouse over it, you can see which fields generated an error:
- When all the fields in a screen segment have been entered, the segment will collapse. Only selected fields will then be displayed on the folded line.
How search screens work:
- When entering data in a field, the application will automatically try to retrieve the correct value based on the entered data:
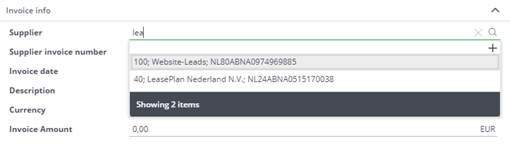
Specifically for the supplier field a “/” can be used to search based on supplier number. When no “/” is used the search will start in the name and bank account number. In other entry fields (like ledger, VAT code, payment term) we will search in the code and description for the text you entered.
- In the dropdown list, always a maximum of 20 items are displayed. If the value you are looking for is not visible, you need to narrow your search, if applicable it will be displayed at the bottom:

- Shortcuts for lookup- and date fields:
Opening of popup to select value:
Closing that same popup:
![]()
![]()
The entry screen will look like this:

Required fields can be recognized by the red asterisk that is shown next to the name of the field.
In the last segment of the screen you can add lines to the transaction or link it to another process.

The buttons that are shown above the transaction columns have the following function:
![]()
Add new line
![]() Delete selected line
Delete selected line
![]() Retrieve transaction defaults (see the information about the organizations)
Retrieve transaction defaults (see the information about the organizations)
![]() Copy selected line
Copy selected line
![]() Split in periods
Split in periods
Notice that:
- Before sending, the balance at the bottom of the lines eventually needs to be 0.00:

- The VAT amount when using VAT-codes with the setting “exclusive” only functions properly if a standard VAT code is linked to the supplier.
- A period division is possible, which can be used if your financial system and the interface support this option. First the full coding line needs to be created and saved. Then you can click the “scissors” icon to split the selected line.
When splitting, you need to select the starting period and the number of periods to split in:

Dividing an amount over periods will now also consider the reporting periods that have been entered in the environment. If these are not sufficient to continue booking in the future, the remaining amount will be added as a new line after the last period. By the use of a setting it can be (un)blocked to book lines in closed periods. Whenever this is allowed and you are booking lines in a closed period the table will show this information. If it is not allowed the amounts for the closed periods will be summed up and booked in the first open period in the selection. If insufficient periods are available the last line will contain the remaining amount that could not be split properly.
VAT-amounts will always be booked on the first line of the spread transaction.
Matching/linking to other transactions
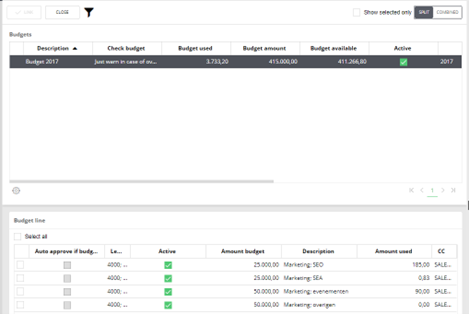
When booking a transaction line, this can be linked to another transaction, for instance an invoice to an order or a contract to a budget. You may also notice a smart ‘counter’ that indicates to how many transactions the active transaction can be linked based on the entered data:

When opening the link-screen the available transactions for linking are shown. You have the option to choose between two different views.
- Split, in the top part of the screen the header transaction are displayed and (after selecting one order), at the bottom the transaction lines from the selected transaction are displayed:
 Combined, the transaction lines are showed below each other
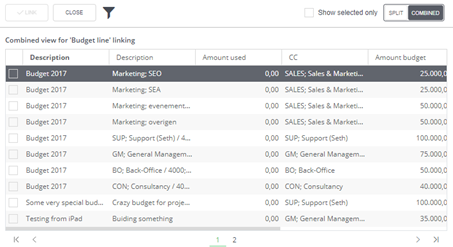
This can be a preferred selection as view modus, the preference for the chosen mode will also be stored user dependent for future use.
When the entry line already exists, it can be linked to a transaction using the three vertical dots.

Via the same three dots, you can also unlink the linked transaction from the current entry line.

Simplified organisation wizard
Within the coding step it is possible to create an organisation by using the simplified organisation wizard. It is therefore possible to create an organisation from a transaction, without leaving the coding screen.
Remark: maintenance of suppliers can only be done in Onventis when it is implemented. It is possible that maintenance of suppliers is done in your financial system and therefore suppliers are imported in the Onventis application.
The plus sign to create an organisation when Coding will appear if you are in the supplier field and is not immediately visible.

As you can see the most important fields can be entered and saved. Via a set of application settings it can be chosen which fields are visible/ required. By default the screen will be displayed as followed:

When you start typing the name of a new supplier, the system will check for similar suppliers (to prevent double entered suppliers).

The same check is executed when entering VAT number and Chamber of Commerce number.
When in the worklist it is possible to assign transactions to an expert by using the “Expert” button. This button is also referred to as the “Question button”, because this give the opportunity to ask a question about a transaction to another employee/user.

In the pop-up you can select the user to which you would like to ask the question.

A remark is always mandatory when assigning an expert.
Whenever the transaction is sent to the expert the worklist of the user that sent the transaction will show it in italics and bold font with a specific icon at the start of the transaction line. The transaction is not editable by the sender at that moment and also approving and rejection are not possible.

When you hover your mouse on the user icon at the start of the line you will be able to see to which expert the transaction has been sent.
For the expert the transaction is visible in his/her worklist with the same icon. The expert can only approve or reject a transaction and provide comments, but this will not set the transaction to the next or previous workflow steps. The transaction will always be sent back to the user who sent it to the expert.
When the expert approves the transaction it will return to the worklist of the sender and it will be marked as ‘unread’ at that moment.
When the expert rejects the transaction it will also return as ‘unread’ to the worklist of the sender, but it will contain a red cross as indicator that the transaction was rejected by the expert.

When the transaction that is waiting in the worklist needs to be retrieved by the sender (e.g. when the question has been answered in some other way), the sender can revoke the expert request and get the control back of the transaction. This can be done by clicking the three dots in the top right corner of the worklist while the transaction is selected and click “Assume’.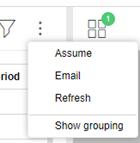
You can pick up the transaction yourself again.
Assigning a specific transaction
From the worklist it is possible so send a transaction to a different user, using the button ‘Delegation’.
By using this, you are saying you cannot approve and transfer the right to a colleague.
If you do this regularly, it might be an indication the approval matrix is incorrect. When the approval matrix is correct, the tasks will be assigned to the correct person by default and you do not have to delegate the transaction.
When delegation a task, it is required to put in a remark. This way, the colleague knows why the transaction is transferred. The transaction will disappear from your worklist and will be only visible in the worklist of assignee.
It may occur that you need to delegate your work due to leave or illness. An easy function for this has been incorporated in Onventis. You can find the button for this at the right top of the screen by clicking the little triangle next to your name and subsequently choose Delegate.

This will take you to the next screen where you can select the person you want to delegate the account to, enter the start and end date and add possible remarks:

When no start- and end date is selected the delegation will be active for unlimited duration. When you go on a holiday, you can enter start- and end date. Only during that period, your colleague can take over your worklist. If no start date is entered, ‘today’ will be the actual start date for the proxy.
The user you select will receive an e-mail stating that he/she received your delegation rights.
When you are not able to set a delegation for yourself (e.g. when you are ill), the application manager can set the delegation for other users.

‘Delegate from’ is the user who’s worklist will be taken over, ‘Delegate to’ is the user who will take over the worklist. A worklist of an external user can only be delegated to external users of the same organisation or by an internal user.
The user which is chosen here will receive a message that this user has received delegation rights on your worklist. This user will have to accept the delegation. This is mentioned in bold and you can see how many tasks this person has.

When you click on this, a pop-up appears asking you if accept this delegation. If you click on ‘Accept’, the delegation is activated but you will not go to the worklist of this user. This will happen when you click on the arrow next to ‘Accept’ and select ‘Accept and use’.
The option “Approval matrix delegation” only needs to be checked when you work actively with ‘back-up’ user. This is an extra security that only specified users (the backup users) for a specific mandate give access to actually approving that invoice (where this specific mandate is used) from the delegated worklist. Users with delegation rights to a worklist cannot approve invoices which use this specific mandate as it is not visible in the worklist.
When a transaction is approved using a delegation this can always be traced in the transaction history as the “proxy user”:

The user that used the delegation rights to approve a transaction is shown in parentheses.
Another feature of the worklist is the document export functionality. This can be used by clicking the three dots in the top right of the worklist screen and selecting “Export documents”. This way for each transaction in the worklist the first page of the main document is exported.

The pages are gathered in a .zip file which is sent to the e-mail address of the logged in user.
Please note this option is only available when a specific activity is selected in the filter.