For expense claims, expense claim types are used. Please refer to the maintenance part of expense claim types for more information. In the maintenance of users, the ‘organisation field is required in order to be able to work with expense claims. Please refer to the maintenance of users for more information.
With the expense claim module it is possible to claim expenses and travel costs using the mobile app (or via web-browser). All claims are collected in one overview and can be sent periodically by the employee.
Schematic representation of the expense claim proces

Employees enter expense claims (either by mobile app or by web browser) via the tiles “Quick expense claim” (e.g. lunch costs) or “Quick travel expense” (business km). The entered claims are collected in an expense claim which can be found in the dashboard tile “Expense claim”. The employee confirms the claim by approving this. The expense claim is sent to the activity ‘finance check’ in order to check the coding of the expense claims, once this is done, it is sent into the appproval process. Once the expense claim is approved, the initiator is informed.
Entering a (quick) claim
Expense claims can be entered using the mobile app or by using the web browser. Expenses are entered by creating a “Quick expense claim” or by creating a “Quick travel expense”.
Quick expense claim
A quick expense claim is used to claim costs not related to travelling (e.g. lunch costs). In a web browser use the ‘new’ button in the dashboard tile “Quick expense claim” to start a new claim.
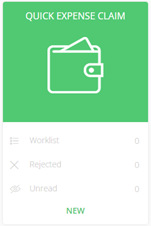
To link a document (which is required), use the ‘Upload’ button on the right side of the screen.
In the mobile app click on the ‘+’ shown behind Quick expense claim. In a pop-up you will see the following options:
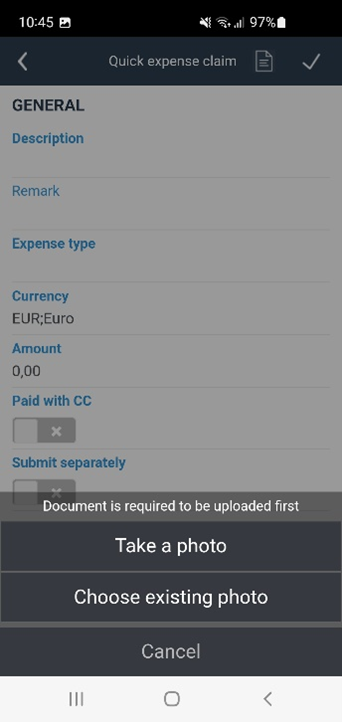
Take a photo -> will open the camera for you to take a photo (of e.g. the receipt).
Choose existing photo -> will open the photo gallery and enables you to select a photo from there. After creating or selecting a photo, the fields are available.
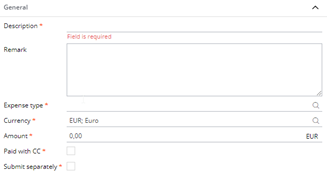
The fields are the same for the mobile app and the web browser
- Remark: Enter additional information. (optional)
- Expense type: Select the type of expenses. (required)
- Currency: Select the currency of the expenses. (required)
- Amount: Enter the amount of the expenses. (required)
- Paid with CC: Check the box when it is paid by a company creditcard.
- Submit separately: Check the box when a separate expense claim should be created for processing. If not checked, it will be placed in the general expense claim for processing. (this is e.g. done if you pre-paid a large amount which you want to be paid back earlier than the regular claims.)
After entering the details, the quick expense claim can be confirmed with the ‘save’ and ‘approve’ button (in web browser) or the v button (in the mobile app).
A new regular expense claim is created (if this is the first quick expense claim this month, or the checkbox ‘submit separately’ is checked) or added to the existing expense claim when this is still in the ‘enter’ step.
Quick travel expense
A quick travel expense is used to claim costs related to travelling (e.g. driven mileage to a customer) In a web browser use the ‘new’ button in the dashboard tile “Quick travel expenses” to start a new claim.
To link a document (which is optional in this process), use the ‘Upload’ button on the rights sight of the screen.
In the mobile app click on the ‘+’ shown behind Quick travel expenses. To upload a document, click on the document icon, left of the v button. This will open the pop-up with two options;
Take a photo -> will open the camera for you to take a photo.
Choose existing photo -> will open the photo gallery and enables you to select a photo from there. After creating or selecting a photo, the fields are available.
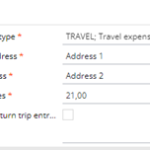
The fields are the same for the mobile app and the web browser
- Expense type: Select the type of expenses. (required)
- From address: Enter the address from where you travelled. (required)
- To address: Enter the address to where you travelled. (required)
- Kilometers: Enter the quantity of kilometers from the ‘from’ address to the ‘to’ address. (required)
- Create return trip entry: If not checked, only one travel line will be created based on the entered data. If checked, automatically a second travel line (the return trip) is created where the ‘from’ address is taken from the entered ‘to’ address and vice versa.
- Remark: Enter additional information. (optional)
After entering the details, the quick travel expense can be confirmed with the ‘save’ and ‘approve’ button (in web browser) or the v button (mobile app).
A new regular expense claim is created (if this is the first quick travel expense this month, or the checkbox ‘submit separately’ is checked) or added to the existing expense claim when this is still in the ‘enter’ step.
Expense claim
Quick expense claims and quick travel expenses are collected (per month) in an expense claim. This can be found in the dashboard tile “Expense Claim”. (It does not have to be created manually!) The expense claim is presented in the worklist of the initiator in the activity ‘create claim’.

The specific sections and fields in the expense claim process are mentioned below.
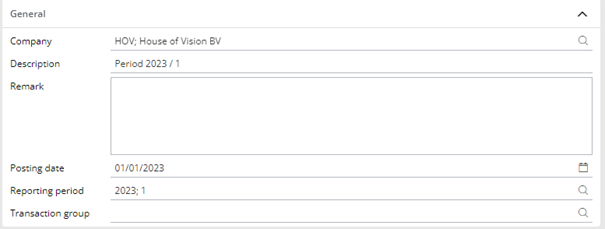
- Company: The company to which the initiator is linked.
- Description: By default the description for an automatically generated expense claim is: ‘Period + yyyy/mm’ of the period the quick expense claim/ quick travel expense is created in.
- Remark: The remark of the first quick expense claim/ quick travel expense is copied here. Additional remarks can be made.
- Posting date: the posting date of this entry.
- Reporting period: the period linked to the posting date of this entry.
- Transaction group: the transaction group of the expense claim.
In general there is no need to change any of these fields.
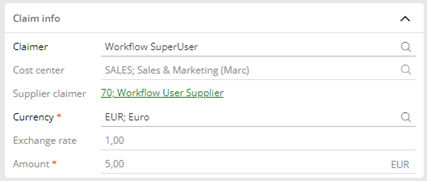
- Claimer: the employee the expense claim belongs to.
- Cost Center: the cost center where the employee belongs too. (taken from the user maintenance.)
- Supplier claimer: The supplier linked to the employee. (taken from the user maintenance.)
- Currency: the currency of this expense claim.
- Exchange rate: the exchange rate of this expense claim.
- Amount: the amount of the expense claim*
Per quick expense a cost line is added.
- Expense date: date when the quick expense was entered.
- Description: description of the quick expense.
- Remark: remark from the quick expense.
- Expense type: expense type from the quick expense.
- Paid with company card: checkbox taken from the quick expense.
- Paid with: prefilled with ‘company card’ in case in the quick expense the checkbox ‘paid with company card’ was checked, otherwise prefilled with ‘cash’.
- Request full payment: Field to indicate that full payment is requested (please see ‘process of the expense claim: Create claim for more info on this’)
- Amount: amount from the quick expense.
- Amount payable: amount which will be paid out. If in the amount of the cost line the maximum amount set in the expense claim type used is exceeded, the maximum amount or maximum quantity * tariff is mentioned as amount payable.
- Ledger account: ledger account linked to the expense type. If no ledger account is linked, it will appear empty.
- Cost center: cost center from the quick expense
- Cost unit: cost unit linked to expense type. If no cost unit is linked, it will appear empty or will not be displayed. (Depends on ledger settings)
- Project: project linked to expense type. If no project is linked, it will appear empty or will not be displayed. (Depends on ledger settings)
- Cost allocation 1 – 7: cost allocation 1 – 7 linked to expense type. If no cost allocation is linked, it will appear empty or will not be displayed. (Depends on ledger settings)
Per quick travel expense you will find at least one line. With a maximum of two per quick expense. If the ‘create return trip’ checkbox is marked, two lines will be displayed in the expense claim, travel lines section.
- Expense date: date when the quick travel expense was entered.
- Expense type: expense type from the quick travel expense.
- From address: from address from the quick travel expense. (Or the ‘to address’ from the quick travel expense when ‘create return trip’ checkbox was checked. )
- To address: To address from the quick travel expense. (Or the ‘from address’ from the quick travel expense when ‘create return trip’ checkbox was checked. )
- Remark: remark from the quick travel expense.
- Quantity: Quantity from the quick travel expense.
- Amount: Quantity * Tariff (from expense claim type)
- Amount payable: amount which will be paid out. If in the travel line the maximum amount or maximum quantity set in the expense claim type used is exceeded, the maximum amount or maximum quantity * tariff is mentioned as amount payable.
Process of the expense claim
Create Claim
After the expense claim is checked, it can be approved by the employee.
In case none of the quick expense claims or quick travel expenses exceeded the maximum amount, no warning message will be provided and the expense claim is sent for approval to the next step.
In case one or more of the quick expenses reached the maximum amount or quantity, the ‘approve’ button will give the claimer a warning.
The message is:
Amount payable is limited on one or more lines.
You can request full payment by setting the status field and setting a remark.

This message will be displayed when hovering over the blinking ‘approve’ button AND when actually approving the expense claim.
From the expense claim itself it is visible which lines are meant, the lines have a small colored part in front;

When editing this travel line, an additional checkbox is displayed: “Request full payment’.
If the claimer wants to have the full amount paid, rather than the maximum amount the checkbox can be checked. This alone will not be sufficient, a remark will need to be entered in order to explain why the maximum amount was exceeded. Once the remark is added, the expense claim can be approved and send to the next step in the approval process.
Finance Check
The next step in the approval process is the activity ‘Finance Check’. This is by default linked to the role ‘coding’.
If all amounts are equal to or less than the maximum amounts as set in the expense claim types, the approver can (after carefully checking the claim) approve the expense claim to the next step.
If a request for full payment is found, this is visible via the ‘approve’ button of the expense claim. The message will be displayed when hovering over the blinking ‘approve’ button AND when actually approving the expense claim.
The message is:
There are one or more costing or travel lines which have been limited by the company policy.
If the request for full payment can be awarded, don’t continue and update the line award full payment status before final approval.

When the approver wants to award the full payment, the approver can edit the expense claim, go to the corresponding line and check the box for ‘Award full payment” and approve the expense claim.

Approval step(s)
Based on the approval matrix mandates, the amount of the cost lines and the total amount, the expense claim needs to be approved by first/second line approvers and first/second overall approvers. More information on this can be found in the helpfiles of the approval maintenance in the ‘maintenance’ manual.
In the First line approval step of the Expense Claim, the approver has the same option to award full payment as present in the Finance Check. In any other approval step, this option will NOT be presented.
Inform claimer
After approval by all (budget) approvers, the expense claim will return to the initiator to inform the user on the approval.
When one or more lines where limited to the company policy, the status of the ‘request for full payment’ can be checked in the linked cost line.
In case the line is green, the indication will be “Your request for full payment has been awarded”.

In this case, the amount payable is updated and aligned with the amount field.
If it was denied, the colour in front of the line is red and the indication will be “Your request for full payment has been denied”.

In this case the amount payable is still limited to the amount as set in the expense claim type.
In the latter case, approving the expense claim when in the activity ‘inform initiator’ will also give a warning message: “Some lines with a maximized amount based on the company policy you asked full reimbursement for have not been awarded”.

When the user approves the expense claim, the expense claim is fully processed and the status is set to ‘ready for export’.
After full approval of the expense claim, the claim is ready for export to the financial system. A separate stream is created for this during the implementation. Please ask your internal application manager for more information.