
Under Catalogs, you as a user have access to all catalogs that have been assigned to you in the catalog view. In the catalog tree you have the possibility to navigate through different levels of directories, catalogs and catalog categories.
The ability to navigate through different catalogs allows users to efficiently perform the following tasks:
- Easy browsing and “rummaging” through catalogues and the corresponding articles
- Targeted access to specific catalog categories and articles
- Quick order of one or more articles from different categories
Navigation in the catalog tree
In the catalog tree, you can navigate through the different levels of directories, catalogs, and categories (hereafter referred to as “levels”). You have the following navigation options within the catalogs:
- You can identify the nesting of layers by color gradation and shading. A level that contains another sublevel is represented by the arrow symbol on the right.
- By clicking on a layer you can open it. Any other level that may already be open is automatically closed.
- Click on the arrow symbol to the right of the layer name to open or close the layer. Any other level that may already be open is automatically closed.
- The currently selected level is highlighted with the color defined for your organization. In the following image, the selected layer is highlighted in black:

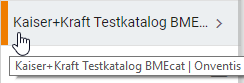
- If a catalog is a supplier catalog, the name of the supplier is displayed in the tooltip on mouse-over over the corresponding catalog name.
- If the name of a directory, catalog or category is too long, the title is abbreviated. The complete title is displayed, also by mouse-over over the corresponding entry.
- OCI and cXML catalogs (punchout), you can recognize by the punchout symbol. OCI and Punchout catalogs include all catalogs for which you can switch to the supplier’s shop system via a link from Onventis.
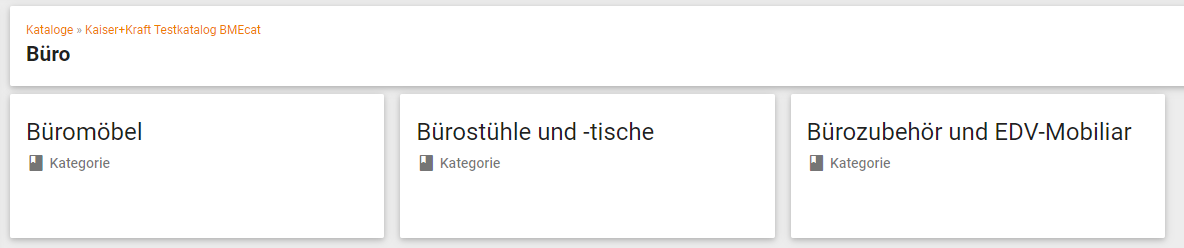
Navigation via tiles
In addition to navigating via the catalog tree on the left, you can also use the tiles in the main area. At the top level, each tile represents a catalog or catalog directory. Within a catalog, the tiles represent the categories of the currently opened category level.
The catalog tree and tiles always behave synchronously with each other, regardless of where you as a user are currently navigating.
In addition to the layer title, the type of the respective layer (directory, Catalog, category or punchout catalog) and, in the case of supplier catalogs, the name of the supplier.
Breadcrumb navigation and layer heading
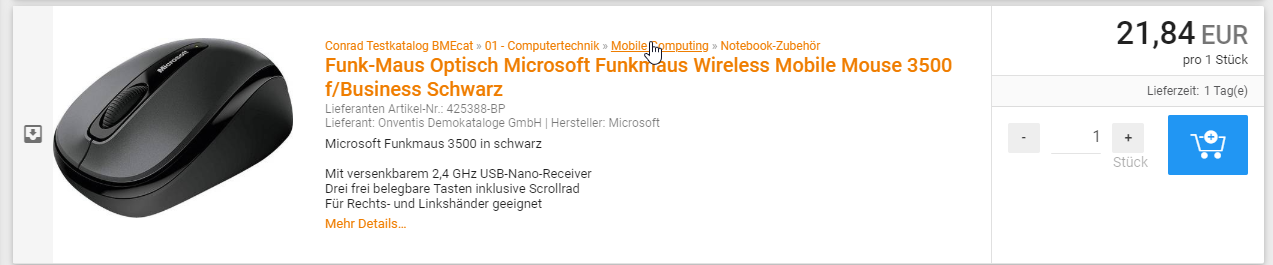
Above the tile navigation or the item list, the title of the currently selected level (directory, catalog or category), the description text of the level and an image of the level are displayed.
Additionally, the path of the currently opened layer, a breadcrumb, is displayed. By clicking on one of the path elements you can jump directly to the corresponding higher level.

Change of the article view
When you call up the lowest category level of a catalog, you can see the items contained in the category.
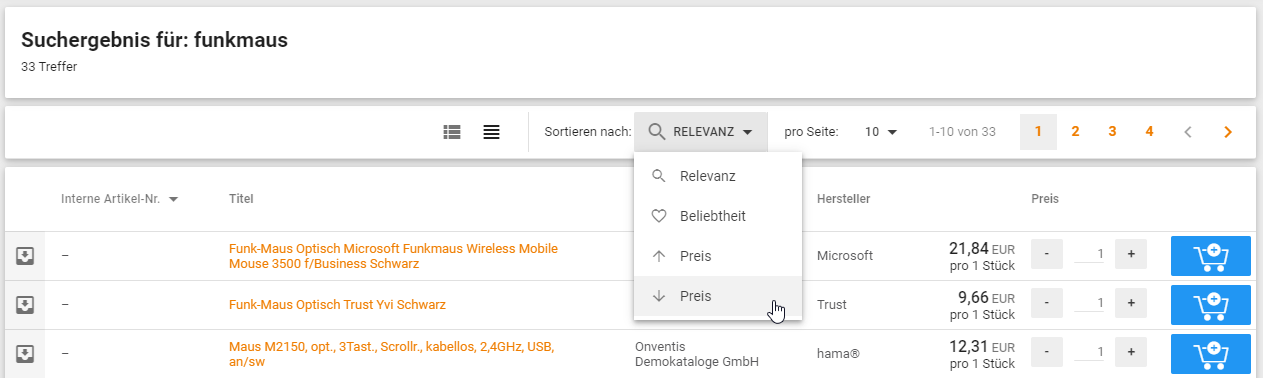
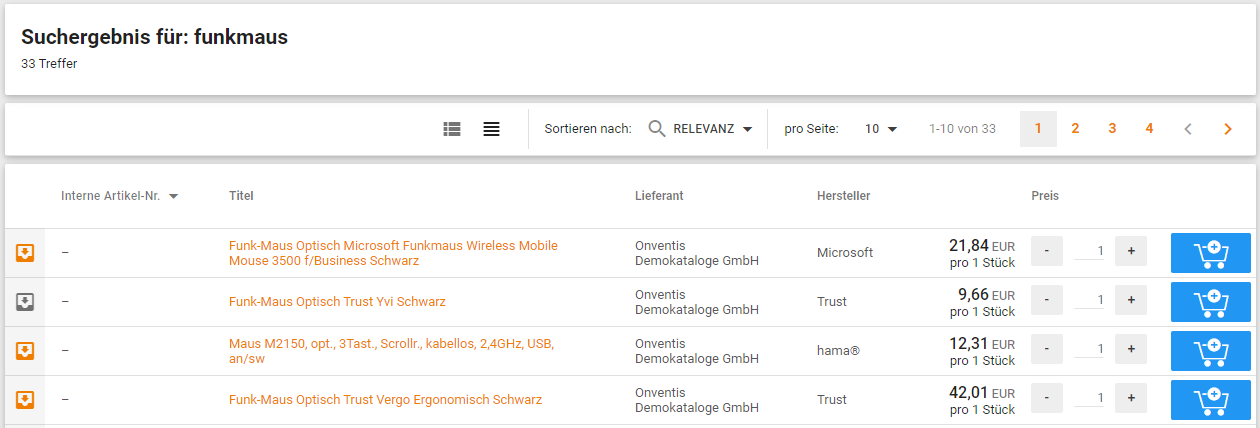
Basically, two different display types are available: the list view and the table view. You can select the views using the corresponding buttons.
Toolbar settings
You can use the toolbar to customize the display of the item list.

| Info
The settings made in the toolbar are retained when navigating through different catalogs. The selected settings are also available for later Onventis calls and are only deleted when you reset the browser cache. The settings are only ever available on the device and browser in which they were made. When you log in to Onventis again in a different browser or on a different device, the default settings are displayed there. If you share the same Windows account with several users on one device/browser, you share the catalog navigation settings as Onventis users. |
Selection between list view and table view
List view
In the list view, as much space as possible is available for a single item, so that a large amount of information, incl. can be displayed on the article screen.
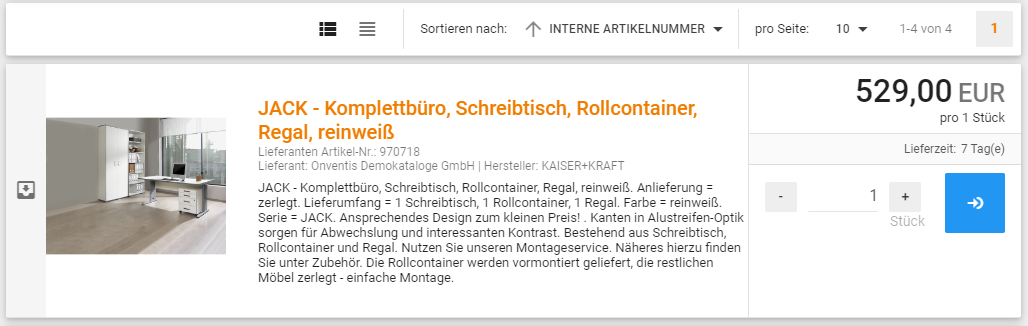
Table view
In the table view, articles are displayed in the most space-saving way possible, so that as many articles as possible are visible at a glance.
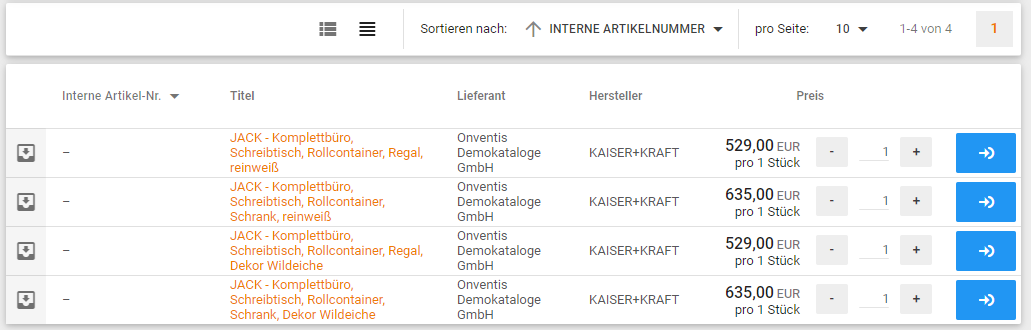
By clicking on the column header of the article number column, you can choose between the internal article number, supplier article number and manufacturer number as the article number to be displayed.
Customize sorting
You can use the Sort by field to influence the sorting of the article list.
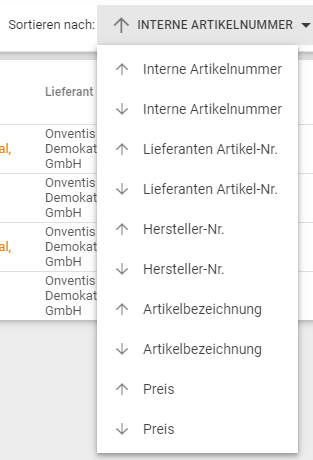
You can sort the list in ascending and descending order according to the following values:
- Internal article number
- Supplier article number
- Manufacturer number
- Article description
Number of entries per page

The per page field allows you to select the desired number of items to be displayed on a page. You can open further pages with articles by using the page numbers and arrow keys to the right.
Ordering articles
Keyboard navigation
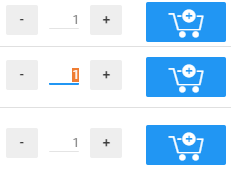
By pressing the Tab key, you can navigate through the displayed articles in the list and table view. The focus jumps through the quantity fields of the articles, the quantity information is automatically highlighted so that you can directly enter the desired quantity via the number keyboard. By pressing the Enter key you can place the article in the shopping cart.
Feedback directly at the shopping cart button
Articles are transferred immediately with the desired quantity when you click on the shopping cart button. You can select several articles directly one after the other.
Successful transfer
The successful transfer of the article into the shopping cart is confirmed directly at the button.

Failed transmission
If an item could not be added to the shopping cart, the button is highlighted in red and an error message is displayed at the top of the page and in the button’s tooltip.
The button remains colored red until the cause of the error (e.g. falling below the minimum order quantity) has been corrected.
![]()
Using punchout catalogs (OCI and cXML)
Punchout catalogs can be integrated into Onventis and are available via the catalog navigation. The corresponding catalogs are marked in the catalog tree by the jump symbol. When clicking on a corresponding entry, the details of the catalog logo, description, right are displayed and the catalog is opened within the frame or as a popup (depending on the setting of the respective catalog).
If a Punchout catalog has been defined as “Default” in the catalog view, this catalog will always be opened automatically when you click on the catalog icon in the Onventis main menu.
Selection of several articles
Via the box symbol you can select several articles for further processing.
You can use the “Selected articles” function to call up the list of selected articles. You can transfer these later into the shopping cart, an order, inquiry, article favorite group or use them for the article comparison.
![]()

As soon as you transfer the articles to other documents, the list is cleared. The article list is cleared again via the Clear selection.
Catalog search
As a user, you can seamlessly switch between “browsing” catalogs and catalog searches by entering search terms.
If you are looking for a specific article, select Catalogues in the search window above:
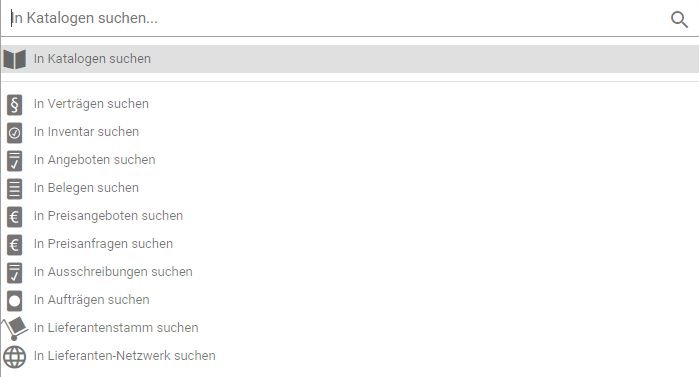
You can then enter the article you are looking for in the search window:

In doing so, Onventis first searches in all catalogues that are activated for you.
Catalog search by properties
You can now refine the search results displayed by narrowing down the search according to the desired properties.
The following properties are available for this purpose:
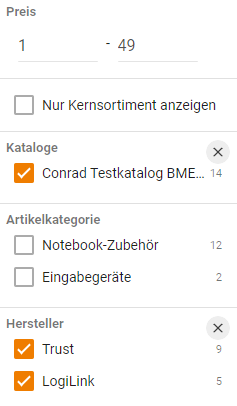
Price: in this section you can set the price limits, from – to.
Show core assortment only: if the article you are looking for belongs to the core assortment and this has been defined in the catal management, you can limit the search to the core assortment.
Catalogues: under Catalogues you can limit the search to a catalogue. To do this, activate the checkbox next to the desired catalog. If you limit the search to a specific catalog, the selected catalog is displayed in the upper search window and the search is performed only in this catalog.

Article category: under Article category you can limit the search to a certain article category. To do this, activate the checkbox next to the desired category. If you limit the search to a certain article category, the selected article category is displayed in the upper search window and the search is only carried out within this category.
Manufacturer: under Manufacturer you can narrow down the search to a specific manufacturer. To do this, activate the checkbox next to the desired manufacturer.
Retrieve search results of a catalog or category
After the search has been executed, the search results are displayed.
In the navigation path you have the possibility to navigate within article categories and catalogues.
Sorting by price
When displaying all items of a certain item category in a catalog, you can sort the results in ascending and descending order by price.
Using the watch list
You can use the watch list together for catalog articles, catalog search and navigation.
You can mark the articles you find for later use and collect them in a separate list. You can add an item to your watchlist using the move_to_inbox button.
You can call up the articles added to the watch list via the “Selected articles” function.
![]()
Article favorites
Under Operative Purchasing → Catalogues&Articles → Find Article Favourites you can add frequently ordered articles to your article favourites.
You can transfer articles from catalogs, orders and inquiries into an article favorite group, or create articles via a form.
The articles in the article favorites list are not updated automatically. Via the Update article favorites… button, you can update the article favorites list.
You can define each favorite group as Public or Private via the visibility. A private favorite group can only be seen by you, a public one by all users in your organization.
Furthermore, you can set the editing rights of the favorites list when creating or editing it. You have the possibility to edit the list only by yourself, to make the list editable by certain or all users, or to allow only certain user groups to edit the list.
Please note that the persons who are to edit the list must also see it. Editing rights do not automatically include viewing rights.
You can create a new article favorite group by clicking the New button.
Via the New article favorite… button you can enter article favorites via a form, e.g. free text items.
Via the Catalog… button you can add items, including image, from the catalogs to the item favorites group.
Via the Use for… button you can transfer articles from the article favorite groups into an order, inquiry or into the shopping cart.
Auto-Learn List
The Auto-Learn list contains all ordered articles and summarizes them automatically according to the respective article numbers and suppliers.
The items displayed depend on the settings in the Auto-Learn list, which includes three specifications:
- Cumulative/Non-cumulative display: This setting can be found in the upper toolbar where the search is also located. The articles can be displayed cumulatively, i.e. summarized, or not cumulatively. In the cumulated view, articles with the same article number and the same supplier are grouped together.
- Period: This determines the period in which the items were ordered. Here you have the possibility to display articles which have been ordered one month, 3 months, 6 months, one year or more than one year ago.
- Sorting: The last setting that affects the results of the Auto-Learn list is the sorting. You can sort either by order frequency or order volume.
Available functions in the Auto-Learn list
You can open the order item by clicking on the article description.
By clicking on the order number in the column Order/best date you can call up the corresponding order in which this article was last ordered.
You can use the delete icon in the last column of the Auto-Learn list to delete the item from the list.
By clicking on the use symbol you can transfer the article to an order, inquiry or the shopping cart. Additionally, you can create the item as an inventory or save it to a catalog category or item favorites group.