Below you will find the description, of how to set up Single Sign-on in Onventis Buyer based on the SAML protocol.
It should help you, configure your SAML Provider and hand over the required information to integrate your Provider on our side.
In general
Single Sign-on allows users to authenticate to the Onventis Buyer application against an Identity Provider that you own. To enable both systems to communicate with each other, the XML framework SAML 2.0 (Security Assertion Markup Language) is used to exchange authentication data between both security domains.
Single Sign-on at Onventis should not be confused with the transfer of user master data (e.g., personal data such as name, address, phone number, language codes, user roles, etc.) from a central employee directory to the Onventis Buyer application. This transfer is supported exclusively via the Onventis Buyer User import feature. If you want to achieve an import of user master data, please contact our consultants to learn more about the automation abilities of this process.
SAML Provider Setup
To set up the SAML-based Single Sign-on you need to take care of four things:
-
Applying the necessary access rights to take care of the configuration
-
Consider the configuration of a SAML Provider on your company’s own Identity Management Solution
-
Configure a link between our solution and your SAML Provider in Onventis Buyer
-
Establish an identifier to map your Onventis Buyer users to the Identity of your SAML Provider
Apply necessary access rights
To set up Single Sign-on for your Onvenits Buyer organization, you must first ensure that your user role has the necessary rights to configure it.
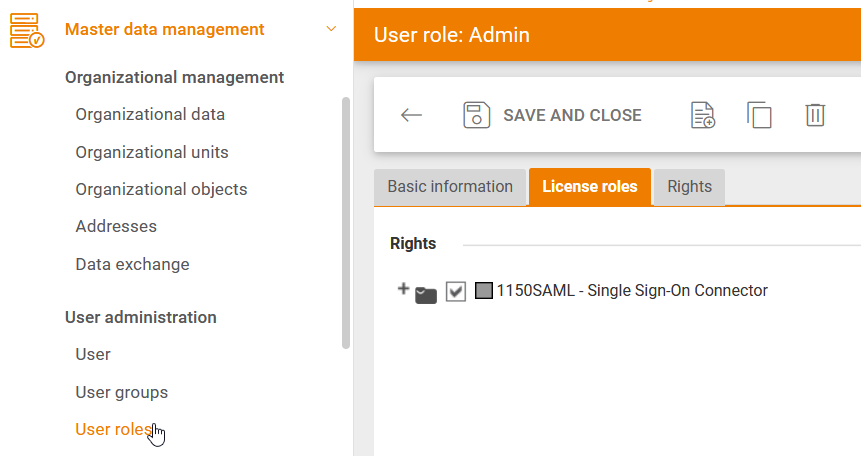
To do this, go to Master Data Management and select the menu item User roles. Open the role assigned to you and check whether the license role 1150SAML – Single Sign-On Connector is activated. If not, activate it and save the update of the user role.
Then perform a logout and log in again to ensure the user role change applies. In case the License role is not available at all, please call your sales contact.
After making sure that your user account has the necessary rights, navigate to Configuration -> Organizational Settings. Here you will find a new tab called “Single Sign-on”.
Please click the Add configuration button. Within the configuration form, you will find all the necessary parameters (SAML URLs) that are necessary for the configuration of the SAML provider on your site:
Configuration of your SAML Provider
First, you need to Create your own application in the Azure enterprise applications.
Once the application is created, you can make the necessary configurations under Single sign-on.
In there, you will need to add Identifier (Entity ID), Reply URL and Sign-on URL. You can copy all three URLs from the Onventis Buyer SAML configuration view:
When the Basic SAML configuration is filled in, you can start with step number two and enter the SAML attributes.
-
email
The address is used as a unique identifier by our Identity Provider -
firstName & lastName
Helping us with our support use-cases and used for addressing users on UI and in emails -
preferredUsername
Used to link an identity between our IDP and the Onventis Buyer application. It is maintained as “External user name” field (Excel field name “ExternalUserId”) in the user master data in the “Advanced” tab of Onventis Buyer. So you are able to change the External user name as you wish to in order to create matching between the SAML user and the Onventis Buyer user.
To create the matching entry in Onventis Buyer you can add the preferredUsername to the ExternalUserId field of the user. This can be done either via import job or via the Onventis Buyer UI.
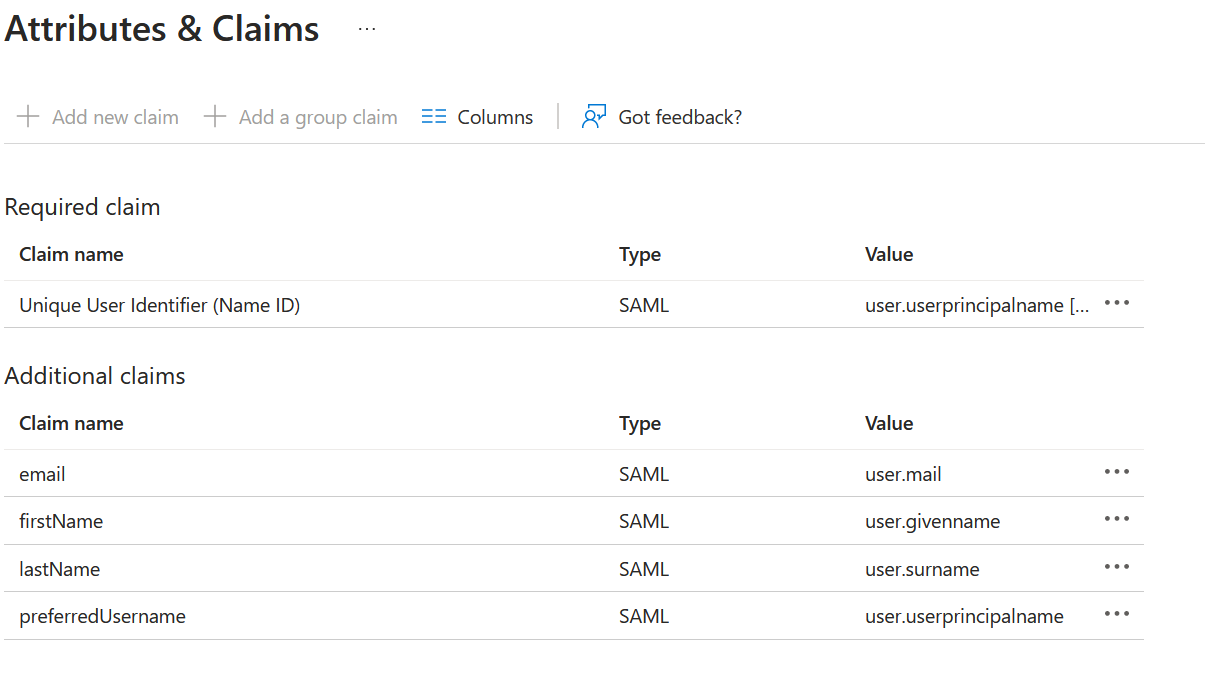
To make these attributes part of your SAML request, you must set up a claim mapping in your SAML provider. A claim is information, that an identity provider specifies about a user in the XML it issues to that user. In the SAML protocol, this data is usually included in the SAML attribute statement.
When configuring the claim mapping, please make sure on all Claims, to have an empty Namespace URI, otherwise the communication will fail:
After finishing with all values, the claim mapping in your Azure application could look like the following:
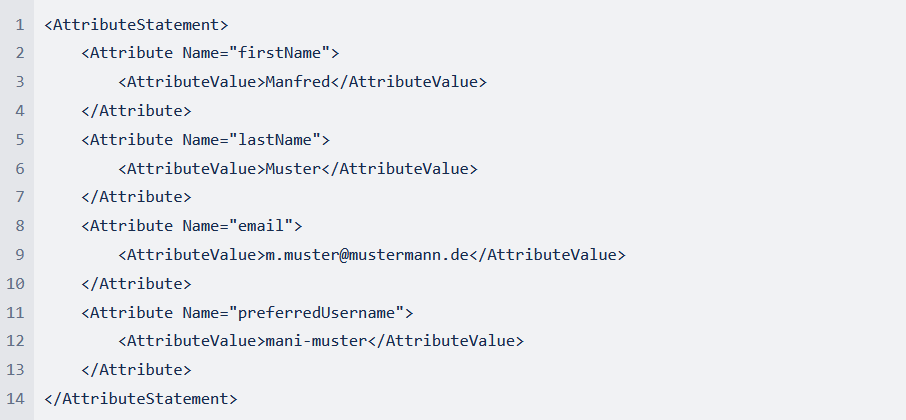
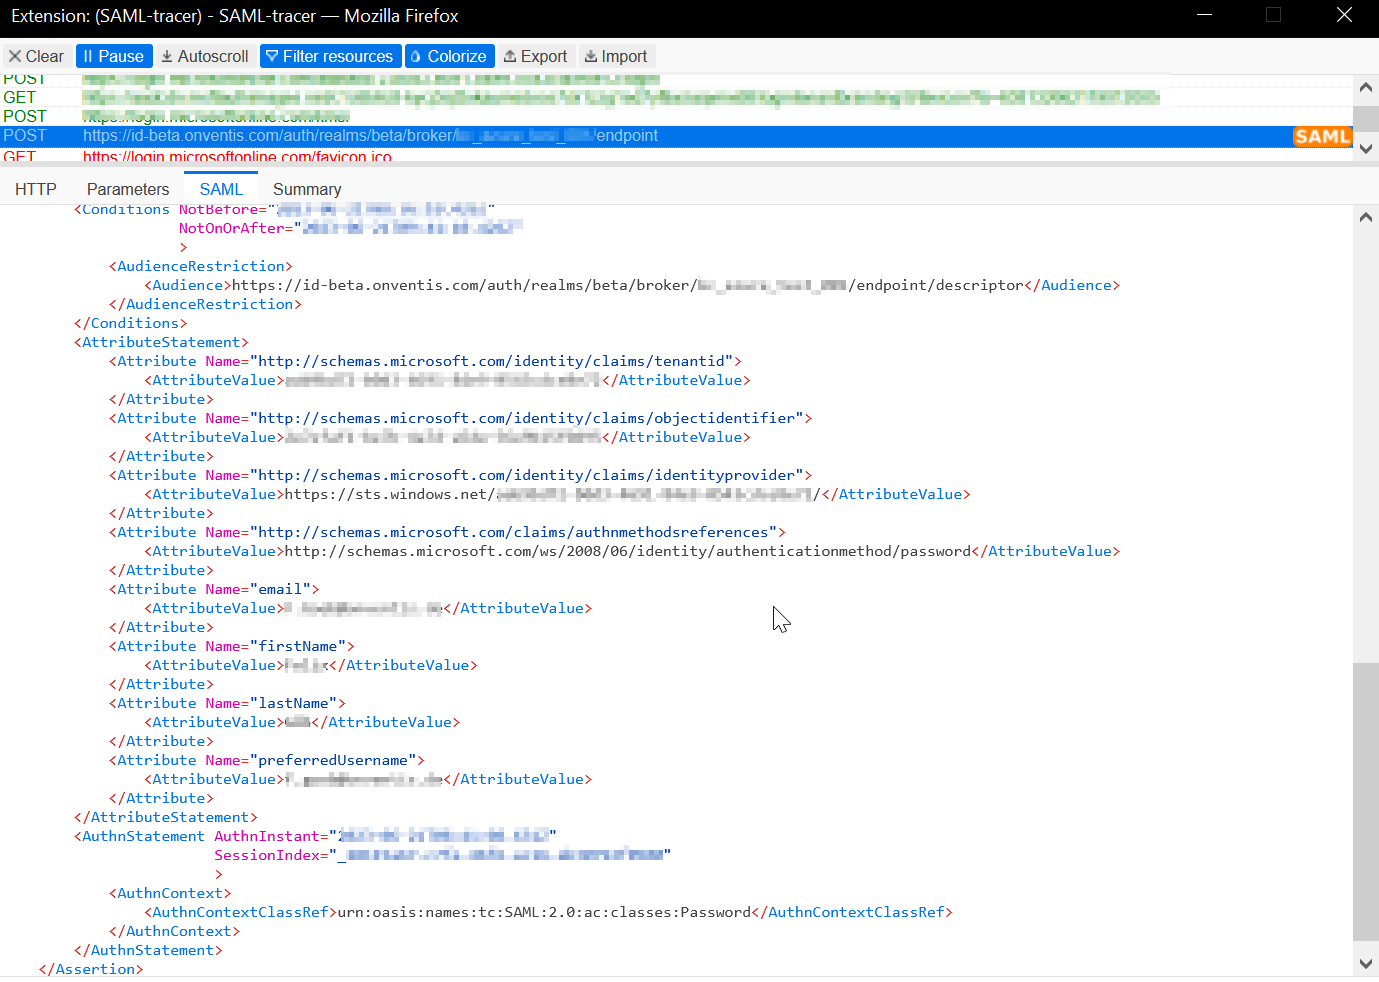
Additional attributes that are sent will be ignored. When claims are mapped correctly, the AttributeStatements in the SAML communication will look like the following example:
When the configuration of your SAML Provider is finished, you can copy the Azure-generated metadata URL. You can find it under Single sign-on configuration → #3 SAML Certificates section → App Federation metadata Url.
Link Onventis Buyer and your SAML Provider
Now that you have a metadata URL, we can return to our Oventis Buyer SAML SSO configuration. Copy the metadata URL from Azure and past it into Your metadata link in Onventis Buyer:
Now activate the Activate SSO checkbox and click on SAVE AND CLOSE.
Afterward, the connection between your Onvnetis Buyer organization and your SAML provider is ready to communicate.
The next step is to prepare your Onvenits Buyer users for using Single Sign-on.
Add user Identifier mapping
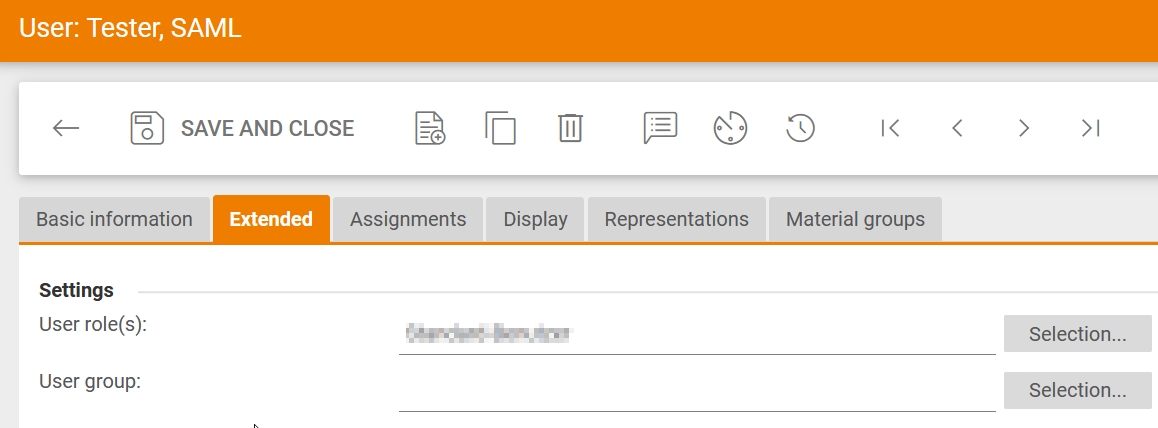
to set up a mapping of your SAML provider user with your Onvnetis Buyer user, you need to maintain an External user ID for each user. The value needs to match with the preferredUsername of your SAML Provider user.
You can maintain the External user ID in the Extended tab of a user profile under Misscellaneous:
For adding an External user ID for multiple users you can use the user import template in the “ExternalUserId” field. If this field is not contained in the import file, e.g. after an export of the existing user master, it must be created manually.
For an update of the user master data, it is sufficient to build and import a file according to the scheme shown below. The ExternalUserId field can also be provided directly in the course of the initial user setup.
Enforce SSO only
While configuring a SAML provider, you can decide weather you want to allow SSO and normal UI logins in parallel. In this case the checkbox stay deactivated.
All your users will be able to maintain their passwords and use such information to perform a login via the UI as well as login via the setup SSO login process.
When you want to limit the access to your organization to SSO users only, you can activate the checkbox.
In this case only users that perform their authentication via your SAML Provider will be able to access your organization. In advance, users will not be able to maintain their password or request a new one. There is one exception:
In order to enable organization administrators to access an organization even if their SAML Provider is down, we allow users with the access-right “SSO-edit“ to enter their organization via the normal Login UI. Users with such rights are also excluded from password change limitations. This enables such users to deactivate the SSO Enforce function if needed independently from the availability of their SAML Provider.
Testing your SAML setup
Once the setup has been completed, the connection can be tested.
If you use the Firefox or Chrome browser, you can install the “SAML-tracer” add-on and use it to monitor the output of the attribute statements. This way you know if the claims mappings are all set up correctly and completely.
If you start the add-on and then click the start-link to your system listed above, you should find the link https://id-beta.onventis.com/auth/realms/beta/broker/<SAML-PROVIDER_NAME>/endpoint in the listing.
If you click on it, you should see the tab “SAML” in the lower window, which you click on again and then read out the attribute statements.
Make sure SAML assertion contains attributes with names email, lastName, firstName, preferredUsername like on screen:
Access Onventis Buyer via Single Sign-on
If Single Sign-on is set up on your and on our Identity provider, users must call up the application via the corresponding start link of the organization in which they want to work.
The start links can be read out in each organization (test and productive system) via “Configuration / Configuration / Layout and texts / Texts / Start link”.
In your case start link for the Test- and Livesystem will be:
- Testsystem: https://<PSP-NAME>-test.onventis.com/default.aspx?id=<GUID>
- Livesystem: https://<PSP-NAME>.onventis.com/default.aspx?id=<GUID>
Single Sign-on can only be used by entering Onvnetis Buyer via the start link.
These should therefore be distributed via a landing page on the intranet or as browser favorites to your users.
However, the activation of Single Sign-on for Onventis organizations does not automatically and necessarily lead to exclusive use of Single Sign-on for logging into the Onventis organization!
Many Onventis customers have parts of their organization that use Onventis for procurement, but at the same time do not yet have many of these users in their Active Directory,
These users must still be able to procure their requirements after Single Sign-on has been activated – even without Single Sign-on.
For this reason, these users can continue to use the standard login with Onventis login name and password as long as these users use the so-called bypass links for logging in and as long as this access method is not prevented.
In your case bypass links for the Test- and Livesystem will be:
- Testsystem: https://<PSP-NAME>-test.onventis.com
- Livesystem: https://<PSP-NAME>.onventis.com
Account Linking
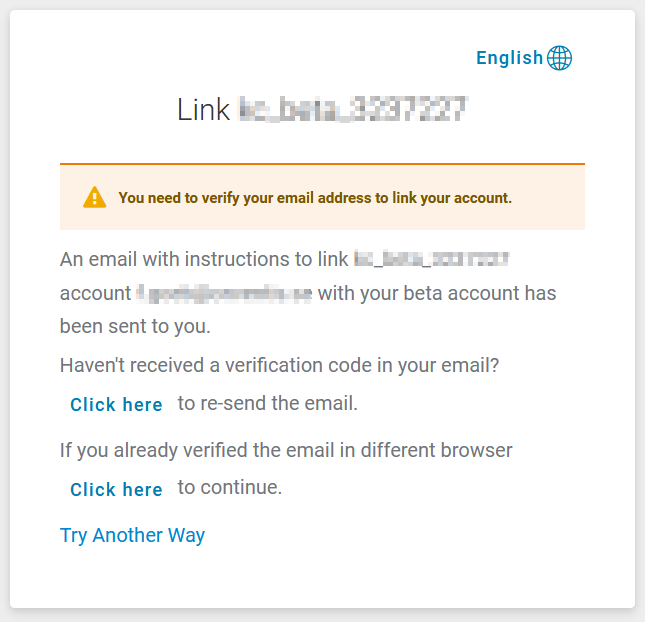
In case a user, that is part of your SAML SSO user set, already exists on our Identity Management solution, the user will be asked to perform an account linking flow on the first login. If a matching user already exists, is determined by the Email address of the user.
On the first login, the user will be requested to link the account needed for the SAML request to his existing account.
The web interface guides the user through the necessary steps. After clicking on the button, the user receives an email with a confirmation link.
By clicking on the link, the user proves access to the provided email address. When the link is opened in the same browser in which the account linking request was started, the process is completed successfully and the user is automatically logged into the system.
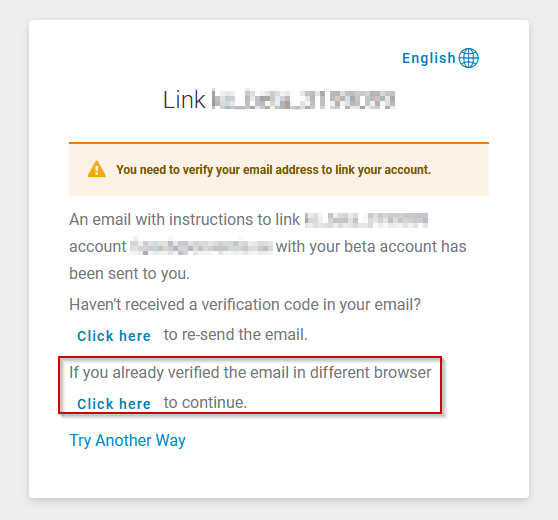
However, if you open the link from the email in another browser, you will be asked to continue the process by clicking on “click here to proceed”.
You must then return to the browser in which you started the process and confirm the completion of the process there
On the next login via the SSO Startlink, account linking was already done and the user will not be asked again.
