A purchase order includes information on the purchaser, supplier and the items to be ordered. An order can go through several process steps from creation to payment processing. The process steps depend on the purchase order processing workflow assigned to the vendor.
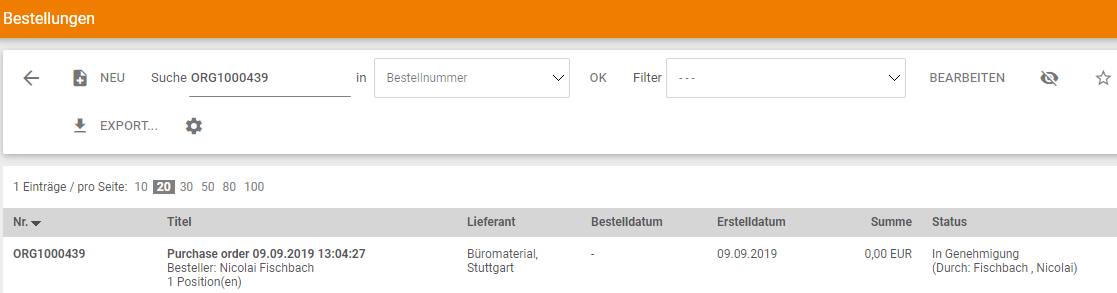
Under Operative Purchasing → Purchase Order Processing → Purchase Orders you can see an overview of all purchase orders.
Toolbar and functions in the order overview list
New
With the New button you can create a new order.

You can use the search field to search for specific records. You can enter numbers or text to search for specific records.

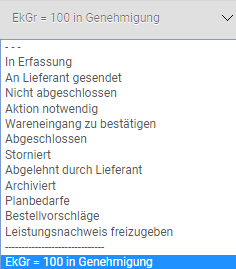
Predefined filters are already available in Onventis. You can use these to refine your search for specific records.
If you do not select a filter, Onventis searches for the selected record in all available fields. If, for example, you wish to search for all purchase orders for a particular organizational unit, select Organizational unit in the filter and enter the organizational unit you are looking for in the search field.
Using the filter functions will make your search faster and more precise.
Edit
You can create new, individual filters using the Edit button next to the filter. The following fields are available for creating filters:
- Input language: here you select the language in which the filter is entered.
- Title: in the Title field, enter a title for the filter. This field is mandatory and must be maintained.
- Description: in the Description field you can describe the filter in more detail.
- Criteria:
- If you choose AND, all of the following criteria must be met.
- If you choose OR, at least one of the following criteria must be met.
- Explanation of the individual operators:
- =: Only data with exactly this value in the field will be displayed.
- >=: Only data with this and larger values in the field will be displayed.
- <=: Only data with this and smaller values in the field will be displayed.
- <>Only data that does not have this value in the field will be displayed.
- contains: Only data that contains this value in the field will be displayed.
- does not contain: Only data that does not contain this value in the field will be displayed.
- begins with: Only data starting with this value in the field will be displayed.
- does not start with: Only data that does not start with this value in the field will be displayed.
- Visibility: if you activate this option, this filter is public, i.e. all users within your organization can access this filter.
Switch off filter
With the filter off symbol you can switch off a set filter. The entire list is displayed again.
Favorites
With the favorites icon you can add the currently opened page to your favorites and manage.
Export…
With the Export button you can export the entire order list to an Excel file.
Order list overview
Under Order Management → Order Processing → Orders you can see an overview of all orders.
Purchase orders of other users are only displayed if you have appropriate access to the external documents of other users. If you are responsible for a particular material group via a user group, you automatically have read and write access to the purchase orders for this material group.
You can configure the columns you want to display in the overview of the order list under User – Display tab. You can select the following columns:
- No.: the order number is displayed in the No. column. This is automatically assigned by Onventis. When importing from SAP, this number corresponds to the SAP purchase order number. The order number cannot be hidden in the overview list.
- Title: in the column Title the order title, the orderer and the number of order positions within the order are displayed.
- Supplier: in the column Supplier the supplier to whom the order was sent is displayed.
- Order date: in the column Order date the date on which the order was sent to the supplier is displayed.
- Creation date: in the column Creation date the date on which the order was created is displayed.
- Total: the total net value of the order is displayed in the Total column.
- Status: in the column Status the current status of the order is displayed.
- Action: in the column Action the overview of the next possible process steps for this order is displayed. The process steps depend on the order processing workflow. By clicking on the link you can create the next document directly from the order overview list.
- Order no.: in the column Order no. the order number is displayed at the vendor.
- Organizational unit: in the column Organizational unit the organizational unit for which the order has been created is displayed.
- Purchasing group: in the column Purchasing group the purchasing group is displayed, which is assigned in the purchase order.
- Currency: in the column Currency the currency in which the order has been sent to the supplier is displayed.
- Delivery date: the delivery date for the order is displayed in the Delivery date column.
The Delivery Date ( Header) note is displayed for the delivery date at the header level. The Delivery Date ( Item) note is displayed for the delivery date at the item level. If more than one delivery date is found in the order items, the earliest delivery date is displayed.
Optimize order search
A search field is available in the header area of the order list. If you want to search for a specific order, you can search for specific orders in the Search field, for example, by entering a purchase order or vendor number.
Onventis searches the list for the string you entered. The filter is switched off and the entire order list is displayed again by clicking the Switch off filter icon.
The purchase order number is always set in the standard system.
Configuration of own filters
You can create your own individual filters in the header area of the order list.

The configured filters can be selected by your Onventis administrator as default filters for each user. You can make the settings under Master Data Management → User Management → Users.
The Edit button opens a new window in which you can configure your own filters.
Click on the back symbol to return to the order overview. Please note that your entries will not be saved.
Use the Save and Close button to save your filter.
You can configure a new filter via the New icon.
Via the Copy icon you can copy the filter and adjust the configuration.
You can delete the filter by clicking the delete icon.
The notes icon allows you to add a note to a filter.
Via the track status icon you can see when and by which user the filter was created and last changed.
Filter area
- Language: you can select the language via the selection box.
- Title: in the column Title you have to enter a title for the filter. This field is mandatory and must be filled in.
- Description: in the Description column you can enter a filter description.
Area Conditions
In the Conditions area, you can define the filter criteria.
If you want to filter by two or more criteria at the same time, select the AND link in the selection box. For the AND link, both criteria must be met.
Example 1:
You want to filter by purchasing group 100 and status In Approval.

Procedure:
- select the AND link.
- in the two selection boxes select purchasing group and “=”. In the input field, enter the purchasing group; in this example, it is 001.
- select Status and “=” from the selection boxes for the second criterion. In the input field, select the desired status, here in the example it is In Approval.
- The Save and Close button saves the filter and the entered title and takes you back to the order list.
Results:
The system displays all purchase orders with purchasing group 001 and the status “In approval” .
If you want to filter by one of several criteria, select the OR link in the selection box. For the OR operation, only one of the criteria must be met.
Example 2:
You want to filter for purchase order changes with the status“in approval” or for purchase orders for which the“proof of performance is to bereleased”.

Procedure:
- select the OR link.
- in the two selection boxes, select Order change in approval = Yes.
- select for the second criterion from the selection boxes Proof of services to be released = Yes.
- The Save and Close button saves the filter and the entered title and takes you back to the order list.
Results:
The system displays all purchase orders for which a purchase order change is to be approved or for which the proof of performance is to be released.
Settings area
Visibility: if you activate this option, other users can also access your filters. Additionally, your Onventis administrator can set this filter as the default filter for you.
Preview area
In the Preview area, the selected conditions are displayed again.
You can use the Refresh button to update the filter again, e.g. after a correction.
Select filter
If you have created and saved a filter, you can then find and select it in the order overview list from the selection box, under the title you entered.
You can deactivate the filter via the Deactivate filter icon. The entire order list is displayed again.
Process steps of an order
An order has multiple statuses throughout the process, from entry to delivery.
| Hinweis
The process steps depend on the order processing workflow that has been assigned to the supplier. |
By means of the coloured display you can see whether the purchaser or the supplier has to carry out an action and which process steps are still open. In addition, you can see all the process steps that have to be carried out until the order is completed. It can happen that several statuses have the same color at the same time.
Meaning of the color representation:
![]()
Dark blue: if a process step is displayed in dark blue, this step has already been completed. The purchase order was sent in the process step shown.
![]()
Light blue: if a process step is displayed in light blue, this step is still open and must be processed. In this case the order is waiting for the order confirmation by the supplier.
![]()
Yellow: if a process step is displayed in yellow, this step is still open and must be processed. In this case, a goods receipt must be posted for this purchase order.
![]()
Grey: if a process step is displayed in grey, this step is still open. In order to process this step, the previous steps must be completed first.
order status
In capture
This status is set if the purchase order is being entered and has not yet been sent to the vendor or an approver. The data of the order can still be changed. In this status, you can delete the purchase order.
![]() Order shipped
Order shipped
The purchase order receives this status when it has been sent to the vendor, possibly after approval.
![]() confirm order
confirm order
In this status, the purchase order can only be processed by the vendor. He checks them and then sends an order confirmation. The supplier can change the order by changing the order. These changes must be approved or rejected depending on the settings in the order processing workflow. It is informed by e-mail whether the supplier has confirmed or changed the order.
![]() Create delivery note
Create delivery note
In this status, the purchase order can only be processed by the vendor. To complete the status, this person must create one or more delivery notes for all items ordered. When the supplier has created the delivery notes, an automatic e-mail is sent. The delivery note is now in the purchase order in the tab Follow-on documents.
![]() Post goods receipt
Post goods receipt
In this status, the goods receipt must be posted. To post a goods receipt, open the purchase order and select New goods receipt in the pull-down menu. This status is completed when the goods receipt has been posted for all items. The supplier is informed about the booked goods receipt by e-mail. The goods receipt documents can be called up in the follow-on documents tab of the purchase order.
![]() Billing info
Billing info
In this status, an invoice info must be generated by the vendor. You can find the invoice info under Purchasing, Incoming Invoices, as well as in the tab Follow-on Documents. If the supplier sends an invoice, Onventis sends information about incoming invoices received. The incoming invoices must be confirmed by the responsible user.
![]() Credit advice
Credit advice
In this status, a credit memo must be generated for the vendor. A credit note includes all items of the order, incl. of all shipping costs. After the credit note has been sent, the supplier is informed by e-mail and must then confirm it.
![]() Filed under
Filed under
If all set order processes have been completed, the order can be archived. Depending on the settings in the order processing workflow, the order is automatically stored and archived. If automatic archiving is deactivated, you can manually store and archive the order using the Store button.
![]() Archived
Archived
The order is now complete and can no longer be edited.
![]() Canceled
Canceled
The order has been cancelled and can no longer be changed. Orders in this status can be copied at any time.
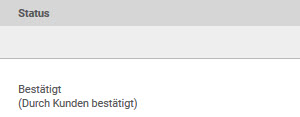
In approval
The purchase order has met the criteria for a purchase order approval workflow. The approver was notified of an order to be approved via email. The approver must approve the purchase order before it can be sent to the vendor. If the purchase order is rejected, it receives the status Rejected by approver. The user who created the order will be informed of the approval or rejection by e-mail.
Rejected by approver
If the approver has rejected the order, the purchaser will be informed by e-mail. The orderer can reset and change the order. The order can then be resent for approval.
Forwarded to representative
The order was not processed in a timely manner by the approver and was forwarded to his representative.
Create purchase order
To create a new purchase order, first go to Operative Purchasing → Order Processing → Order List, in the order list.
You can create new orders by clicking the New button.
You can also create purchase orders from the following areas:
Shopping cart – overview
Catalog
Requirement items
Tenders
Orders – Basic data tab
The general data is selected in the basic data. The displayed fields and options, as well as the definition of the mandatory fields is defined by your administrator in the organization settings.
Toolbar and functions in the Basic Data tab
Save and close
With the save and close button you leave the order and get back to the overview.
New
With the Create new record icon you can leave the current order and create a new order. As a user, you have the advantage that you do not have to switch to the order overview list to create a new order.
Click to copy
With the Copy record icon you can copy the current order and create a new order. If desired, you can adjust the data.
Delete
With the delete record icon the order is deleted. This operation cannot be undone, the record is permanently deleted. In the standard system, only purchase orders with the status In process of creation can be deleted, i.e. only those purchase orders that have not yet been sent to the vendor.
If you as a user have the right“Delete order in order process“, you can also delete orders with the following statuses:
- In capture
- Purchase order sent to supplier
- order to be confirmed by the supplier
- Order was confirmed by the supplier
- Post goods receipt
- Goods issue already booked
- Generate delivery note
- Delivery note generated
- To generate power output
- Performance record posted
| Hinweis
Orders which have been invoiced or for which the credit note procedure has been triggered cannot be deleted for revision reasons. |
Notes
With the notes icon you can create notes for this record or, if available, call up the notes.
Resubmission
With the resubmission icon you can set the order to resubmission. Orders in resubmission can be sent on a specific date by a specific user. On the date entered, the user receives an e-mail with a link to the resubmission.
Track status
The Track Status button allows you to see the current processing status for this order. The change history button allows you to view the changes made, if any.
The changes are always displayed in the form of a table with two columns:
Changed on/by: in this column you can see when and by which user changes have been made.
Field: in the field column you can see which position and which record has been changed.
Old value: in the column Old value you can see the originally used data set.
New value: in the New value column you can see the change that has been made.
With the close button you leave the track status view and return to the basic data of the order.

Navigation – Icons:
With the help of the navigation icons you can quickly navigate between the orders or the order items:
With the To first record icon you can call up the first order from the order list.
Within an order position you can switch to the first position in the order with the To first record icon.
With the Previous record icon you can call up the previous order, if available. Example: Order no. 11 → Call previous order no. 10.
Within an order position you can switch to the previous position in the order with the Previous record icon.
With the Next record icon you can call up the next order, if available. Example: Order no. 11 → Call next order no. 12.
Within an order position you can switch to the next position in the order with the Next record icon.
With the To last record icon you can call up the last order from the order list.
Within an order position you can switch to the last position in the order with the To last record icon.
Budget
With the Budget button you can view the given budget targets which have been violated.
The following functions are available in the Action drop-down menu:
Preview
With the preview button you get an order preview in PDF format.
Simulate
With the Simulate button you can simulate an order transfer to your SAP system. If the data is incorrect or incomplete, an error message is displayed and you can adjust the data if necessary. This function is particularly useful in connection with purchase order approval workflows, since the purchase order is only transferred to your SAP system after the last approval step. In this case, only the last approver would receive the error message and would return the purchase order for correction if necessary. After the change is made, the purchase order would go through the entire purchase order approval process again.
Check order
With the check order button you can check the order before sending it. If the data is incorrect or incomplete, an error message is displayed and you can adjust the data if necessary. This function is particularly useful in connection with purchase order approval workflows, since the purchase order is only sent and thus checked after the last approval step. In this case, only the last approver would receive the error message and would return the purchase order for correction if necessary. After the change is made, the purchase order would go through the entire purchase order approval process again.
| Hinweis
The mandatory fields are always checked when saving or before sending. With the two functions Simulate and Check purchase order, all remaining fields can be checked. |
Export SG&A form
The Export SG&A Form button creates an Excel file for the SG&A approval process. SG&A (Selling, General and Administrative Expenses).
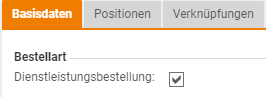
Ordering area
- Service order: if this option is activated, the order is a service order.
- Blanket order: if this option is activated, the order is a blanket order.
- Template order: if this option is activated, the order is a template order.
- Consignment order: if this option is activated, the order is a consignment order. Consignment refers to a special form of delivery of goods. The vendor stores the goods at the customer’s premises in a consignment warehouse. As soon as the customer removes the goods from this warehouse, these goods are purchased. With the order, the customer notifies the supplier of the removal of the goods. The supplier replenishes the warehouse if the quantity falls below a specified level. The quantity withdrawn shall be invoiced at regular intervals. The text stored for the consignment order under Configuration → Layout and Texts → Consignment Text for Order PDF is displayed in the order PDF. You as the customer can determine the text yourself.
- SG&A order: if this option is activated, the order is an SG&A (Selling, General and Administrative Expenses) order.
- No.: the order number for this order. The number ranges can be defined by your Onventis administrator in the Organization Settings – Number Ranges tab. If the orders are imported from your ERP system into Onventis, the order number is taken from your ERP system.
- Title: the title of the order. This field is mandatory and must be filled in. The title is automatically preset with the following data in the standard Onventis system: Order <DD.MM.YYY hh:mm:ss> and can be overwritten. Automatic title preassignment can be disabled by your Onventis administrator in the organization settings.
- Document status: under Document status you can see the current status of the order.
- Customer order number: under Customer order number you can enter the order number or purchase order number of your customer. This field is a free text field.
- Commission no.: under Commission no. you can enter the commission number.
- Commission: under Commission you can enter a text for Commission. This field is a free text field.
- Project no.: under Project no. you can enter a project no. This field is a free text field.
Period area (only for blanket purchase orders)
Start of term: in the Start of term field, you can enter the start time for the blanket purchase order.
Term end: in the Term end field, you can enter the end time for the blanket purchase order.
Submission: in the Submission field, enter the submission number, if available. A submission number is used to logically group orders.
SAP Assignment Area (only for SAP Integration)
- Controlling area: under Controlling area you have to select the SAP controlling area for which the purchase order is triggered. In the case of an SAP connection, this field is mandatory and must be filled in.
- Company code: under Company code you have to select the SAP company code for which the purchase order is triggered. In the case of an SAP connection, this field is mandatory and must be filled in.
- Purchasingorganization: under Purchasing organization you have to select the purchasing organization for which the purchase order is triggered. In the case of an SAP connection, this field is mandatory and must be filled in.
Supplier data area
- Company: via the dropdown field you can select the supplier from your supplier master. This field is mandatory and must be filled in. Via the Info … button you can view the address details of the supplier. Clicking the close button closes the window with the address details and takes you back to the basic order data.
- Contact person: under Contact person you can enter the direct contact person at the supplier. If you have maintained contact persons for the supplier in the supplier master, you can display them using the Search… button. button to display them. Via the Transfer.svg icon you can add the desired contact person to the order. You can use the Remove button to remove the contact person again.
- Telephone: under Telephone the telephone number of the supplier, which is stored in the supplier master, is determined automatically and transferred into the basic data of the order. If no telephone number is entered in the supplier master, the field remains empty. You can also overwrite this field at any time.
- Order-Fax: under Order-Fax the fax number of the supplier, which is deposited in the supplier master, is determined automatically and transferred into the basic data of the order. If no fax number is entered in the supplier master, the field remains empty. You can overwrite this field at any time.
Order e-mail: under Order e-mail, the e-mail address of the supplier, which is stored in the supplier master, is automatically determined and transferred to the basic data of the order. You can also overwrite this field at any time. By activating the Use checkbox, you can specify that the order is to be sent to the e-mail address entered in the basic order data. If you do not activate this checkbox, the e-mail address stored in the supplier master under Communication will always be used.
Customer data area
- Company: under Company, the main address of the organizational unit to which you are assigned as a user is automatically determined and transferred to the basic data of the order.
- Drop shipment: if you purchase articles via drop shipment you can activate this checkbox. By activating this checkbox, the following fields are also displayed:
- Supplier data: you can select the second supplier via the drop-down field. Via the Info… you can view the address details of the supplier. Clicking the close button closes the window with the address details and takes you back to the basic order data.
- Delay view for supplier 2, number of days before delivery date: you can enter X days in this field. In this case, the second supplier receives the notification by e-mail only X days before the delivery date. The lowest delivery date + x-number of days is always calculated.
- Delivery address (default): under Delivery address you can select a delivery address from the dropdown menu to which the articles are to be sent. Via the Info… button you can see the details of the selected address. Via the New... button you can enter a new address, this will be permanently stored in the master data under Administration → Master data → Addresses. Via the Edit… If you select Ad-hoc address from the drop-down list, you can use the Enter address button to enter a delivery address that has not been entered in the master data. An ad hoc is not stored in the master data.
The selection of delivery addresses depends on further settings in user administration, in Create and Manage Addresses and Create and Manage Organizational Units. - Billing address: under Billing address you can select a billing address from the drop-down menu. Via the Info… button you can see the details of the selected address. The selection of billing addresses depends on other settings in user administration, in Create and Manage Addresses and Create and Manage Organizational Units.
- Orderer: under Orderer the user is displayed who has created this order. Via the Info… button you can see the details of the user.
- Additional user: under Additional user you can select a second user. By selecting another user, this user can view and edit the order in his Onventis account.
- Purchasing group: under Purchasing group you can use the Search… button to search for a purchasing group responsible for the purchase order. Via the transfer icon, the purchasing group is transferred to the purchase order. In SAP integration, this field is mandatory and must be maintained. The persons belonging to the purchasing group can be maintained by your Onventis administrator under Master Data Management → User Management → User Groups.
- Buyer is contact person of the supplier: you can activate this option if you want to select a specific buyer as contact person for the supplier for this order. After activating this checkbox you can see the details of the buyer via the Info… button to see the details of the buyer. Via the Search… button, you will be shown the users belonging to the purchasing group. The user is transferred to the basic data of the order via the Transfer button.
Conditions area
- Payment terms: under Payment terms you can select from the dropdown menu the payment terms that apply to the order.
- Payment methods: under Payment methods you can select the payment methods valid for the order from the drop-down menu.
- Terms of delivery: under Terms of delivery you can select from the drop-down menu the terms of delivery that apply to the order.
- Place: under Place, the place applicable to the delivery term is entered. Depending on the settings in the vendor master, this field may be a mandatory field, in which case the location must be entered.
- Delivery date (preset): under Delivery date you have to enter the delivery date in the format (dd.mm.yyyy) or select a delivery date via the displayed calendar. This field is mandatory and must be filled in. In the standard system, the delivery date can be preset for each purchase order. The settings can be made by your Onventis administrator in the organization settings.
- Currency: under Currency you can select the currency for the order from the drop-down menu.
- Packing instruction: under Packing instruction you can select a packing instruction from the drop-down menu.
Other area (external)
- Document request: in this field you can request a specific document from the supplier, e.g. delivery note. In the settings, you can specify that the delivery consultant must insert a file attachment when creating a delivery note. You can find the settings for document requests in the administration area in the organizational settings and in the purchase order processing workflow.
- External remark: this field is a free text field. You can enter an additional text under external comment. The text is visible to the supplier. Via the Selection… you can select a text module.
- External footer text: if a footer text for orders has been stored under Configuration → Templates → Transactions, this text will be displayed here.
- External file(s): via the Select… button you can select a file and attach it to the order. The external files are visible to the supplier.
Other area (internal)
Internal remark: in this field you can enter a text. The text is only visible within your organization, the internal remarks are not visible for the supplier. Via the Selection… you can select a text module.
Internal file(s): via the Select… button you can select a file and attach it to the order. The internal files are not visible to the supplier.
Orders – Positions tab – Overview
In the Items tab, you can select items and add them to the order.
As long as the order has not been shipped, you can change or delete the added items or correct the quantity.
Direct entry area
In the direct entry area, you can enter the desired article directly:
- Enter the desired article number in the field Article no.:.
- in the Quantity: field, enter the desired order quantity.
- with the add button the article is added to the order and displayed in the position list.
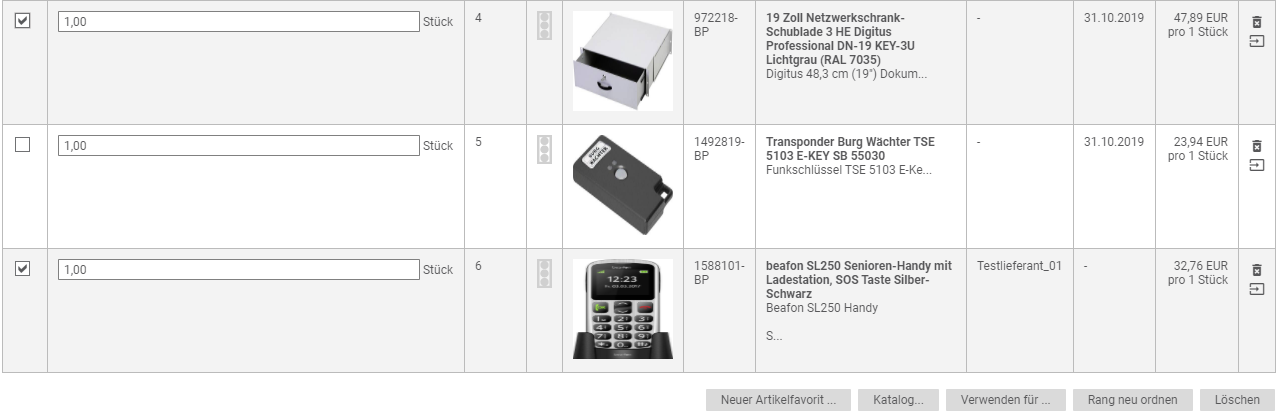
Position list area
In the item list, you can see an overview of all items added to the purchase order. The following columns are displayed:
- Pos.: in the column Position the position number within the order is displayed. The Sort icon allows you to sort the position list in descending or ascending order according to the position number.
- Article: in the column Article all relevant position information is displayed. If the warning symbol is displayed next to the article, certain mandatory fields have not been filled in. You will get more information if you position the mouse pointer on the symbol. Alternatively, go to the position details and check whether all fields marked with * are filled in.
- Article description
- Item type: under Item type you can see whether it is a free text item or a catalog item.
- Item no.: Item no.
- Internal part no.: Internal part no.
- Account assignment information: Account assignment information
- Customer article no.: Customer article no.
- Commission No: Commission number
- Quantity: in the field Quantity you see the ordered quantity. This field is an input field. You can overwrite the quantity directly in the overview.
- Unit price: in the Unit price field you can see the item price per unit of measure.
- Total price: in the field Total price you see the item price multiplied by the unit of measure plus the applicable VAT.
- Delivery address: in the field Delivery address the address to which the ordered goods should be delivered is displayed.
- Delivery date: in the field Delivery date you see the date on which the ordered goods should be delivered.
- Status: in the Status field you can see the order status for this item.
- Action: in the Action field you can copy the position via the Copy icon, via the Delete icon the position is deleted.
In the Item List area, you can select items from multiple sources and add them to the order.
Position summary area
- Net total value: in the line Net total value the sum of all article positions is displayed in net.
- Additional costs 1 to 3: in the lines Additional costs 1, 2 and 3 you can enter additional costs. For the additional costs, you must always enter the amount in the selected currency, the valid VAT, and the additional cost text. The additional costs entered are added to the net total value. The total costs are displayed in the net order value line.
- Net order value: in the line Net order value the total value of the order items including the additional costs and the corresponding value added tax is displayed.
- Gross order value: in the line Gross order value the total gross value of the order items plus the value added tax from the item and additional costs is displayed. The additional costs are only displayed after activation in the organization settings.
Via the Update… button the net and gross order value will be updated.
The positions are numbered consecutively using the Number positions button.
Add order items
In the item overview, you have various options for selecting items and adding them to the order. The following options are available:
Catalogues
About the catalog… button to switch to the Catalogs area. In the catalog, you can use the search field to search for the desired item or navigate to the item. You can add the item to the order by clicking the ![]() button.
button.
Punchout Catalogs
You use the network vendor to switch to external, so-called punchout catalogs. When you call up a punchout catalog, you switch to the catalog of your supplier. At closing, the items from the external shopping cart are transferred to the order in Onventis.
Article favorites list
Via the Favorites... button you can select items from the item favorites list. To do this, open the desired Aritkelfavoritenliste by clicking on the title.
In the column Quantity you can enter the desired quantity, then you can add the item to the order by clicking the Transfer button.
If you want to select more than one article from the article favorites list, first activate the checkbox next to the desired articles.

You can then transfer the selected items to the order using the Use button.
Auto-Learn List
Use the Auto-Learn List… button you can select items from the auto-learn list.
In the column Quantity you can enter the desired quantity, then you can add the item to the order by clicking the Transfer button.
If you want to select more than one article from the article favorites list, first activate the checkbox next to the desired articles.
You can then transfer the selected items to the order using the Use button.
Free text items
Free text orders are freely formulated article or service descriptions of a consumer. Via the free text items… button you can add free text items to the order.
Excel import
Via the Import… button you can import articles via the OrderPosition template into Onventis.
To import the order positions download the Import_OrderPosition_Template.xlsx and fill in the columns with the desired position according to the default. When importing via CSV, the file must have the same columns as the Excel file.
The following columns are available:
| ArticleNo | Quantity | InternalArticleNo | CustomerArticleNo | LineItemGroupTitle |
- ArticleNo.: in the column ArticleNo. you enter the number of the article, which is to be inserted. The article must be in a catalog. This field is alphanumeric and may contain a maximum of 35 characters. The article no. is a mandatory field and must be filled in.
- Quantity: in the column Quantity you enter the desired order quantity for the article, the quantity is numeric and must be entered as a number. This field is mandatory and must be filled in.
- InternalArticleNr: in the column InternalArticleNr you enter the internal article number. This field is alphanumeric and may contain a maximum of 35 characters. The column Internal article number is optional.
- CustomerArticleNr: in the column CustomerArticleNr you enter the customer article number. This field is alphanumeric and may contain a maximum of 35 characters. The column customer article number is optional.
- LineItemGroupTitle: in the column LineItemGroupTitle you enter the name of the item group to which the item is to be assigned. If the item group does not exist, it is created. This field is alphanumeric and it can contain a maximum of 100 characters. The LineItemGroupTitle column is optional.
After clicking the Import… button, the window for importing the file opens. Via the Selection… button you can select the completed Excel or CSV file.
Under File type you have to select if it is an Excel or CSV file, for this click on the corresponding radio button.
With the Import button you can import the file.
In the Imports area, you see a table with the following columns:
- Title: in the Title column you can see the title of the file to be imported.
- Status: in the status column you can see the current import status. The following statuses are possible:
- Saved: as soon as the import has been started, the import is in the status Saved, i.e. the file is being processed by Onventis.
- OK: the import was completed without any problems, the data was imported into Onventis.
- Warning: the import was completed with restrictions. This status occurs if, for example, columns in your import file that are not mandatory fields are missing. The missing data does not lead to termination. The remaining data is imported without errors.
- Error: the import could not be performed, e.g. due to missing columns which are mandatory fields. The import was terminated and no data was imported into Onventis.
- Saved: as soon as the import has been started, the import is in the status Saved, i.e. the file is being processed by Onventis.
- Creation date: in the creation date column you can see the time, date and time when the import was created.
| Hinweis
Since the import runs in the background, it may take a few minutes to complete. You can use the Refresh button to query the current status. |
You can close the window by clicking the Close button. You return to the order item overview. As soon as the import has been completed successfully, the imported items are displayed.
Transfer items to other documents
Via the Use… button you can transfer positions to other documents or transactions.
After clicking the Use... button, the window for the position transfer opens.
Transfer item(s) to: You can use the dropdown to select the transactions or documents to which the items are to be transferred.
The following selection options are available:
- Purchase order: for the transfer of the positions into a purchase order you can choose between a new or already existing purchase order.
In the Transfer Details area, you can enter an order number in the Search field and confirm your entry by clicking OK. From the results in the drop-down menu, you can select the order you want. To transfer the order items confirm your entries with the OK button.
With the Cancel button you can cancel the process. You return to the order item overview.
If you want to transfer the positions to a new order, select -New- in the dropdown menu and confirm your entries with the OK button.
After you have transferred the items, the selected or new purchase order appears and you can process it further. - Inquiry: for the transfer of the positions into an inquiry you can choose between a new or already existing inquiry.
In the Transfer Details area, you can enter a request number in the Search field and confirm your entry by clicking OK. From the results in the drop-down menu you can select the desired request. To transfer the order items confirm your entries with the OK button.
With the Cancel button you can cancel the process. You return to the order item overview.
If you want to transfer the positions into a new request select -New- in the dropdown menu and confirm your entries with the OK button.
After transferring the positions, you will get to the selected or new inquiry and can process it further. - Article favorite group: for the transfer of the items into an article favorite group you can choose between a new or already existing article favorite group.
In the Transfer Details area, you can enter the title of the article favorite group in the Search field and confirm your entry by clicking OK. From the results in the drop-down menu, you can select the desired article favorite group. To transfer the order items confirm your entries with the OK button.
With the Cancel button you can cancel the process. You return to the order item overview.
If you want to transfer the items to a new article favorite group, select -New- in the drop-down menu and confirm your entries with the OK button.
After transferring the items, the selected or new article favorite group appears and you can process it further. - Catalog category: to transfer the item(s) to a catalog category, you must select the desired catalog category from the drop-down menu in the Transfer Details area and confirm your entries with the OK button.
After you have transferred the items, the Catalogs area appears. - Shopping cart: to transfer the item(s) to the shopping cart, select at Shopping cart and confirm your entries with the OK button.
After transferring the items, the shopping cart appears and you can process the items further. - Reclamation: to transfer the item(s) to the inventory, select Inventory and confirm your entries with the OK button.
After transferring, the items are automatically created in the inventory management and you get to the item in the inventory management. - Inventory: to transfer the item(s) to a complaint, select Complaint and confirm your entries with the OK button.
After transfer, a new complaint is automatically created and you go to Complaint.
Purchase orders – Order item tab
In the order item you can fill in all relevant data for the article.
| Hinweis
The displayed areas as well as the available fields depend on the fields that have been activated for the order items, the available licenses and the associated rights. The settings can be made under Configuration → Settings → Organization settings → Order tab in the Order item area. |
All fields marked with a red star * are mandatory fields and must be filled in.
Toolbar in the order item
Save and close
With the Save and Close button you leave the order position and return to the order position overview.
Notes
With the notes icon you can create notes for this record or, if available, call up the notes.
Track status
The Track Status button allows you to see the current processing status for this order item. The change history button allows you to view the changes made, if any.
The changes are always displayed in the form of a table with two columns:
Changed on/by: in this column you can see when and by which user changes have been made.
Field: in the field column you can see which position and which record has been changed.
Old value: in the column Old value you can see the originally used data set.
New value: in the New value column you can see the change that has been made.
With the Close button you leave the “Track status” view and return to the basic data of the order item.
Navigation – Icons:
With the help of the navigation icons you can quickly navigate between the order items:
Within an order position you can switch to the first position in the order with the To first record icon.
Within an order position you can switch to the previous position in the order with the Previous record icon.
Within an order position you can switch to the next position in the order with the Next record icon.
Within an order position you can switch to the last position in the order with the To last record icon.
Use…
With the Use button you can transfer the position to other documents.
Inherit
With the Inherit button you can inherit the entries from selected fields to further order items.
Outline order area Item category (only for blanket orders)
The blanket purchase order item category area is only displayed if you have marked it as a blanket purchase order in the basic data for the purchase order.
You can choose between the following item categories:
- Position with invoicing plan: by activating this option, an invoicing plan is automatically created when the order is transferred to SAP.
- Limit position: by activating this option this position will be marked as blanket order with limit position. Blanket purchase orders are purchase orders with a specific validity period and a fixed value limit.
Position area
- Position number: the position number within the purchase order is entered in the Position number field. The item number is generated automatically according to the settings and can be overwritten if necessary. This field is mandatory and must be entered.
- Item status: in the item status, you can see the current status of the purchase order item. The item statuses can differ within a purchase order.
The following item statuses are possible:- Confirmed (not final confirmed)
- Confirmed (final confirmed)
- Rejected by supplier
SAP Area – Assignment Only with SAP Integration
- Plant: You can use the selection field to select the SAP plant. In the case of an SAP connection, this field is mandatory and must be filled in.
- Location: You can select the SAP storagelocation via the selection field. In the case of an SAP connection, this field is mandatory and must be filled in.
- Requirement number: in this field you can enter the SAP requirement number. If the purchase order was created from a requirements item, this field references this requirements number.
Article area
- Trial tool: if you activate this option, the order position will be marked as a trial tool.
- Quantity/ME: in this field you have to enter the desired quantity. Via the selection field you can choose the corresponding unit of measure, e.g. piece, kg, etc.. This field is mandatory and must be filled in.
- Article number: in this field you can enter the article number, if known. For catalogue articles, the article number, if available, is automatically taken from the catalogue.
- Internal article number: in this field you can enter the internal article number, if known. For catalogue articles, the article number, if available, is automatically taken from the catalogue and can be overwritten. The internal article number is not displayed at the supplier.
- Manufacturer no.: in this field you can enter the manufacturer article number, if known. For catalogue articles, the manufacturer article number, if available, is automatically taken from the catalogue.
- Manufacturer: in this field you can enter the manufacturer, if known. For catalog items, the manufacturer is automatically taken from the catalog.
- EAN/GTIN-No.: in this field you can enter the EAN/GTIN, if known. For catalogue articles, the EAN/GTIN, if available, is automatically taken from the catalogue. The EAN/GTIN is a global article number, which is usually printed as a machine-readable barcode on the goods packaging and can be decoded by barcode scanners.
- Eclass-No: in this field you can enter the Eclass number, if known. For catalogue articles, the Eclass number, if available, is automatically taken from the catalogue. E-Class is a cross-industry product data standard for the classification and description of products and services.
- Customer article number: under Customer order number you can enter the order number or purchase order number of your customer. This field is a free text field.
- Commission number: under Commission no. you can enter the commission number.
- Article: in this field you have to enter the article description. For catalog articles, the article description, if available, is automatically taken from the catalog. This field is mandatory and must be filled in.
- Item description: in this field you can add a detailed item description. For catalogue articles, the article description, if available, is automatically taken from the catalogue.
- Data sheets: under data sheets you can see a data sheet for the article, if it is stored in the catalogue. Data sheets are usually technical drawings or more detailed, specific article data.
Conditions area
- Unit price: in this field you have to enter the item price. For catalog items, the price is automatically taken from the catalog.
- Price unit: in this field you have to enter the price unit, e.g. piece for the article price. For catalog items, the price unit is automatically taken from the catalog.
Transfer free item: if you activate this option, the order item will be marked as a free item. With SAP integration, when a purchase order is sent, this item is transferred to SAP as a free item. - Conversion: if the order unit and the price unit are different, the conversion factors for the units of measure are stored in the fields “Conversion” and “Corresponds”.
In the “Conversion” field, you define how many order units (e.g. pieces) correspond to the price units (e.g. kg) stored in the “Corresponds” field.
The total price of an item is calculated from these factors and the values stored under “Unit price” .Example:
Quantity: 5 pieces (order unit)
Unit price: 100,00 EUR per 20 kg (price unit)
Conversion: 1 piece
Equivalent: 12,00 kgTotal price: 300,00 EUR - Total price: the total price is displayed in this field. The total price is calculated automatically by multiplying the quantity by the price.
- Surcharges/deductions: via the Edit button you can define additional conditions as surcharges or deductions for this position.
- VAT: this field displays the value added tax. The value added tax, if deposited, is taken from the catalogue article. If no VAT is stored in the article, the settings of your organization apply.
- VATdue: this option shows if VAT is due for the shopping cart item. The value added tax is determined automatically by Onventis:
- for catalog items, the tax rate is taken from the article master, if defined. If no tax rate is stored for the catalog item, the standard tax rate of your organization will be used.
- for free text items, the standard tax rate of your organization is used.
- Delivery: for delivery you can choose between complete delivery and delivery division.
- Complete delivery: in the case of a complete delivery, the entire quantity ordered is to be delivered on one delivery date.
- Delivery allocation: by clicking the New allocation button you can allocate the delivery of the total ordered quantity to several delivery dates.
Example
You order a total quantity of 50 pieces and you want 25 pieces delivered on 03/31/2017 and the remaining 25 pieces delivered on 04/10/2016.
25 pieces are to be delivered on 31/03/2017.
25 pieces are to be delivered on 10/04/2016.
Click on the New Assignment button.
Under delivery date you enter the 31.03.2017
Under Quantity, enter 25.
With the Save and New button you maintain the second delivery date:
Under delivery date you enter the 10.04.2017
Under Quantity, enter 25.
With the Save and New button you save your entries and return to the position.
In the item, you now see the two delivery dates and the quantities that are to be delivered on this date.

You can correct your entries using the New Assignment button.
- Delivery date: in this field you can enter the desired delivery date for this article in case of a complete delivery.
- Material group: you can select a material group via the selection field.
- Delivery address: you can select the delivery address via the selection field. Via the Info … button you can view the address details. Via the Search … button you can search for another address and add it to the order item via the Transfer.svg icon. Via the New. .. button you can create a new address. The newly created address is saved under Master Data Management → Organization Management → Addresses.
- Framework agreements: if you maintain framework agreements in Onventis and the ordered article is a part of the framework agreements, you can select the corresponding framework agreement via the dropdown box. As soon as you have sent the purchase order to the vendor, the total of all the quantities ordered is displayed as the released quantity in the outline agreement.
- Settings: if you activate the option Inventory managed in Settings, an increase in stock is posted in your ERP system when the order is sent. For an article to be activated as an inventory-managed article, a material number must be maintained.
Customs data area
- Weight: in this field you can enter the weight of the item.
- Settings: if you have activated the option Customs declarable, the article will be marked as customs declarable. It is then mandatory to include a customs tariff number and the country of origin in the item with this article in the order.
KPI area
If KPIs have been defined for the article, you can select the KPIs for the order item. The KPI’s can be evaluated via management reports. The following KPIs are available:
- Savings type
- Award category
- Reason for price increase
- Comparison price: in this field you can enter a comparison price in order currency.
- Price increase: in this field you can enter the price increase in order currency.
After the order has been sent, the KPI fields are read-only and can no longer be changed.
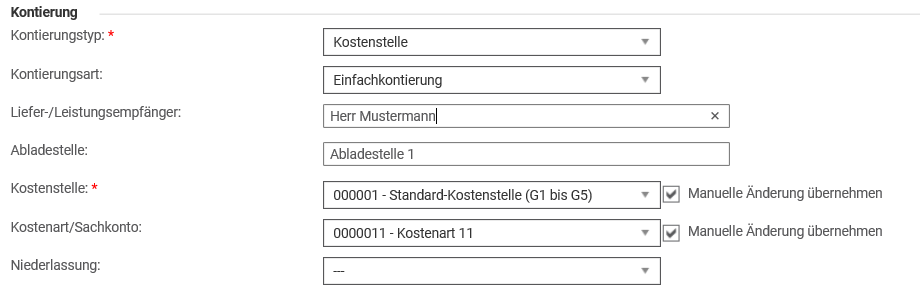
Account assignment area
The Account assignment area is only displayed if the option Show block ‘Account assignment’ has been activated in the organization settings.
- Account assignment category: you can select an account assignment category via the selection field. This field is mandatory and must be filled in.
- Account assignment type: you can select the account assignment type via the drop-down field. The following selection options are available:
- Single account assignment: the ordered quantity is posted to an account assignment object, for example, cost center 4711.
- Quantity-based account assignment: the ordered quantity is distributed by quantity to several account assignment objects, for example, quantity 50 pieces → 25 pieces to cost center 4711 and 25 pieces to cost center 4712.
- Quantity-based account assignment: the ordered quantity is distributed on a percentage basis to several account assignment objects, for example, quantity 50 pieces → 50% = 25 pieces on cost center 4711 and 50% = 25 pieces on cost center 4712.

For a quantity-based or percentage-based account assignment, select the required account assignment type from the dropdown field.
The Cost assignment field is displayed under the account assignment type:
Click on the New Assignment button. In the new window, you can define an account assignment distribution.
You can maintain the account assignment data in a new window. These fields correspond to the fields in the item and are described below.
Via Save and New your entries are saved and you can enter the next cost allocation.
Clicking on Save and Close saves your entries and takes you back to the order item.
The cost assignment entered is displayed as a table in the purchase order item.
You can adjust the existing distribution by clicking on the quantity.
You can enter a new account assignment object using the New Assignment button.
- Recipient of delivery/service: in this field you can enter a recipient for the delivery or service, e.g. Mr. Mustermann.
- Unloading point: in this field you can enter an unloading point for the delivery or service, e.g. 2nd floor room 4711 or gate 1 Musterstrasse 47.
- Cost center: you can select a cost center via the selection field.
- Costtype/general ledger account: you can select a cost type or a general ledger account via the selection field.
- Business area: you can select a business area via the selection field.
- Task: you can select a task via the selection field.
- Order: in this field you can enter an order number.
- WBS element: in this field you can enter a WBS element.
- Attachment: in this field you can enter an attachment.
- Sales order: in this field you can enter a sales order.
- Customer: if you select No via the radio button, you cannot select anything. If you select Yes via the radio button, you can select a customer.
If the functionality “Dynamic coniter determination” is active for the organization, the user can manually adjust the automatically found values afterwards, depending on the settings. These manual adjustments are saved with the activation of the corresponding checkbox and thus no automatic change of the respective field takes place in the further order processing process:
| Hinweis
The selection of account assignment information depends on the selected account assignment category and the settings associated with the account assignment category. Only the account assignment information is displayed which has been defined as MUST or CAN fields for the respective account assignment category. For MUST fields, these fields are mandatory and must be entered. For CAN fields, the entry is optional. |
Other area
- Document request: in the field Document request you can inform the supplier which document he has to attach when sending the delivery note.
- External remark: in this field you can enter a text. The text is visible to the supplier.
- Internal remark: in this field you can enter a text. The text is only visible within your organization, the internal remarks are not visible for the supplier.
- External files: via the Select… button you can select a file and attach it to the order item. These files are visible to the supplier.
Surcharges and discounts for SAP integration
With an SAP connection, it is possible to import the SAP calculation schema into Onventis.
If an SAP calculation schema has been imported into Onventis for your organization, you can define surcharges and discounts for this position using the Edit… button. button to define surcharges and discounts for this position.
You can select new supplementary conditions via the New Supplementary Conditions… button you can select new additional conditions.
Use the Recalculate button to recalculate the price.
The OK button adds the surcharges and/or discounts to the order item.
You can cancel the process by clicking the Cancel button.
Inherit information to multiple positions
Within Onventis you have the possibility to inherit the same information to several positions. The following information can be inherited:
- Account assignment type
- Recipient of delivery/service
- Unloading point
- Cost center
- Account type/general ledger account
- Business division
- Order
- WBS element
- Attachment
- Customer order
- Customer
- Task
- Factory
- Storage location
- Delivery address
- Delivery date
- Material group
- Vendor (only for free text items)
| Hinweis
Vendors can only be inherited from user-defined text items to other user-defined text items. In the case of free text items for which the vendor has already been entered, the vendor may be overwritten by using the inherit function. |
To inherit the information, proceed as follows:
- open a purchase order item and enter the relevant data.
- press the Inherit button.
- By activating or deactivating the checkboxes, you can select or deselect the desired fields, as well as the articles to which the information is to be passed on.
- Confirm your selection with the OK button. With the Cancel button you can cancel the process.
- After confirming, you will see the note Position details were inherited on X positions.
![]()
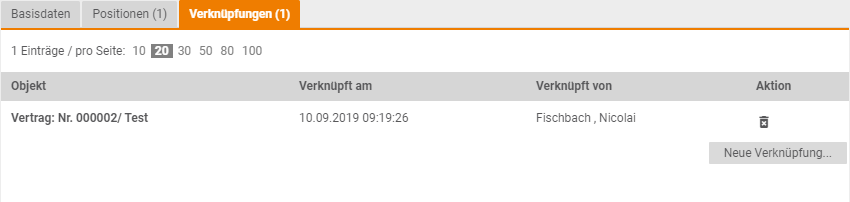
Purchase order item – Relationships tab
In the Links tab, you can link the purchase order item to a contract or add it to an inventory list.
Via the New link... button you can link the order item.
To link the order position with the desired area, activate the radio button next to Contract or Inventory. You can confirm your selection by clicking the OK button. You can cancel the process by clicking the Cancel button.

Linking a purchase order item to a contract
To link the order item with a contract, activate the radio button at Contract and confirm your entries with OK.
After you have confirmed your entries, you will be taken to the Contracts area.
To link the order item to an existing contract, first open the desired contract by clicking on the contract number in the No. column.
By choosing Link, you can link the purchase order item to the contract and return to the purchase order item.
The link is displayed in the table:
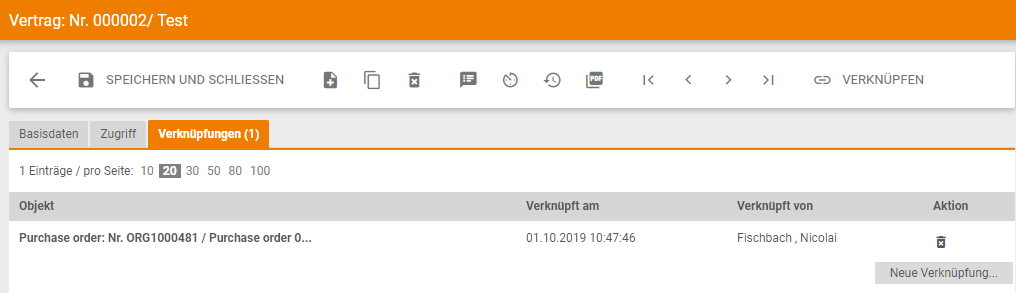
If you want to link the purchase order item to a new contract that has not yet been created, repeat the steps until you have switched to the Contracts area.
You can create a new contract by clicking the New button.
You can find more information on this area under the following link: Framework Contracts.
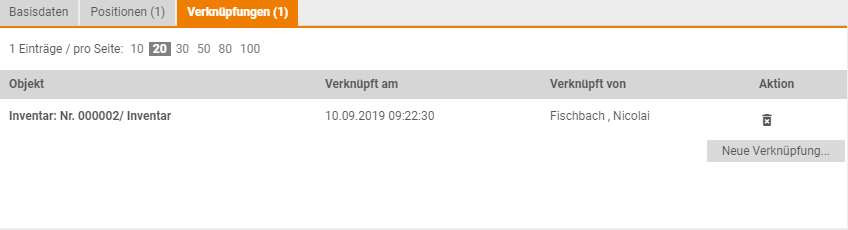
Add order item to inventory list
To link the order position to an inventory, activate the radio button at Inventory and confirm your entries with OK.
After you have confirmed your entries, you reach the Inventory area.
To link the order item to an existing inventory, first open the desired entry by clicking on the number in the No. column or the title in the Title column.
By choosing Link, you can link the purchase order item to the inventory and return to the purchase order item.
The link is displayed in the table:
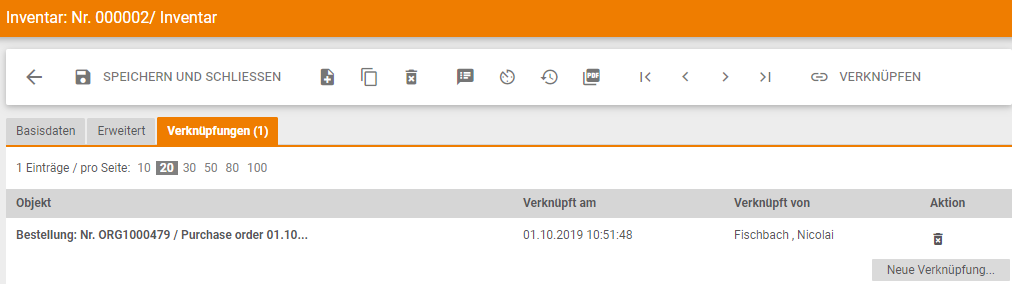
If you want to link the order item to a new inventory that has not yet been created, repeat the steps until you have switched to the Inventory area.
You can create a new inventory using the New button.
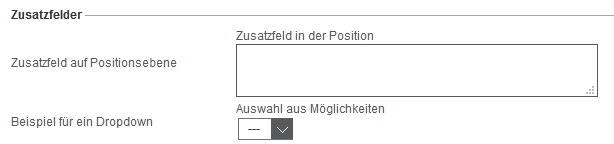
Order item – Additional fields tab
In the Additional Fields tab, you can select additional fields from templates or create new additional fields and add them to the order item.
Select an additional field from the templates
Click on the New About Templates… button.
In the Additional fields area you can open the desired additional field by clicking on the additional field title.
Switch to the Additional fields tab.
Via the Use… button, the additional field is transferred to the order item.
The selected additional field is visible in the order item in the Additional fields area.
Create a new additional field
Click on the New additional field… button.
Create the required additional field.
With the Save and Close button you can save your entries.
With the Save and New button you can create a new additional field.
Further information on maintaining additional fields
Under Configuration → Operative Purchasing → Additional Fields (Item Level) you can create additional fields for purchase order items.
Additional fields for orders on item level are freely definable form fields which can be added to the order items in the orders.
You can create a new additional field by clicking the New button.
Basic data tab
- Title: in the Title field, you must enter a title for the additional fields. This field is mandatory and must be entered.
- Description: in the Description field you can enter a description for the additional fields.
- Default: if you activate this checkbox, the additional fields will be displayed as default for all order items. If you do not activate this checkbox, the additional fields in a purchase order can be selected from the templates.
Additional fields tab
Additional field area
- Rank: the rank is a mandatory field and must be entered. If there are several additional fields, you can use the rank to specify the sequence in which the additional fields are displayed.
- Title: the title of the additional field. This is displayed in the additional field in the order item.
- Heading: Heading for the additional field. The heading is displayed above the additional field.
Settings area
- Field property vendor: with field property vendor you can define the properties for the additional field from the dropdown field. The following properties are available for selection:
- Optionalfield: with the optional field property, the selection or entry in this additional field is optional.
- Mandatoryfield: with the mandatory field property, this additional field is a mandatory field.
- Write-protected field: with the write-protected property, only the orderer can enter something in the additional field.
- Invisible field (not public): with the property invisible field the additional field is only visible for the orderer.
- Field property Customer: By activating the checkbox “Mandatory field” you can define the field as a mandatory entry for the user.
Area Definition
- Text: with the field type Text you can create an additional field as a text field.
- Number: with the field type Number you can create an additional field as a number field.
- Date: with the field type Date you can create an additional field as a date field.
- Selection as dropdown menu: with the field type Dropdown menu you can create an additional field as a selection field with predefined values. In a drop-down menu, only one value can be selected at a time.
- Selection as checkbox: with the field type Checkbox you can create an additional field as a checkbox with predefined values. In the case of a checkbox, there is the possibility of multiple selection.
- Field group: with the field type Field group you can create a field group with several fields.
- Blank line: with the field type Blank line you can define blank lines between the additional fields.
- Unit text: in the Unit text field you can specify a unit (e.g. unit of quantity, currency or time) for the response field. The unit is displayed behind the answer field
- Number of text lines: in the field Number of text lines you can define the number of text lines for the selected field type
- Length of text lines: in the field Length of text lines you can define the number of characters within a text line for the selected field type.
Orders – Additional fields tab
In the Additional Fields tab, you can select additional fields from templates or create new additional fields and add them to the order.
Select an additional field from the templates
Click on the New About Templates… button.
In the Additional fields area you can open the desired additional field by clicking on the additional field title.
Switch to the Additional fields tab.
Via the Use… button, the additional field is transferred to the order.
The selected additional field is visible in the order in the Additional fields area.

Create a new additional field
Click on the New additional field… button.
Create the required additional field.
With the Save and Close button you can save your entries.
With the Save and New button you can create a new additional field.
Further information on maintaining additional fields
Under Configuration → Operative Purchasing → Additional Fields (Header Level) you have the possibility to create additional fields.
Additional fields for orders on header level are freely definable form fields, which you can add to the tab Basic data in the orders.
You can create a new additional field by clicking the New button.
Basic data tab
- Title: in the Title field, you must enter a title for the additional fields. This field is mandatory and must be entered.
- Description: in the Description field you can enter a description for the additional fields.
- Default: if you activate this checkbox, the additional fields will be displayed as default for all orders in the tab Basic data. If you do not activate this checkbox, the additional fields in a purchase order can be selected from the templates.
Additional fields tab
Additional field area
- Rank: the rank is a mandatory field and must be entered. If there are several additional fields, you can use the rank to specify the sequence in which the additional fields are displayed.
- Title: the title of the additional field. This is displayed in the additional field in the order.
- Heading: Heading for the additional field. The heading is displayed above the additional field.
Settings area
- Field property vendor: with field property vendor you can define the properties for the additional field from the dropdown field. The following properties are available for selection:
- Optionalfield: with the optional field property, the selection or entry in this additional field is optional.
- Mandatoryfield: with the mandatory field property, this additional field is a mandatory field.
- Write-protected field: with the write-protected property, only the orderer can enter something in the additional field.
- Invisible field (not public): with the property invisible field the additional field is only visible for the orderer.
- Field property Customer: By activating the checkbox “Mandatory field” you can define the field as a mandatory entry for the user.
Area Definition
- Text: with the field type Text you can create an additional field as a text field.
- Number: with the field type Number you can create an additional field as a number field.
- Date: with the field type Date you can create an additional field as a date field.
- Selection as dropdown menu: with the field type Dropdown menu you can create an additional field as a selection field with predefined values. In a drop-down menu, only one value can be selected at a time.
- Selection as checkbox: with the field type Checkbox you can create an additional field as a checkbox with predefined values. In the case of a checkbox, there is the possibility of multiple selection.
- Field group: with the field type Field group you can create a field group with several fields.
- Blank line: with the field type Blank line you can define blank lines between the additional fields.
- Unit text: in the Unit text field you can specify a unit (e.g. unit of quantity, currency or time) for the response field. The unit is displayed behind the answer field
- Number of text lines: in the field Number of text lines you can define the number of text lines for the selected field type
- Length of text lines: in the field Length of text lines you can define the number of characters within a text line for the selected field type.
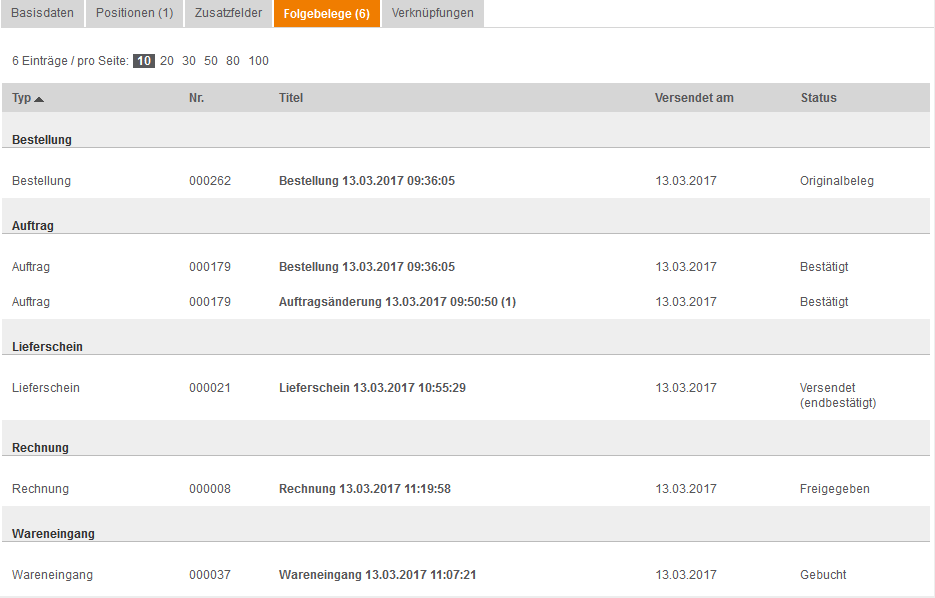
Purchase orders – Follow-on documents tab
On the Follow-on documents tab, you can see all the follow-on documents that belong to the purchase order. Follow-on documents include:
- Order changes from users
- Order changes from suppliers
- Performance records for service orders
- Incoming goods
- Bills
- Credits
| Hinweis
Please note that the follow-on documents may differ depending on the order processing workflow that has been set up. |
You can open a follow-on document by clicking on the title of the follow-on document in the Title column.
Orders – Links tab
In the Links tab, you can link the purchase order to a contract or add it to an inventory list.
Via the New Link... button you can link the order.
To link the order to the desired area, activate the radio button next to Contract or Inventory. You can confirm your selection by clicking the OK button. You can cancel the process by clicking the Cancel button.

Linking an order to a contract
To link the order to a contract, activate the radio button at Contract and confirm your entries with OK.
After you have confirmed your entries, you will be taken to the Contracts area.
First open the desired contract by clicking on the contract number in the No. column.
You can link the order with the contract via the link and you will return to the order.
The link is displayed in the table:
If you want to link the order to a new contract that has not yet been created, repeat the steps until you have switched to the Contracts section.
You can create a new contract by clicking the New button.
You can find more information on this area under the following link: Framework Contracts.
Add order to inventory list
To link the order to an inventory, activate the radio button at Inventory and confirm your entries with OK.
After you have confirmed your entries, you reach the Inventory area.
To link the order to an existing inventory, first open the desired entry. You can open the entry by clicking on the number in the No. column or the title in the Title column.
You can use the Link button to link the purchase order to the inventory and return to the purchase order.
The link is displayed in the table:
If you want to link the order to a new inventory that has not yet been created, repeat the steps until you have switched to the Inventory area.
You can create a new inventory using the New button.
Service orders
In Onventis you have the possibility to process service orders.
The prerequisite for this is the activation of service orders in the administration area. If this function is activated, articles in the shopping cart can be marked as service items and orders as service orders. In the case of service orders, the process step Proof of Service ![]() is automatically activated, provided it has been activated in the order processing workflow and assigned to the vendor.
is automatically activated, provided it has been activated in the order processing workflow and assigned to the vendor.
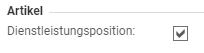
Catalogue items that have been created as service items and are transferred to the shopping cart are automatically marked as service items.
Free text orders must be marked manually by activating the service order option.
Create a service purchase order
To create a service order, go to Order Management → Order Processing → Purchase Orders. You can create a new order by clicking the New button.
In the Basic data tab of the purchase order, activate the Service order option.
By activating the option, the data fields for the entry of the execution period are displayed in the tab Basic data → Conditions area.
![]()
All other fields are filled in as described under Orders – Basic Data tab.
In the Positions tab you can now add the desired positions.
| Hinweis
Only free text items or catalog articles of the type service article can be added to a service purchase order. |
If you use the Catalog… button to add an item that is not defined as a service item to the service order, you will receive an error message: “The selected order is a service order. Therefore, only services can be transferred.
Creating a service order from the shopping cart
To create a service order from the shopping cart, go to Operational Purchasing → Order Processing → Shopping Cart or click the shopping cart icon in the header area of your Onventis account.
In the shopping cart you can add the desired item.
By activating the option Service item, the option Service order in the tab Basic data of the order is automatically activated when transferring the shopping cart into an order.
Shopping cart items that are transferred from the shopping cart to an order are automatically summarized per supplier and separated according to service and normal items.
Template orders
To reduce the manual effort required to create and send recurring purchase orders, you can use the Template Purchase Order feature.
The template order itself is not sent. This only serves as a template for the automatic creation of follow-up orders, which are regularly generated and sent to the supplier at the set order interval.
The follow-up orders are simply copies of the template order and are treated as normal orders, i.e. settings that apply in order processing and/or order approval workflows automatically apply to all follow-up orders.
If the article conditions change after a template order has been created, the system always determines the conditions that are valid when the subsequent order is sent automatically. The determination of the current prices is only valid for catalogue articles.
| Hinweis
Each follow-up order is a copy of the template order and is treated like any new order. |
You can stop the execution of a template order at any time by clicking the Stop execution button. In this case, no more purchase orders will be created at the next possible point in time, and the status of the template purchase order will change to “In process of creation”.
The template order can be activated by your Onventis administrator under Configuration → Settings → Organization Settings → Order tab via the option Mark Order as Template Order.
To create a template order, call up the order list under Operative Purchasing → Order Processing → Purchase Orders . In the order list you can create a new order by clicking the New button. To create a template order, activate the checkbox Template order in the construction data of the order, in the area Order.
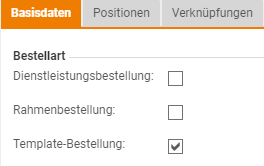
In the Period area, you can define an interval for the regular sending of follow-up orders:
- Start date: you can use the selection field to specify a start date on which the order is to be sent for the first time.
- Order Interval: in the Order Interval field you can specify the interval for the automatic creation and sending of follow-up orders. A number is entered in the input field and you can select the time frame in the selection field:
- Day
- Week
- Month.
- End date: you can use the selection field to specify an end date on which the order is to be sent for the last time.
The remaining order fields are filled in as usual.
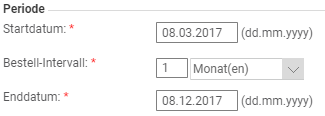
Example:
- Start date: 08.03.2017
- Order interval: Input: 1 Selection: Month(s)
- End date: 08.12.2017
Results:
- On 08.03.2017 the first order is generated and shipped.
- On 08.04.2017 the second order is generated and shipped.
- On 08.05.2017 the third order is generated and shipped.
- etc.
- The automatic order dispatch ends with the last order on 08.12.2017.
To start the execution click on the Start Execution button. As soon as you have started the execution, the following information is displayed:
| The template order is active – the creation and dispatch of further interval orders takes place automatically on the next defined date. |
The status of the template order is set to Template order active.
The next execution date is displayed in the Period area.
As soon as the entered end date of the template order has been reached, the status changes to template order inactive (expired). No further purchase orders are generated and sent.
Framework orders
You can use a blanket order to order services or articles over a defined period of time and without a fixed delivery date. Blanket orders are often used in conjunction with services for, e.g., machine maintenance and construction projects. By entering the start and end of the term of the order, the period during which the services can be provided is defined.
In combination with invoicing plan items, an invoicing plan is created for the automated creation and payment of invoices in your SAP system.
In combination with limit items, you can specify, in the case of services performed by the vendor, the value that may not be exceeded and/or the value above which approval is required.
| Hinweis
For blanket orders, no goods receipt is required for invoicing. The Goods Receipt (GR) step should be deactivated in the purchase order processing workflow. |
To create a blanket purchase order, call up the order list under Operative Purchasing → Order Processing → Purchase Orders . In the order list, you can create a new purchase order by clicking the New button.
Basic data tab
Ordering area
To create a blanket purchase order, activate the blanket purchase order checkbox in the construction data of the purchase order.
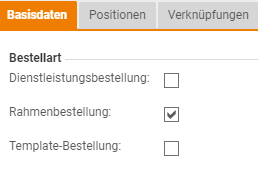
Range Period
In the Period area , you can define the validity period for the blanket purchase order.

- Term start: in the Term start field, you must enter the term start for the purchase order. In the case of services, for example, the services can only be billed from the start of the term. This field is mandatory and must be filled in.
- Termend: in the Term end field, you must enter the term end for the purchase order. In the case of services, for example, the services can be billed until the end of the term. This field is mandatory and must be filled in.
- Submission: in the field Submission you can enter a submission number, if available. With a submission number, the orders can be logically grouped together.
Basic data tab of an order item
Area blanket purchase order Item category
In the blanket purchase order item category area, you can select the item category.

- Item with invoicing plan: by activating this option, an invoicing plan is automatically created for the purchase order when it is transferred to your SAP system. The following additional fields are displayed in the purchase order item:
- Interval: the Interval field is filled in automatically after the invoicing plan type has been selected.
- Total number of activity units: the field Total number of activity units is filled in automatically after selecting the invoicing plan type. The number of activity units depends on the invoicing plan type and the interval.
- Invoice plan type: Selection of the abbreviation for the desired invoice plan type.
The fields Interval and Total number of activity units result from the runtime and the selected invoicing plan type:
Example:
In the header data of the order, you select the term from 01.01.2017 – 01.03.2017.
For the invoicing plan type, choose the abbreviation for monthly billing.
Results:
Interval = Month
Total number of power units = 3
- Limit position: by activating this position it will be marked as limit position. The additional field Limit value is displayed in the purchase order item.
- Limit value: in this field you can enter the limit value at which the material or service is to be procured.
| For blanket orders, it is not necessary to enter the account assignment data at the time of the order. Within Onventis, the account assignment data can be used, e.g. for order approvals by a cost center manager. If required, the transfer of account assignment data to your SAP system can be suppressed. |
Administration settings for blanket purchase orders
Organization settings
Blanket purchase orders can be activated by your Onventis administrator under Configuration → Settings → Organization Settings → Purchase Order tab via the option Mark as blanket purchase order on header level.
Order processing workflow
For blanket orders, no goods receipt is required for invoicing. This step should be deactivated in the order processing workflow.
Supplier management
Under Vendor Management → Vendors, the correct purchase order processing workflow must be assigned to the vendor with which the blanket purchase orders are processed. For this purpose, different workflows can be assigned to a supplier, according to order type.
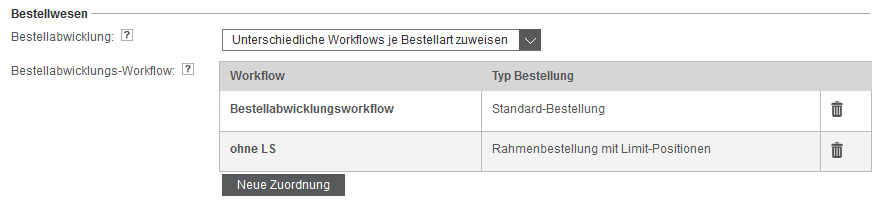
Order approval workflow
If you use purchase order approval workflows within your organization, the following additional functions are available for blanket purchase orders:
- Limit value (per order)
- Limit value (per position)
- Position with invoicing plan
- Limit position
Approve or reject orders
Within Onventis you have the possibility to define order approval workflows. You can define different criteria for the check and several approval steps.
Purchase orders that meet the criteria of a purchase order approval workflow are not sent to the supplier until they have been fully approved.
As soon as a user sends a purchase order that meets the criteria of a purchase order approval workflow, a notification is displayed:
| “Approval request has been sent to <user: last name, name>!”. |
The approver will be notified of the receipt of an approval request via email.
If you are defined as an approver for purchase orders in a purchase order approval workflow, you have the following options for calling it up:
- from the to-do list in your dashboard: To-do list → Release list → “X tasks with release request”.
- from the release list
- from the order list
- from the incoming e-mail:
- Approval via direct link
- Call from the e-mail
Approve purchase order
To approve an order, open the desired order in the order list. The order is approved via the Approve button.
A dialog box appears for you to confirm your entries:
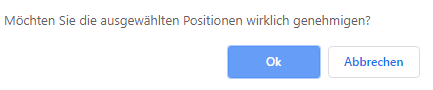
Confirm the approval process by clicking the OK button. If you want to cancel the process, click the Cancel button.
After successful approval you will get an information to whom the order was sent.
If you are the last approver for the purchase order, the purchase order is sent directly to the vendor. In this case, the following information is displayed:
| “The purchase order has been submitted in Onventisan to the suppliers <supplier name> “. The order email has been prepared to be sent to <supplier email address> and will be sent shortly.” |
If other approvers need to approve the purchase order after you, the purchase order is sent to the next approver. In this case, the following information is displayed:
| “Order approved! Approval request has been sent to <user last name, name>!” |
After the purchase order has been approved, the purchase order is sent to the supplier, depending on the purchase order approval workflow that has been set up.
The customer will be informed about the approval by e-mail.
Decline order
To reject an order, open the desired order in the order list. Before you can reject a purchase order, you must first enter a reason for rejection in the Comment on approval/rejection field.

After entering the reason for rejection, you can reject the order by clicking the reject button.
A dialog box appears for you to confirm your entries:

Confirm the rejection process by clicking the OK button. If you want to cancel the process, click the Cancel button.
If you do not enter a rejection reason, you will receive an error message:
| “Please enter a reason for rejection!” |
After the correct rejection you will get a confirmation information:
| “Order refused!” |
The customer will be informed about the rejection by e-mail.
Approve and reject individual items
As the approver, you can also approve or reject individual items of a purchase order.
To approve individual items, go to the item list of the purchase order and activate the checkbox for the items you want to approve. In the standard system, all items are activated.
You must deactivate item(s) that you want to reject.
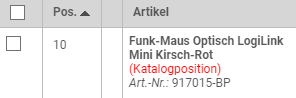
For the item(s) you want to reject, you must enter the reason for the rejection of the item(s) in the Comment for release/rejection field.
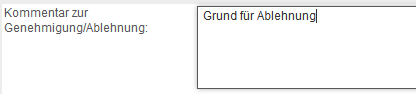
The Approve button sends the approved items either to the next approver or to the supplier.
The purchaser will be informed about the approved and rejected positions by e-mail.
| Hinweis
The rejected item is deleted from the purchase order. In the history, which can be called up via the INFO.svg symbol, the positions are displayed as rejected. |
Approve an order via direct link from an e-mail
Depending on the settings in the order approval workflow and in the organization settings, you can approve or reject the orders via direct link, without entering the logon data.
| Hinweis
In the case of approvals via the direct link, only all items are approved or rejected for several purchase order items. If you only want to approve or reject individual items, please use the “To order” link. |
If the settings for direct login are activated, you as the approver will receive an e-mail about the order to be approved.
In the e-mail you can take the user data and the rough data for the order. In addition, you can access the following three links from the email without entering your login details:
- Approve order: by clicking on this link you can approve the order immediately. As soon as you have clicked on the link you will get the following information:

- Reject order: by clicking on this link you can immediately reject the order. As soon as you have clicked on the link you will get the following information:

- To the order: by clicking on this link, you will be taken directly to the order, without any action, and you can process it further in Onventis.
E-mail for order approval
If you are to approve an order, you will be notified of each new order by email.
In the e-mail you can see the user and the rough data for the order.
After entering your login data, you can call up and process the order directly via the To order link.
Transfer approval of a purchase order to another approver
Depending on the settings in the purchase order approval workflow, you can forward the approval of a purchase order to another approver.
To forward a purchase order to another approver, first open the desired purchase order.
Click on the Transfer approval to other approver button.
In the new window, you can select another user to approve the order from the drop-down menu.

Confirm your entries by clicking the OK button.
The order is forwarded to the selected approver, and the following information is displayed:
| “Approver changed by <user last name, name> to <user last name, name>.” |
The selected approver and the purchaser are informed of the approver change by e-mail.
Order change as approver
As an approver, you can change the order to be approved before it is sent. Prerequisite for this is the activation of the option: User can change orders as approver in your user settings.
To change the purchase order, open the purchase order to be approved.
In the tab Basic data you can change the general data for the order:
- Order data
- SAP Assignment
- Supplier data
- Customer data
- Conditions
- Other
The positions ordered by the user are listed in the Positions tab. To make a change to an item, open the item by clicking on the item in the Item column.
You can change the item data in the Basic data tab of an item:
- SAP Assignment
- Article data
- Conditions
- Customs data
- Account assignment data
- KPIs
- Other
Via the Save and Close button, your changes will be saved.
After the changes have been made, you can approve or reject the order.
The purchase order is sent either to the next approver or directly to the vendor, depending on the purchase order approval workflow that has been set up.
Information on the approval process
Within a purchase order, you can track the approval process. If one of your purchase orders has not yet been approved, you can use the approval history to determine which user has already approved or not yet approved the purchase order.
To view the approval status, open the desired purchase order.
Via the track status icon you can see the current status of the order.
Via the message history button, you can view all e-mails sent for the order and resend them if necessary. You can open the messages by clicking on the recipient company, the recipient or the name and see the sent text. To resend a message, activate the checkbox in the left column next to the message in question. Click the Send again button to send the e-mail again. The back symbol takes you back to the status overview of the order.
Object: under Object you see the order number and the order title of the order
Changes area
- Created: under Created you can see when and by whom the order was created.
- Last modified: under Last modified you can see when and by whom the order was last processed.
Approval workflow area
- Step: in the column Step you can see all approval steps that have to be processed before the order can be sent to the supplier.
- Type: in the column Type you can see if in this step the order has to be approved or if it is an information. The Information type is only used to inform an approver, the approver does not have to approve the purchase order.
- Approver: in the column Approver you see the name of the user who has to approve or has already approved the order. In addition, you can see when the approver received notification of the purchase order approval. Under Reaction on, you can see the date and time when the order was approved, as well as which user approved the order.
- Substitute: in the column Substitute, you can see the substitute entered in Onventis, if this has been entered for the approver under User administration. The substitute may take over the order approval if the first approver cannot approve the order due to vacation or illness.
- Activated workflow criteria: in the column Activated workflow criteria you can see the workflow conditions for the respective workflow step by clicking on the link “Show workflow criteria”. In the table, you can see the reason for the purchase order approval, the condition set in the workflow for activating the workflow step, and the current value of the purchase order.

The Back button takes you back to the approval history.
- Status: In the Status column, you can see the current status of the respective approval step. The following statuses are possible:
- Approved: the purchase order was approved in this step
- To approve: the user has not yet processed the order approval for this step.
- Rejected: the approver has rejected the order.
- Not used: the approval step was not used. In this case, the criteria for this approval step were not met.
Area Course
In the History section you can see the entire approval history.
- Title: in the Title column, you can see detailed information about the approval process.
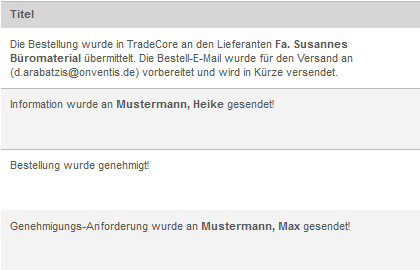
- Created by: in the Created by column, you can see who edited the associated approval process.
- Company: in the Company column you can see the organization that processed the approval process.
- Date: in the column Date you can see the time (date, time) when the approval process was processed.
Via the change history button you can see the order changes, if any.
You can close the approval history by clicking the Close button. This will take you back to the order form.
Carry out order change
If you want to change a purchase order that has already been sent to the vendor, you must make a purchase order change.
To make a purchase order change, first go to the purchase order overview, under Operative Purchasing → Purchase Order Processing → Purchase Orders.
In the order overview, open the desired order by clicking on the order number. in the No. column or the order title in the Title column.
Open the action menu and click on the New Order Change… button. button.
In the dialog box, you are asked whether you want to create a purchase order change document. You can confirm the process by clicking the OK button. You can cancel the process by clicking the Cancel button.

As soon as you have confirmed the dialog box with OK, a new purchase order change document is created.
![]()
Now you can make the desired order changes.
The Show changes button displays all changes made in the order in a table:
- Field: the name of the field in which a change has been made.
- Ordered: the original value that was contained in the associated field before the order was changed.
- Changed: the change of the original value in the related field.

To send the order change to the supplier, select the Send button from the Actions menu.
In the dialog box you will be asked if you want to send the order change.
You can confirm the process by clicking the OK button. You can cancel the process by clicking the Cancel button.

After the order has been sent, the order change is displayed in the Follow-on documents tab of the relevant purchase order:
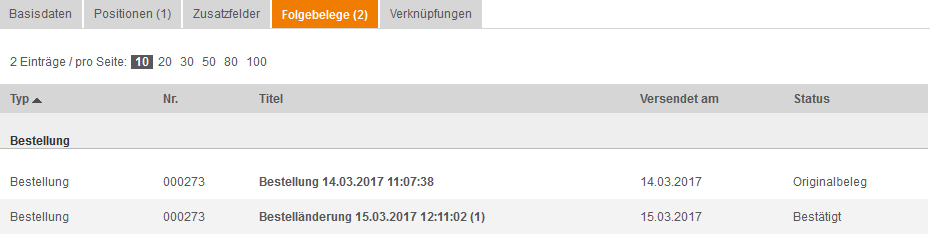
The supplier receives an e-mail about the order change that has been made.
The purchase order is processed further according to the set purchase order processing workflow and, if necessary, the purchase order approval workflow.
Cancellation of purchase orders and purchase order items
If you wish to cancel a purchase order or a purchase order item that has already been sent to the vendor, you must first make a purchase order change.
| Hinweis
Depending on the settings in the purchase order processing workflow, the purchase order change is confirmed automatically by the system or must be confirmed manually by the vendor. |
Cancellation of an order
If you want to cancel the complete order you have to enter a reason for cancellation in the field External remark in the section Miscellaneous , then open the Action menu and click on the Cancel button.
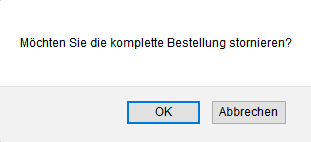
If you want to cancel the order, confirm your entries by clicking the OK button. With the cancel button you can cancel the process. if you confirm your entries you get in the header of the order information displayed that the order was canceled. the order gets the canceled ![]() Status.
Status.
Cancellation of an order item
If you want to cancel an order item, switch to the Items tab and open the desired item by clicking on the item description.The item is cancelled via the Cancel button.In the header area, you will receive information that the item has been set to status “The purchase order item is given the status “Canceled”.Cancelled by customer“.
Cancel cancellation of a purchase order item
If you want to reverse the cancellation of a purchase order item and the purchase order change has not yet been sent to the vendor, you can use the Cancel Cancellation button to reverse the cancellation.If you have already sent the purchase order change, you must first make a new purchase order change. You can then cancel the cancellation of the purchase order item, as already described. In the header area you will see information that the cancellation of the item has been cancelled, after which you must send the order change by clicking on the Send button.
Self-entry of an order confirmation
Within Onventis you have the possibility to enter the order confirmation of the supplier yourself. This function is useful if, for example, the supplier has no possibility of accessing Onventis via the Internet and sends you an order confirmation by another means.
The prerequisite for the self-entry of an order confirmation is the activation of the corresponding settings in the order processing workflow.
To enter an order confirmation for the supplier, open the desired order and click on the Confirm order itself button in the Actions menu.
In the dialog box you will be asked to confirm the operation. Confirm the dialog with the OK button, you can cancel the process with the Cancel button.
After you have confirmed the process, an order is displayed. In the header area of the order you will see the following note:
To send the order confirmation to the customer, click on action > Confirm order.
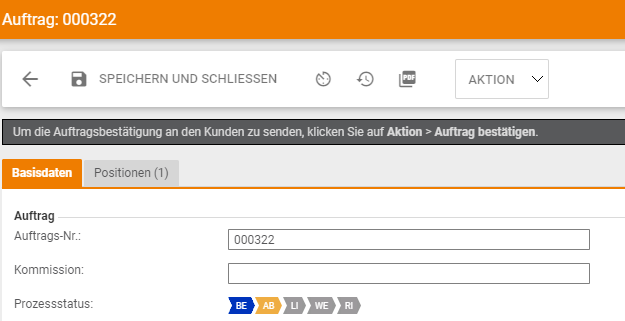
Depending on the settings in the purchase order processing workflow, you can change the order on behalf of the vendor.
To send the order confirmation, select the Confirm Order button in the Actions menu.
In the dialog box you will be asked if you want to send an order confirmation to the customer.

Confirm the dialog with the OK button, you can cancel the process with the Cancel button.
When you have confirmed the process, you will receive a confirmation message:
| The order confirmation <number> was sent to the customer by e-mail. |
The process status of the order changes to Order Confirmation Received.
In the case of a self-entered order confirmation, the information (Confirmed by customer) appears in the process status of the relevant order.