
The goods receipt is a part of the order process with which you as a customer confirm the acceptance of the delivered goods.
Under Operative Purchasing → Order Processing → Goods Receipts you can see the list of goods receipts created in your organization.
The following columns are displayed:
- No.: the number of the goods receipt.
- Title: the title of the goods receipt, as well as the number of related items.
- Order no.: the order number of the purchase order for which the goods receipt was created.
- Supplier: the supplier to whom the order was sent and who delivered the goods.
- GR date: the date on which the goods receipt was posted.
- Status: the current status of the goods receipt. The goods receipts can have the following status:
- Posted: this status indicates a goods receipt that has already been posted.
- In entry: with this status, the goods receipt is currently in entry, that is, the goods receipt document has been created but not posted.
- Canceled: a posted goods receipt was canceled again.

Post goods receipt
To post a goods receipt, go to the purchase order overview under Operative Purchasing → Purchase Order Processing → Purchase Orders.
You have the following options for entering the goods receipt:
- In the overview list, in the Action column via the New icon.
- By opening the order and selecting the new goods receipt button.
After you have completely entered the data, you can post the goods receipt by clicking the Post button.
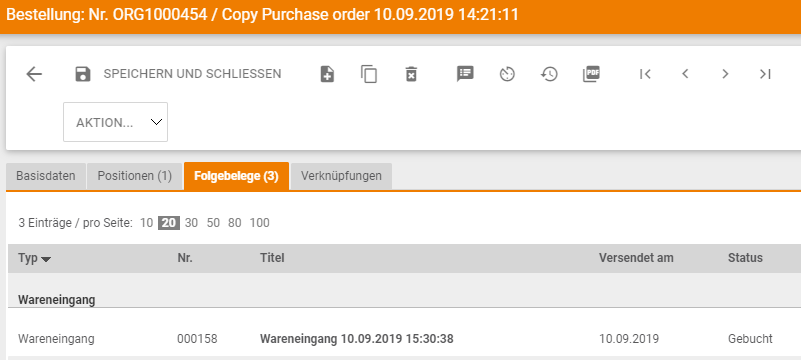
You can find the posted goods receipt document in the list of goods receipts or in the purchase order on the Follow-on documents tab page.
Goods receipts that have been entered but not yet posted can:
- From the overview of goods receipts under Operative Purchasing → Purchase Order Processing → Goods Receipts via the selection of the goods receipt and the Post button or
- from the purchase order via the A goods receipt is located in entry link
can be booked.
If the process step Delivery note LI has been activated in the purchase order processing workflow, the supplier must first send a delivery note. A goods receipt can then be posted.
Basic data tab
Goods Receiving Area
- Goods receipt no.: the number of the goods receipt. This number is automatically generated by Onventis and can be overwritten for documents in entry.
- External goods receipt no.In the case of a goods receipt imported from your ERP, the ERP goods receipt number is transferred here.
- Title: the title of the goods receipt. The title of the goods receipt is generated by Onventis in the standard system and can be overwritten at any time.
- Commission: in the field Commission you enter the commission for the goods receipt.
- Status: the status in which the goods receipt is currently located. The following statuses are possible:
- In entry: the goods receipt document has been created and is being processed until it is posted. Documents that are being entered can be deleted by clicking on the delete symbol.
- Posted: the goods receipt document has been posted and can no longer be changed. Posted goods receipts can only be reversed.
- Canceled: a posted goods receipt document was canceled.
- Delivery note no.: if the process step LI for delivery note is activated in the order processing workflow, the delivery note number can be selected via the selection menu.
- Order no.: the order number of the purchase order for which the goods receipt is posted. By clicking on the order no. you can call up the order directly.
- Delivery date: in the field Delivery date you can enter the date on which the goods were delivered.
- Barcode no.: in field Barcode no. you can enter a barcode number.
- Carton no.: in the field Carton no. you can enter a box number.
- Personnel no./name: in this field you can enter the personnel no. and enter the name of the person who created or posted the goods receipt.
Delivery data area
- Order no.: the order number at the supplier to which the goods movement is posted. By clicking on the order no. you can call up the order directly.
- Company: the company of the supplier who delivered the goods.
Other area
- External remark: this field is a free text field. You can enter an additional text under external comment. The text is visible to the supplier. Via the Selection… button you can select a text module.
| Hinweis
If you enter something in the external comment field in the goods receipt, the vendor always receives a notification of the posted goods receipt by e-mail. The e-mail is also sent if you have activated the setting Send info e-mail to supplier on goods receipt confirmation in the goods receipt tab of the order processing workflow. |
- Internal remark: in this field you can enter a text. The text is only visible within your organization, the internal remarks are not visible to the supplier. Via the Selection… button you can select a text module.
- Remark of the customer: in this field you see the remarks, which were entered under text modules within your organization.
- Files: via the Select… button you can select a file and attach it to the order. The external files are visible to the supplier.
Positions tab
In the tab Positions you can see the positions belonging to the order. You can use the checkboxes to select individual items and delete them from the current goods receipt. When you post a goods receipt, these items are not included in the goods receipt. They remain open and can be posted with another goods receipt.
Default values
Using the default values button, the entered quantities are compared with the ordered quantities and overwritten:
Example
ordered quantity = 100 pcs
Recorded goods receipt quantity = 10 pieces
The entered quantity = 10 is overwritten with the ordered quantity = 100 via the default values button.
Book
The goods receipt is posted via the Post button. You can find the goods receipt document in the list of goods receipts or in the purchase order on the tab page Follow-on documents.
Position list area
- Item: Item number in the goods receipt.
- Item: Item description, item number(s) and stock.
- Quantity: in this column the ordered or still open goods receipt quantity is displayed. This field can be overwritten with the actual goods receipt quantity. In addition, you can see the partial quantity that has already been posted, if any, and the goods receipt that is still open.
- Delivery address: the delivery address to which the article is to be delivered.
- Final Confirmed: if you do not expect any more goods receipts for this order item, you can activate the option Final Confirmed. This option automatically completes the order when the goods receipt is posted.
- Action: in the column Action you can use the Delete.svg symbol to delete the item from the goods receipt.
Goods receipt item
Article area
- Position no.: the position number from the purchase order is taken over in the Position no. field.
- Quantity: in this field the ordered quantity is taken from the purchase order item and must, in case of deviation, be overwritten with the actual goods receipt quantity. This field is mandatory and must be filled in.
- Final Confirmed: if you do not expect any more goods receipts for this order, you can activate the option Final Confirmed. This option automatically completes the order when the goods receipt is posted.
- Article no.: in this field the article number from the order is taken over.
- Internal article number: in this field the internal article number from the order is taken over.
- Illustration: if stored in the catalogue, the illustration of the article is displayed here.
- Article: in this field the article description is taken over from the order position.
- Article description: in this field the article description is taken over from the order position.
Conditions area
- Delivery address: in this field the delivery address is taken from the order item.
- Delivery date: in this field the delivery date is taken over from the order item.
- Recipient of delivery/service: in this field the recipient of delivery/service is taken over from the order item.
- Unloading point: in this field the unloading point is taken over from the order item.
SAP Settings Area
- Storage location: in this field you can select the storage location for the item from the dropdown menu.
Other area
- External remark: this field is a free text field. You can enter an additional text under external comment. The text is visible to the supplier. Via the Selection… button you can select a text module.
- Internal remark: in this field you can enter a text. The text is only visible within your organization, the internal remarks are not visible to the supplier. Via the Selection… button you can select a text module.
- Remark of the customer: in this field you see the remarks, which were entered under text modules within your organization.
Numbers tab
In the Numbers tab, you can maintain additional numbers for the goods receipt items. This tab is only displayed if the numbers are activated in the organization settings.
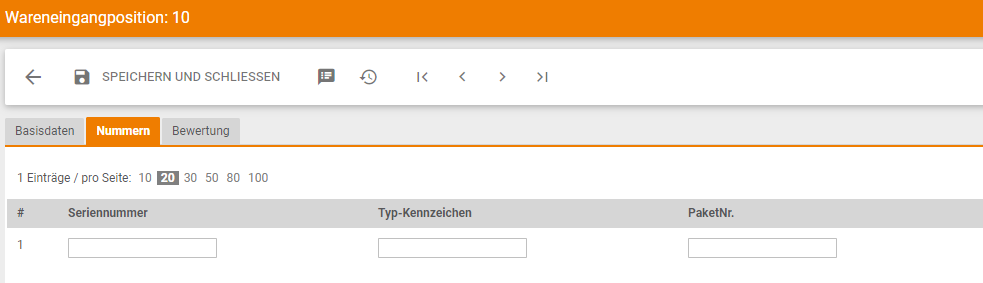
Number 1 to 3: In the fields 1 to 3 you can maintain additional numbers, e.g. serial number, type number, package number etc..
Cancel goods receipt
You can cancel a goods receipt either from the purchase order or from the goods receipt overview.
| Hinweis
Posted goods receipts can only be reversed for purchase orders that have not been archived. You can recognize an archived order by the green symbol |
To cancel a goods receipt of an archived purchase order, you must first cancel the archiving of this purchase order.
Go to Operational Purchasing → Purchase Order Processing → Purchase Orders and open the desired purchase order. You can cancel the archiving in the action menu via the Cancel archiving button.
The status of the order changes to![]() Filed. You can then cancel the goods receipt.
Filed. You can then cancel the goods receipt.
Cancellation from the order
Show details…
Go to Operational Purchasing → Purchase Order Processing → Purchase Orders and open the desired purchase order.
On the Follow-on documents tab page of the purchase order, you can see all the goods receipts posted for the purchase order. Open the desired goods receipt document by clicking on the title of the goods receipt.

You can then cancel the goods receipt document by clicking the Cancel button.
In the dialog box, you are asked whether you want to cancel the goods receipt:

You can confirm your entries by clicking the OK button. You can cancel the process by clicking the Cancel button.
As soon as you have confirmed the dialog, the information will be displayed:
| Goods receipt <Goods receipt number> was cancelled. |
The process status of the purchase order is adjusted. The process step for the missing goods receipt is displayed in yellow .![]()
Reversal from the goods receipt list
Go to Operative Purchasing → Purchase Order Processing → Goods Receipts and open the desired goods receipt document.
You can then cancel the goods receipt document by clicking the Cancel button. If the cancel button is not available, the order is archived. In this case, call up the order using the order no. and cancel the archiving.
In the dialog box, you are asked whether you want to cancel the goods receipt:

You can confirm your entries by clicking the OK button. You can cancel the process by clicking the Cancel button.
As soon as you have confirmed the dialog, the information will be displayed:
| Goods receipt <Goods receipt number> was cancelled. |
The process status of the purchase order is adjusted. The process step for the missing goods receipt is displayed in yellow .![]()
Delivery note
If the process step Delivery note LI has been activated in the order processing workflow, the supplier must create a delivery note ![]() after the order confirmation.
after the order confirmation.
You can make the settings for the delivery note in the settings in the order processing workflow.
Within Onventis you have the possibility to use a barcode for the delivery note. You can select the barcodes in the settings in the order processing workflow.
If the vendor has sent a delivery note, you can call it up in the Follow-on documents tab of the purchase order. Go to Operational Purchasing → Purchase Order Processing → Purchase Orders and open the desired purchase order. In the purchase order, switch to the Follow-on documents tab. Clicking on the delivery note opens the delivery note.

Toolbar in the delivery note
New
With the Create new record icon you can create a new delivery note.
Click to copy
With the Copy record icon you can copy the delivery note. If desired, you can adjust the data.
Notes
With the notes icon you can create notes for this record or, if available, call up the notes.
Resubmission
With the resubmission icon you can set the delivery note to resubmission. Delivery notes in resubmission can be sent by a user on a specific date. On the date entered, the user receives an e-mail with a link to the resubmission.
Track status
With the Track Status button you can see the current status. With the close button you leave the track status view and return to the basic data.
With the print icon you can print the delivery note.
Label printing
With the label print button you can create labels for the positions.
New goods receipt
With the New Goods Receipt button you can create a goods receipt based on the delivery note.
Basic data tab
Delivery note area
- Delivery note no.: the number of the delivery note
- Replacement delivery: if this option is activated, it is a replacement delivery for the originally ordered item.
- Title: the title of the delivery note.
- Commission: the commission number if it is a commission item.
- Status: the status of the delivery note.
- Order no.: the order number at the supplier. By clicking on the order no. you can open the order. The paging_left_new.svg icon takes you back to the delivery note.
Customer data
- Customer no.: Your customer number at the supplier.
- Customer: the contact details of the ordering party. You can view the contact details by clicking the info button.
- Order no.: the order number for which the delivery was made and the delivery note was created. By clicking on the order number you can open the order. The Back icon takes you back to the delivery note.
Supplier data
- Supplier: the contact details of the supplier who shipped the items and created the delivery note. You can view the contact details by clicking the info button.
Conditions
- Delivery conditions: the delivery conditions at the supplier. The terms of delivery are taken from the order.
Other
- External remark: Additional remark of the supplier.
- File(s): in this field the supplier can attach additional files, which you can open by clicking on them.
Positions tab
In the tab Positions you can see the overview of all positions entered in the delivery note. The following columns are displayed:
- Pos.: the item number in the delivery note, usually corresponds to that in the purchase order.
- Item: in the item column you can find the information about the items, the following information is displayed: Item name, item number, delivery address, delivery date. This information is copied from the order.
- Quantity: the column Quantity contains the ordered quantity, the posted goods receipt quantity and the still open goods receipt quantity.
- Final delivery: in the column Final delivery you can see whether it is a final delivery or no final delivery for this article. If the final delivery is “Yes”, in this case no more deliveries are expected. In case of a “No”, it is a partial delivery, in which case the article will be delivered at a later date.
Follow-on documents tab
As soon as a goods receipt has been posted, it is displayed on the Follow-on documents tab.
By clicking on the title of the goods receipt in the Title column, you can open the goods receipt document.
Delivery note item
Delivery note: the number of the delivery note.
Article area
Item no.: the item number in the delivery note, usually corresponds to that in the purchase order.
Quantity: the quantity delivered for this item.
Article no.: the article number.
Article: the article name.
Article description: the description of the article.
Delivery data area
Delivery address: the address to which the article will be delivered.
Delivery date: the date on which the item will be delivered.
Other area
Document request: if a document request is activated and entered in the purchase order, you can see which attachment the supplier must attach in the Document request field.
External remark: Additional remark of the supplier.
File(s): in this field the supplier can attach additional files, which you can open by clicking on them. In the case of a document request, the supplier must have attached a file.