User Management & Permissions
The user administration can be found under “Permissions” from the main menu. Only users with Administration rights can access the Permissions part of the system, so if you cannot see or access it you do not have the rights to do so. To change this, contact any person in your organisation that has Administration rights and request access.
User life cycle

Click on the tab “All Users” to see a list of all the users. Each user can either have a role in the system (see below for a description of the User Roles) or be listed as “Off”. The latter means that the user has been disabled and unless that user is assigned a User Role it will be automatically removed completely from the system. See below how to disable a user.
User roles
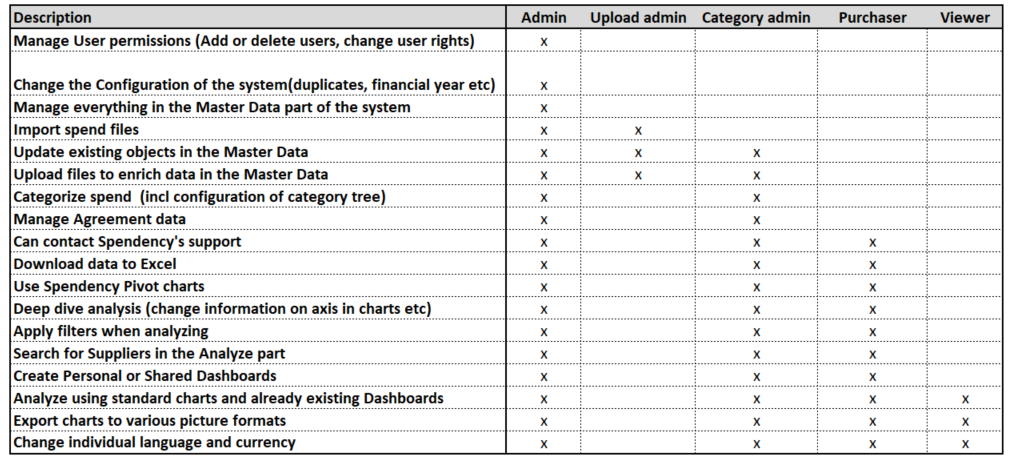
In the Permission part, all users and their respective rights are shown. There are five different user roles, each with their different rights in the system. See the table below for a description of the user roles.
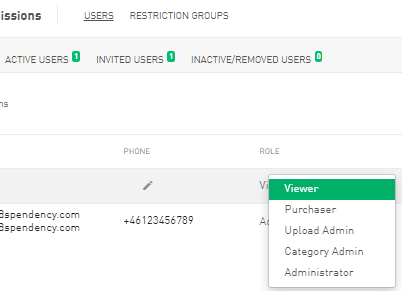
You change a User’s role by going to the “Role” column and clicking on the row corresponding to the user in question. See example below.
The user roles: Purchaser and Viewer can be configurable to see only certain part of the available data. For example only spend associated with a certain Category, Cost center or organisational unit etc.
Restricting Purchasers or Viewers
If you want to restrict a user. Ensure that they have been assigned either the role Purchaser or Viewer. Then click on the “Add restriction” button next to their name as shown below.

From the left side of the screen, choose either an already existing set of restrictions to apply or create a new restriction by selecting which dimensions you want to use to create the restriction. Use the toggle at top to set whether the selected items are the only one the user CAN access or the only items the user CAN NOT access. Once a selection is made it is added to the bottom of the screen. See below where the everything under the Category MRO in the Category tree has been excluded (the user CAN NOT access it).

Add all the restrictions you want, they are summarised in the bottom left corner of the screen. See below where the user restriction is that the access is not allowed to the MRO category and access is limited to only two specific Cost Centers.
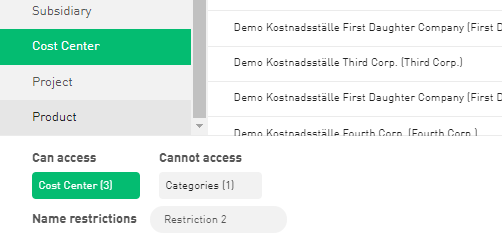
Under the restrictions there is a field to Name the restrictions. Enter a name and press OK to both set the restriction on the user in question as well as saving the Restriction so it can be re used.
If you want to see an overview over all the restrictions and the users affected by them click on the link “Restriction groups” at the top of of the main Permission page. See below.

Invite users, reset passwords or 2FA code, etc
New users are invited by clicking on the “Add user” button to the right. Once a user is invited they will show up in the list of users. There are a number of simple actions that each admin can take for each user.

Commercial responsible
Each organisation must have one commercial responsible person that is also a Onventis Analytics user. It is not possible to have multiple Commercial Responsible persons. This person will receive all commercial updates between Onventis Analytics and your organisation. For example when there is an updated version of the General Price List available or there is a change in the list of Sub-processors that Onventis Analytics have as a part of a Data Processing Agreement, the person in question will be be informed.
If you want to change the Commercial responsible for your organisation, simply click on the Commercial Responsible button next to whomever you want to appoint and confirm the selection in the pop-up dialogue box.
Reset invitation
Sometimes invitation emails are lost or they are not actioned on before their expiration. If so use the “Reset invitation” action to re-send the invitation e-mail.
Reset 2FA app
Every time someone changes their phone their 2 Factor Authorisation (2FA) app must be reset. Once it has been reset the person in question can log in again to Onventis Analytics and set up their 2FA app.
Disable user
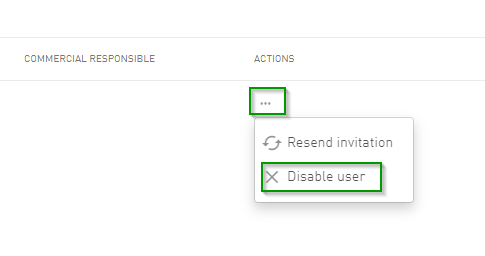
If a user should no longer have access to the system, press the three dots under “Actions” on the line corresponding to the user and then click “Disable user”. The user will be disabled immediately and will no longer count towards your total number of licenses. Their user information will however remain visible in the system for 3-6 months for traceability and security purposes. Once that time period expires, the user will be permanently and completely removed.
Send a password reset e-mail
Users tend to forget their passwords. If so pushing the “Send password…” button will send out a password reset e-mail enabling the user in question to reset the Onventis Analytics password.
